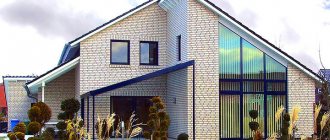
Wall cladding schemes are varied. This is how Bavarian bricklaying appeared in Germany in the 17th century. In those years, German masons used this design as a necessary measure. Bricks in the 17th century came in different colors and shades, and there was not enough of the same building material to build one house. Such wall cladding in the construction of modern cottages and houses adds variety to the interior.
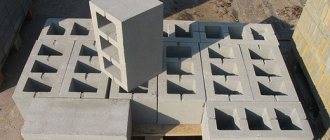
Bavarian-type masonry uses several types of brick blocks of similar shades.
Features and brief technological characteristics of Bavarian bricklaying
First, you need to clarify that this is not some unknown German masonry, but a special type of brick. As for the actual masonry, the Germans did not come up with anything original; everything is done according to the usual and long-known technology. The name appeared in connection with the appearance of brick walls caused by the parameters of the brick. By the way, the walls of all ancient buildings have this appearance, not only in Germany, but also in other European countries, including Russia.
Bavarian masonry
The front side of the houses is not monochromatic, but has different shades that form unpredictable patterns. Previously, no one specifically tried to build houses with “multi-colored” facades; on the contrary, they tried to achieve a uniform color. But the imperfection of brick production technology did not make it possible to obtain material with absolutely identical properties; depending on the method of preparing the mixture, the chemical composition of the clay, temperature conditions and firing time, each batch unloaded from the kiln turned out to be of a different shade.
Bavarian masonry close up
Prestigious buildings were plastered, and industrial buildings and the houses of poor residents had a motley appearance. Nowadays, modern technologies make it possible to produce bricks of the same appearance; the mixing and chemical composition of clay is precisely controlled; constant annealing temperatures make it possible to obtain bricks that are absolutely identical in physical characteristics and appearance. But the country (rustic) style came into fashion, and colorful façade walls became not a disadvantage, but a design solution. Manufacturers had to develop special firing technologies to produce Bavarian brick, a material with different shades of the front surface. Complex technology, of course, has caused an increase in production costs, which explains the high price of bricks.
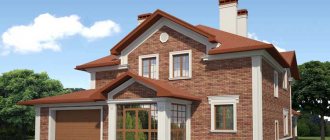
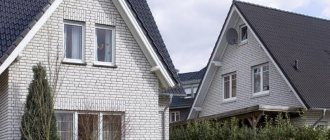
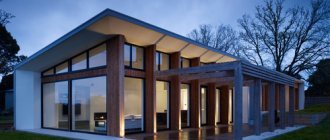
Examples of houses using Bavarian brickwork
Main types of suture dressing for walls and buildings
The three main types of masonry are spoon, English and Flemish. When using a spoon ligation, the bricks of each row are laid on a spoon. This type of masonry is only suitable for walls half a brick thick. The bricks overlap each other in half their length. Spoon ligation is perfect for building a non-surface structure or a hollow wall. English ligation is characterized by an alternating arrangement of rows of bonded and spooned masonry. In this case, the sticks of the bricks of the top row are located exactly above the middle of the sticks of the bricks of the bottom row. Flemish binding is characterized by an alternation of spoons and pokes in each row, with the pokes of the bricks of the top row being exactly above the middle of the spoons of the bricks of the bottom row.
Types of dressings | |
| |
Special types of dressings | |
| |
How is Bavarian brick made?
It is produced using the flash firing method.
Flash firing technology
Brickworks
At the final stage, additional air is pumped into the furnace; oxygen increases the heating temperature of the top layer and becomes a catalyst for removing certain chemical compounds from the clay. As a result, the surface changes color. The color range of products changes as planned; precise control of modes makes it possible to obtain predictable shades. In addition, due to the high temperature, the outer layer is sintered to a glassy state, the brick becomes much stronger, does not absorb moisture, does not change its original properties throughout the entire period of operation, and it reaches several hundred years.
Facing brick “Bavarian masonry”, smooth
The thickness of the glassy layer is also adjustable and, depending on the specific brand, ranges from 2–4 mm. Another advantage of Bavarian brick is that efflorescence does not appear on the surface; this phenomenon is excluded even theoretically. The fact is that during a short-term increase in firing temperatures, the salts have time to decompose. In addition, the glassy front surface does not allow the release of salts, it is almost airtight.
Facing brick “Flash firing” – Bavarian masonry
The most technologically advanced enterprises have learned to achieve not only a uniform color on the surface, but also multi-colored streaks of bizarre shapes. Such bricks are used only on the most critical buildings and structures. External surfaces can be smooth or textured.
Facing brick BRAER “Bavarian masonry” oak bark with sand
Bavarian masonry color scheme
Brick for Bavarian masonry
We have figured out the peculiarities of the technology for making Bavarian brick, now we can consider recommendations for its laying.
Manufacturing technologies
Making figured bricks is done in different ways:
- The plastic molding method involves the formation of products from raw clay, followed by drying and firing;
Individual bricks are cut from a long block formed using a press
- The vacuum pressing method is the placement of raw materials into special molds in which they are pressed under high pressure, as a result of which all air is removed and fine particles of clay are firmly adhered to each other.
Vacuum extruder for facing bricks
For reference. Pressed brick can withstand very heavy loads, reaching 7 tons per square centimeter.
- Waterjet cutting technology makes it possible to produce products with complex curved surfaces. The computer-controlled machines used for this significantly increase their cost.
Waterjet Cutting Machine
All these methods are used in mass production. And in cases where standard shaped products do not fit in size or shape, patterned bricks are made to order in small batches according to special sketches. If the instructions require it, it is given special properties. For example, increased moisture resistance or acid resistance.
Decorations on the façade made of molded bricks
Preparatory activities
Before giving step-by-step masonry instructions, let's consider several features of Bavarian masonry.
- Selecting a picture. There are many shades of Bavarian brick, but we do not recommend using more than four on one wall. The more shades, the more difficult it is to lay bricks, the more time it will take to find the right colors. Practice shows that 3-4 shades are quite enough to give façade walls an original look. On the Internet you can find recommendations to develop color alternations using special programs. You shouldn't go this way, don't waste your time. None of the professional masons adheres to the exact location of each brick.
An example of a Bavarian masonry scheme
Bavarian masonry, by the way, is different in that there is no exact pattern in the alternation of different bricks; it is not a strict geometric pattern. Decide on a main tone and two or three additional ones. The main tone must be at least 50%, the rest can be selected in arbitrary proportions. If it’s difficult to choose the main tone and additional ones that go with it, contact the designers or look for options on the Internet. When purchasing bricks, the number of shades must correspond to the percentage of each tone. With this in mind, calculate the materials needed before visiting the store.
Brick “Bavarian masonry Vanilla”
- To speed up the laying, roughly arrange bricks of different colors on the scaffolding. There is no need to count accurately; each color can be added if necessary.
- Bavarian masonry is done only for jointing; prepare all the tools and equipment. We will tell you what you need to have in the article below.
Laying is done under jointing
- If you wish, buy a colored solution. It costs a little more, but the money spent is justified by a significant improvement in appearance.
Bavarian masonry can be used as separate cladding or as the outer row of a brick wall. During separate cladding, you can use foam boards to insulate the wall. But we do not recommend using this method of insulation; its actual effectiveness is far from expected. The fact is that foam slabs lying freely in the space between the load-bearing wall and the cladding do not interfere with the thermal convention of air, which is what leads to the main heat losses.
Insulation of walls outside
Prices for thermal insulation materials
Thermal insulation materials
To eliminate convection, you need to additionally tightly fill the space between the foam and the walls with liquid foam. This significantly increases the cost of construction work.
Foam insulation
There is another method of insulating facade walls for cladding with slabs - plaster the wall, glue or fix the slabs with dowels, seal the gaps between them and only then begin cladding with Bavarian bricks. But this method also increases financial losses significantly. From an economic point of view, it is better to insulate such walls from the inside of the premises.
Paving the area inside the porch border
Having finished the curb at all levels, we begin paving the platforms and steps. We chose a herringbone pattern, which is easy to mark and allows the bricks to lay evenly, even if they are not quite the right shape, as was the case in our case.
When laying bricks, we often used a straight batten (usually a long rule) not only for leveling, but also to check the slope. As with the curb, some temporary bricks were installed as guides along the back edge.
After finishing the tread of one step, we installed the bricks for the riser of the next step. We combined the first rows of brick columns with the risers of the lower step. Each tread is like a small platform with a curb installed and then brick infill laid. But the field of steps was so small that all the bricks for it had to be sawed.
On the top landing we installed perimeter curb bricks 75mm above the concrete surface. Because the front door is recessed into the wall of the house, the rear curb bricks had to be matched to the entry threshold and trimmed on either side of the door to meet the J-profile of the vinyl siding. Initially we wanted to trim the siding and cover the joint with a flashing. But this place is well covered by the wide overhangs of the porch roof and the protruding walls of the house, so to save money they only sealed the joint with mortar.
The “Christmas tree” on the upper platform was marked in the same way as on the lower one. And again, in order to support the infill bricks at the required slope, we checked the span between the front and rear curbs with a long lath.
Step-by-step instructions for the work
Bavarian brick can be used both for separate cladding and for the external visible row of load-bearing facade walls during their laying. The physical characteristics of the material make it possible to use it for the manufacture of loaded architectural elements.
| Characteristic name | Indicators |
| Freeze/thaw resistance | F50 |
| Compressive strength | M150 |
| Thermal conductivity | 0.51 W/(m2×С°) |
| Maximum moisture absorption | 8–10% |
As an example, we will consider the option of facing Bavarian brick. Choose for yourself which method of insulation you use; detailed comparative characteristics are available on our website.
Tools for working with facing bricks
Prices for building levels
Construction levels
Step 1. Check the verticality of all façade walls. To do this, you will need a plumb line, check the position of the walls along the entire height, and mark the preliminary position of the cladding on the foundation. Please note that the minimum distance between the main wall and the cladding is no less than the thickness of the insulation. If there is no insulation, then choose the minimum distance; all cracks will be sealed with mortar.
Step 2. Mark the position of the first row of bricks, it is very important that all the bricks on the cladding are intact. Lay out one row of Bavarian bricks, starting at one corner and working towards the opposite. The distance between them is within 8–10 mm. To control the width of the seam, prepare devices. You can buy them at a hardware store or make them yourself. We suggest doing it yourself; for this you will need a square profile with a side of 8–10 mm. One piece is approximately 50–60 cm, and is used to control horizontal seams. The second piece is 15–20 cm long for installing a vertical seam. When laying out the first row, use a metal rod.
If the layout does not end with a whole brick, then widen the gaps a little. Increase the distance between adjacent bricks by no more than 2–3 mm at a time, otherwise the discrepancy will become noticeable. After 20–25 bricks you can eliminate up to 10 cm in size, this is enough for most possible cases. Is it difficult to adjust the gap? You will have to cut off the brick; in the future, use it in inconspicuous places.
Step 3. Clear space near the wall from construction debris and unnecessary items. Take care of the scaffolding right away; they will be needed when the cladding height is 1.5-1.6 meters. You can make scaffolding yourself from lumber, borrow or rent ready-made metal ones. The second option is preferable: it is much safer to work, the speed of laying is noticeably increased due to the efficiency of changing the height of the site depending on the number of facing rows.
Step 4. Prepare masonry mortar at the rate of one part cement to four parts sand. Water is added as needed. The mortar should be somewhat thicker than for masonry with ordinary red brick. The fact is that Bavarian absorbs less moisture and can “float” when using a liquid mixture.
Step 5. Place waterproofing on the foundation; for this purpose it is better to use two layers of roofing material. The laying begins from two opposite corners, raise them to a height of 4–5 rows. Constantly monitor the position of the corners with a plumb line or level. Remember that the most accurate tool for checking verticality is an ordinary plumb line or level, which has permissible errors, which can accumulate over time and create problems. Each corner should have a width of 4–5 bricks at the base, then its width is reduced by half a brick. While you are working on the corners, do not remove the installation row. It will gradually be removed during further laying. High-quality Bavarian brick has high dimensional accuracy and parallelism of surfaces, which simplifies the work. We will tell you below what to do with low-quality material.
Bookmark the first row
Maintain distance between seams
Step 6. Stretch the rope between the corners and check that it is horizontal.
Pull the threads to control the evenness of the masonry
Everything is in order - start laying one brick at a time. Take it from the previously laid out row and place it on the solution. Adjust the width of the seams using metal square rods. Immediately remove any solution that gets on the front side of the cladding with a damp cloth. Move the twig along the rows as they increase. Remember to use different shades of Bavarian brick according to the previously developed plan. There is no need to count them, the main thing is that the approximate ratio of the different colors is observed. Do not forget that the main background should occupy at least 50% of the area of the facades. If you want, you can roughly follow the alternation of colors, make a mistake - no problem. Bavarian masonry does not have symmetrical patterns.
Applying the solution
Corner laying
Laying facing bricks
Practical advice. Facades decorated with colored bricks only in window and door openings, corners, arches, etc. look very original. And for other surfaces you can use ordinary facing bricks. But this is a matter of taste, make your own decisions.
The main thing in laying facing bricks is to be careful and ensure the uniformity of the seams
Brick laying process
Step 7. After 4-5 rows, start grouting the masonry joints. The number of rows depends on your skill and professionalism; change it to suit your individual capabilities. The main criterion for starting grouting is that the mass should harden a little, but not harden completely. Grouting is done with purchased plastic devices, homemade metal or wooden ones. The width of the devices should allow working in seams without jamming. If gaps in the mortar are found during grouting, add it and re-level it. Constantly clean surfaces of dirt, do not leave work for later. Prolonged exposure of cement mortar to the surface of Bavarian cladding can cause the appearance of difficult-to-remove stains; it is much more effective to do all the work in a timely manner.
Joining seams
After jointing, the surface is cleaned with a brush
Step 8. Carefully place the cladding in the openings. In most cases, the brick will have to be cut to length. Use a cylindrical grinder with a diamond disc for this. The cut brick should not be placed at the corner of the opening; place it a few bricks earlier.
Step 9. To increase the stability of the cladding, tie it to the load-bearing wall. For these purposes, periodic profile construction reinforcement, metal mesh or perforated galvanized strip are used.
Hangers for wall and facing masonry
It is easiest to work with a perforated strip: it has decent strength indicators, its position can be easily adjusted taking into account the height of the row of cladding, and fixation to the load-bearing wall can be done with ordinary dowels. Practitioners recommend making fastenings at a distance of 2–2.5 m horizontally and 1–1.5 m vertically. There are craftsmen who do not use anchors; they assure that the cladding, even without it, has sufficient stability due to the common angles. This is correct, but for peace of mind it would not hurt to additionally tie the structures to each other. Moreover, it takes little time.
How to fix a strip?
- Drill holes in the load-bearing wall at the distances indicated above. The diameter must correspond to the diameter of the dowels. Fasten the strip; the length should be 2–3 cm shorter than the width of the Bavarian brick.
Drilling a hole
Prices for popular hammer drill models
Hammers
Fasteners
Fixing the gimbal
- Tilt it towards the facing plane. It doesn’t matter that it lies unevenly - the next top row of bricks will press the element in the desired position.
The facing brick wall must be connected to the wall of the house
Attaching facing masonry to existing walls
Further work continues according to the above algorithm. Do not forget to constantly alternate the colors of the Bavarian masonry. The scaffolding platforms are raised as needed; place bricks of different shades on them in several places.
Step 10. If the Bavarian brick is all over the cladding, continue laying as usual. If you want to use it only in some places of the facade wall, then proceed according to the previously drawn up sketch.
Use corners to cover openings
Laying the solution
Use a pick to cut off part of the brick
Laying brick on steel corner
We carry out the laying along a stretched thread
What sizes are there and prices for the product?
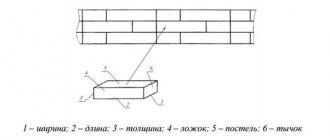
In the classification of sizes, the name of single and one-and-a-half sizes is usually used, while for shaped products the measurement is used as for a full-size look, regardless of the type of figure. Single size has the following indicators:
- Length – 25 cm;
- Height 12 cm and 6.5 cm.
One-and-a-half have the same length, but their height is greater - 88 mm. The enlarged one-and-a-half size has a height of 138 mm.
European sizes are different - standard length 240 mm, height 115 and 71 mm. North American standards are 250 mm long and 60 or 65 mm wide. Prices depend on the region and the complexity of the product’s shapes; clinker, ceramic and hyperpressed ones are priced individually, but silicate ones cost thousands. The minimum price for clinker and ceramic bricks is 34 rubles per unit, for hyperpressed bricks - 20 rubles, but fireclay silicate bricks are estimated at 24-27 rubles per unit.
Practical recommendations
The depth of jointing has its own characteristics. Deep jointing perfectly hides existing unevenness and minor flaws in the shadow. Do it for ordinary mass. But in Bavarian masonry, white jointing is often used; it gives the façade of buildings an exclusive look. The shadow for white paneling is not a helper, but an enemy; it smooths out the contrast of the facade design. Keep this in mind, white jointing cannot be made deep, maximum 1–2 mm. This automatically means that the seams must be perfectly even and without gaps; the slightest problems are visible on a white background.
How to joint joints in brickwork
Correct and incorrect types of seams
Light masonry mortar
Dark masonry mortar
There are cases when developers, due to inexperience or in order to save money, buy low-quality bricks. The best option is to take several bricks before purchasing, lean them one by one against each other with all their edges and check the gaps and variation in size. But if low-quality material has already been purchased, then you will have to learn to work with it. This needs to be laid using a slightly modified technology.
What to do if the brick has uneven edges
- The thickness of the fresh mortar should be approximately two centimeters, in which case the width of the seam between the rows will be approximately a centimeter. Therefore, a new device must be made to control the height. You can use ordinary even pieces of boards 20 mm thick. Using small self-tapping screws, screw them in a T shape, one edge will rest against the top plane of the bricks, and the second against the side. When moving the device to a new place, be sure to use a trowel to trim the area where the fresh mass adjoins it, otherwise it will move. Then, when grouting the joints, more effort will be required.
- Place the brick on the fresh mass, press it down a little, check the position. The side edges may be so uneven, but it will not be possible to align them perfectly; give the brick a middle position. Be sure to place the thick edge of one brick next to the thick one of the neighboring one, level the horizon with the thickness of the mortar using at least three bricks at a time, and not one at a time. When leveling, never hit the edges of the bricks, only knock in the middle. If you don’t do this so that the bricks will lift the opposite side, you will have to remove them, remove the old mortar and repeat it all over again. In this way, you can even use bricks that have saber-curved edges. Constantly visually monitor the appearance of the seam and immediately remove any mortar that appears with a trowel. Laying, of course, will be done more slowly, but this is the price for saving money or inattention.
Do-it-yourself bricklaying
- Insert an ordinary metal rod measuring 10 mm and finally press down the brick. Check the position with a level in two planes. While the mortar is soft, place an even strip edgewise on the outer corner of the bricks (verst) and lightly tap it to level it, the edges of the bricks will move in one line. As you can see, during laying you will have to use two devices with different thicknesses, otherwise you will never be able to align the defective bricks. If everything is done correctly, then only a professional craftsman will be able to distinguish defective bricks from quality bricks on finished Bavarian masonry, and then only after careful examination at close range. Do the jointing with a minimum recess, the bricks are uneven, there is no need to open their planes.
Facing brick
If you strictly follow the Bavarian masonry technology, the facade will not only be beautiful, but also durable. Never rush to do the work, remember that correcting mistakes in any case takes more time than careful masonry. It is impossible to describe all possible cases in one article; learn to make independent decisions; the more practical experience you have, the easier it is to solve the difficulties that arise.
Wall cladding
High-quality Bavarian masonry
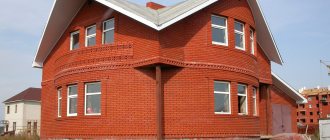
As practice has shown, Bavarian masonry is very popular among consumers
Photo of a house made of Bavarian masonry bricks
Prices for facing bricks
Facing brick
First we line the sides of the porch
All open surfaces that receive precipitation must have a slope for water drainage of at least 0.02, that is, about 20 mm/m. Fortunately, here the surface of the concrete platforms had a slightly greater slope, so the bricks laid on it acquired a slope automatically.
We convinced our customers that the side walls of the concrete porch should also be lined, as this would not only improve the overall appearance of the building, but also create a base for the brick columns. However, when finishing the side walls, a big question arises: should the bricks be laid strictly horizontally (Fig. 1)1
If the rows of the wall are laid out horizontally, then its top will protrude above the plane of the site, which is made at a slope, and each brick in the top row of the wall will have to be sawed at a slight angle. Works
a lot, and the result, in my opinion, will be disgusting. In addition, the sawn bricks will visually emphasize the slope of the top of the wall.
Our solution is to maintain the slope and carefully complete the markings and lay out the wall in even rows. Due to the fact that the slope is small, the appearance of horizontal masonry will be created.
We began marking the side walls by measuring the distance from the top point of the porch area near the wall of the house to the ground and dividing it into 75 mm segments. We chose this interval based on the thickness of our brick 66 mm and a seam of 9 mm, which looks good between the rows. To correctly take measurements from an uneven surface, we laid the slats horizontally on the porch and pressed the end of the tape measure end-to-end against it. In this way we were able to avoid the influence of irregularities on the measurement results.
On the steps we were unable to accurately measure and mark the 75mm intervals as the riser heights varied from 152mm to 165mm. Therefore, we decided to average the dimensions, taking the height of the risers to 158 mm, but setting the spacing to 79 mm.
Drawing 1: It is better to imitate horizontality. rather than looking at the level. In the top picture, the side wall bricks are laid horizontally, so the top row, where the bricks intersect with the landing, must be trimmed, which emphasizes the slope. The author's solution (bottom picture) is to lay the side wall bricks at a slope, creating the impression that the landing and rows of side walls of the porch are horizontal.
Having received marking points in front and behind the porch, we knocked out a chalk line for each row of masonry. They turned out to be a little non-parallel, but the three-millimeter difference in the thickness of the mortar joint at the beginning and end of the row is almost unnoticeable. The rows should be laid with uniform spacing and maintaining the slope of the porch.