The installation of floors on the foundation of a house under construction is carried out in different ways. One of the most common options: installation of reinforced concrete floor slabs. The strength of a building under construction with this type of flooring largely depends on compliance with the rules for installing slabs on the foundation.
Following standards and building codes will allow you to evenly distribute the loads created by floor slabs and increase the rigidity of the house structure when building on moving soils.
The rules and general algorithm for working with reinforced concrete floors will not work effectively without taking into account the individual characteristics and features of the materials used. Before laying the slabs, a number of works and organizational measures are carried out
Preparatory stage
The organization of work at the preparatory stage is of great importance for high-quality installation. Often little attention is paid to preparation, and shortcomings in the organizational process, as a rule, lead to violations of technology and defects in work.
Leveling the foundation surface
Preparing the foundation for the installation of slabs involves checking it with a level and, if necessary, leveling its upper horizontal surface. These steps are performed in the following order:
- The top point of the foundation strip is determined.
- Several beacons are installed around the perimeter of the foundation.
- If the height difference is no more than 5 cm, a leveling screed is performed across the entire base or in its individual sections - this is an acceptable error, since it is impossible to make a foundation strip that is almost perfectly zero.
- Before screeding a foundation made of FBS blocks, adjacent blocks are fixed (pulled together, anchored) together by twisting 3-4 mm wire through the mounting loops of the elements.
- If there are many differences in height in the tape, then the screed is reinforced with two parallel metal profile rods with a diameter of 10-14 mm around the entire perimeter; this situation often arises when using used FBS blocks.
- In case of significant differences in the level of the foundation, leveling the surface with solid ordinary brick is allowed.
- Sometimes board formwork is used to create a thick leveling layer.
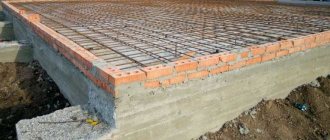
In the construction of one or two-story private residential buildings, various types of foundations are used. The foundation of the house can be monolithic or block, pile or columnar. The choice of foundation is determined by the type of soil on which the house is being built and a number of other criteria. A prerequisite for the installation of piece reinforced concrete floors is a flat, horizontal surface of the foundation strip arranged at a single level.
Sometimes construction projects include the installation of an armored belt, but such a decision must be justified and confirmed by calculations. Arranging an armored belt for the sole purpose of leveling a poorly constructed block or monolithic foundation is inappropriate due to the high cost of such a structure.
Organization of work on a construction site
It is almost impossible to install reinforced concrete products without lifting equipment. Installation using various hoists, levers and other devices is, of course, possible, but unproductive and complicated. For the operation of a truck crane, a number of conditions must be met:
- A site with dense soil for installing a crane at a safe distance from a house under construction.
Laying floor slabs
- There are no obstacles in the form of poles, trees, or power lines in the area where the boom of the truck crane extends.
- Availability of an access road for trucks transporting reinforced concrete products, in case of laying them “from wheels”.
- When installing products stored on site, it is important to correctly calculate the distance from the storage location to the installation point, otherwise you will have to additionally transfer them with a crane closer to the object.
- The construction site must be cleared of stones and materials that interfere with the movement of slingers and installers.
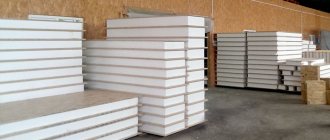
- Plates, if they are prepared in advance, should be stored in a dry, elevated place, in stacks on wooden supports, without contact of the products with each other.
The facility must be equipped with the necessary tools and accessories for installation:
- crowbars and pry bars for adjusting laid products;
- sledgehammers for bending mounting loops;
- It is advisable to have a welding machine on site.
The truck crane involved in the work is usually equipped with slings, “spiders” and other specific rigging equipment.
Sequence of installation work
In addition to following the rules for laying floor slabs, it is necessary to follow a certain sequence in work:
Installation work
- First, it is necessary to fill the voids of the reinforced concrete slabs in those places that will rest on the foundation.
- Next, concrete mortar of a grade not lower than M100 is applied to the areas of the foundation that will come into contact with the floor slabs.
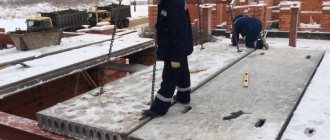
- Now you can begin directly laying the floor slabs on the foundation. It is important not to turn the slabs over to prevent elements from breaking due to improper installation.
- Installation work should be performed by 3-4 people. One worker, using a special sling consisting of four branches, secures the slab to the hook of a construction crane. For convenience, the plates have special mounting loops. Two more workers regulate the work process, laying the slab in the designed position. They also perform the detachment of the sling. If there is no eye contact between the crane operator and the workers, an additional person is hired to give commands to the crane operator. During the installation process, it is necessary to ensure that the slabs fit tightly to each other.
Floor slabs for low-rise construction
Of the wide range of reinforced concrete floors in low-rise housing construction, the most in demand are hollow-core products of the PB and PC series. From an installation point of view, they are equally simple and easy to use. The number of standard sizes with small (300 mm) length increments makes it possible to cover almost any span in a residential building. The difference between the series is in production technology.
PC
They are made in the traditional way using formwork for molding. The most practical width of the products, 1m 20 cm, helps reduce transport costs - the width of the vehicle body allows two rows of slabs to be transported simultaneously. It is not recommended to cut products of this brand to length, as their load-bearing capacity is significantly reduced. Models are produced with permissible support on 2 and 3 sides.
PB
Modern conveyor formless technology, which is used to produce slabs of this series, allows them to be cut to length, since the reinforcement in them is arranged somewhat differently. The load-bearing characteristics of the slabs are optimal for the construction of small residential buildings. The front surface of the products is smoother compared to PC boards.
Types of reinforced concrete floor slabs
Manufacturers produce several types of reinforced concrete slabs of standard sizes for arranging floors:
- tent-shaped (ribs are located around the perimeter);
- with longitudinal ribs;
- flat (solid, without voids);
- multi-hollow (with longitudinal voids of round or oval shape).
Flat and hollow-core slabs are most actively used. At the same time, flat ones (PT), with a thickness of 80 to 120 mm, perform the function of additional elements. They are smaller in length and width than hollow-core ones, and are used to cover storage rooms, bathrooms, narrow corridors, etc.
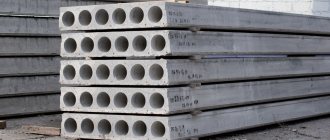
Among multi-hollow reinforced concrete slabs, the most popular are round-hollow slabs (PC) and continuously formed slabs (CP). The presence of voids reduces the weight of the slab and increases its heat and sound insulation properties.
PC boards have been used for construction work for several decades. Standard mass-produced products have a thickness of 220 mm and lengths from 2700 mm to 9000 mm in increments of 300 mm. The width is 1000mm/1200mm/1500mm/1800mm.
Standard round-hollow slabs are used in individual construction, but at the design stage of the building it is important to take into account their dimensions and installation features - the distance between the walls on which the slab will rest depends on this. Manufacturing custom-made PC slabs of non-standard length will significantly increase their cost, since the manufacturer will have to produce special formwork.
PB slabs have the same thickness and width as PC, while the manufacturing technology makes it possible to obtain continuous molded reinforced concrete of any length. This makes it possible to order structures of the required length for construction according to an individual project. The disadvantages of PB boards include the lack of comprehensively developed regulatory documentation and relatively little experience in application.
Waterproofing
The foundation tape along the entire perimeter is covered with a protective waterproofing layer. The most affordable and effective material for insulation from water is chosen - glassine, roofing felt or roofing felt. A strip of insulating material is cut to a width slightly larger than the width of the foundation tape, laid with an overlap of approximately 5 cm on both sides. The roofing felt tapes are joined with an overlap of 20-30 cm.
Distance between floor slabs during installation
The cross-section of a reinforced concrete slab is a trapezoid. Therefore, from the basement side there will remain a fairly wide
gap. It will need to be filled with cement mortar. But in order to reduce the consumption of cement-sand mixture, it is necessary to lay the floor slabs correctly, namely closer to each other. The maximum possible distance between them is 2 cm. There is no need to delay sealing the seam. They quickly fill with garbage, which will be difficult to remove.
How to fill the gap correctly:
- Place the board on supports on the basement side.
- You can tie it with wire to reinforcing bars laid across the gap on top of the ceiling.
- Place insulation in the gap, usually using polystyrene foam.
- Pour the prepared mixture.
The gaps between the edges of the foundation and the slab material are filled with concrete mortar, in which fine crushed stone is used. To do this, formwork must be constructed around the entire perimeter of the house. You can seal it with bricks or wall blocks made of different types of concrete. To do this, piece wall material is laid with one edge on the foundation, the other on the laid slabs.
It is the second option that is used more often today, because brickwork can be converted directly into raising the wall. This reduces the time it takes to build the walls of the house. In addition, pouring concrete into formwork, that is, the first option, is a process with drying of the solution, which can last up to a month. After which it can be loaded with wall materials. That is, this method takes longer.
Installation
After completion of the preparatory work, installation work is carried out.
Important! Only workers who have been trained in safety rules are allowed to work with a truck crane. The truck crane operator must also undergo regular training and have the appropriate permit.
Laying floor slabs on the foundation is a general principle:
- The slabs are laid on a continuous layer of cement-sand mortar 2-2.5 cm thick.
- The slinger hooks the slab, then it is moved by crane to the installation site.
- The slab is placed on tensioned slings at a minimum height above the installation site.
- Installers at both ends correct the movement and direction of the slabs.
- After checking the installation location, the product is smoothly lowered to its permanent location.
- The final adjustment is made by manually moving the slabs, using mounting crowbars as a lever.
- Anchoring and other options for fixing the slabs are carried out after installing the entire floor structure.
Important! The support of floor slabs on a foundation made of monolithic concrete or reinforced concrete blocks must be at least 6.5 cm. On a foundation lined with brickwork, the support must be 12.5 cm (brick length). If the width of the foundation strip allows, the support parameters can be increased to its middle.
Basic principles of laying hollow core slabs
Basic rules for laying floor slabs:
- Elements of precast reinforced concrete floors must rest on wall or foundation structures with their short sides.
- Before installation, the voids at the ends must be sealed with special concrete liners or lightweight concrete M200 - this will make the slabs stronger at the points where they are pinched by the wall.
- The supports need to be coated with mortar. Brand – from M100 and above, layer thickness – from 20 mm.
- The stove must not be turned over. In order for the structure to withstand high loads, reinforced reinforcement is provided in the lower plane of the slab to resist tension. An incorrectly installed plate may break during operation. The lower surface of the reinforced concrete product (the future ceiling of the room) is smooth, the upper surface is rough and uneven.
- Installation work is carried out by three to four people, using special lifting equipment. One person attaches the slab to the crane hook using a four-legged sling, the other two are engaged in laying the slab in its designated place and unhooking the sling. If work is carried out outside the crane operator's viewing area, an additional person is required to give commands to the crane operator.
- The slabs are laid as tightly as possible. If the length of the room is not a multiple of the width of the elements, the remaining gap between the floor slabs during installation is sealed with monolithic concrete, having previously installed the formwork.
- At the final stage of installation, reinforced concrete slabs are anchored to the walls and to each other to ensure the rigidity of the entire structure. The installation step of anchors on the walls is 2-3 meters. The ceiling of the entire floor must be a rigid solid disk so that the building is stable and does not collapse for as long as possible during high seismic activity.
Sealing the ends of hollow core slabs
Voids perform a number of important functions, for example, they reduce the consumption of concrete during production and help reduce the weight of the product without losing its strength. But the most important feature of the voids is that they give thermal insulation properties to the slabs. The function of a heat insulator is performed by air in voids, but only on the condition that the ends of the product are closed from the flow of air. After laying the slabs into the voids, insulation is laid to a depth of approximately 15 cm, then the holes are plugged with a concrete plug or simply sealed with cement-sand mortar. Sometimes this work is carried out in advance, before installing the slabs.
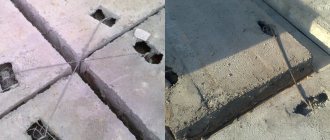
How to properly anchor floor slabs
Laying the slabs is not all. It is necessary to fasten them together, for which a steel round timber with a diameter of 10-12 mm is used. Reinforcement cannot be used, it is hardened, and therefore will not withstand vibration loads, especially the welding area.
- Make holes in the slabs closer to the ends, get to the reinforcement frame.
- Bend its elements located transversely towards each other. That is, from one plate to another.
- Cut rods from round timber so that their length is equal to half the distance between the holes in the two slab elements, plus 20 cm.
- On each rod, bend a 10 cm long end into a hook.
- One rod is hooked onto the reinforcement frame of one slab, the second onto the adjacent one.
- Both rods are joined to each other in the same plane so that their connection occurs with an overlap of 10 cm. Carry out the joining with an interference fit to each other.
- Weld the overlap area using electric welding.
The installation pattern of anchors can be different: crosswise, parallel to each other in the transverse direction, in pairs, individually. If a balcony is planned in the design of a private house, then it would be good to anchor the floor to the balcony. That is, it becomes possible not to connect it with round timber to the foundation.
Video: anchoring floor slabs
Anchoring to the foundation is rarely done. They don’t do this at all if the structure is made of concrete blocks. If the slabs are laid on a brick base, then anchoring will also be difficult. It is optimal if the foundation structure is a concrete strip with a reinforcing frame inside. To do this, even at the stage of pouring the solution, steel embedded parts are attached to the reinforcing mesh or grid. It could be a strip, corner, pipe or even fittings. It is to the mortgages that the anchors are attached.
If the foundation part of the house is built from individual FS concrete blocks, then it is necessary to pour a reinforcing belt over them, which is often called a seismic belt. And it is precisely this that is already anchored. That is, not to the belt itself, but to the reinforced frame that is embedded in it. Here, just as in the previous version, metal parts are laid to which the anchors will subsequently be attached.
Construction of a hatch and other technological openings in the ceiling
Sometimes, when covering the foundation, it is necessary to leave a hole or hatch into the basement in the ceiling.
Cutting slabs is an extremely undesirable process, but if necessary, work is performed using the following algorithm:
- markings are applied to the surface;
- According to the markings, cuts are made using a grinder with a disc on the concrete;
- internal reinforcement is cut with a gas cutter;
- the bottom of the slab breaks through.
It is worth remembering that using a grinder to cut stressed reinforcement often leads to injury to the performer.
Adjusting the dimensions of the floor slab
A decrease in the length or width of a reinforced concrete slab cannot be called a rare occurrence, since it is almost impossible to accurately select the material. To change the size of the slab, you need to cut it lengthwise or crosswise.
Cross section
The cross section makes the reinforced concrete slab shorter by a certain amount. To do this you need to do the following:
Cross cutting of slab
- Mark the cutting line with chalk or marker.
- Lay the slab on pads on the ground, and the pad should exactly coincide with the cutting line. This is necessary for more convenient cutting of material.
- Make a cut on the top of the slab using a grinder or concrete disc.
- Next, you need to make several blows with a sledgehammer or fist at the location of the voids. You should focus on the blows so that they land into the void and not into the rib. In this case, 3-4 hits will be enough. In a similar way, all voids in the slab are broken through.
- After this, you need to knock down the ribs, for which you hit them with a fist from the side.
- Having punched through the voids and knocked down the ribs, they begin to punch through the lower part and free the reinforcement bars.
- The cleaned rods are cut using a grinder.
Lengthwise cut
To reduce the width of the floor slab, it is necessary to cut the product lengthwise. This process is a little easier, but may require much more time. This is explained as follows: the length of the slab is most often 6 meters, and the width is no more than 1.5 meters.
In principle, similar work is performed. A grinder is used to cut through the upper part, and then using a cam, the slabs are punched over the voids. Next, a crowbar is used to pierce the bottom of the slab through its entire length. If reinforcement bars get in the way, make a cut with a grinder.
Common mistakes
Errors in choosing materials, technological defects during installation, excessive “savings” of developers, unprofessionalism of performers are the main reasons for construction defects with possible extremely negative consequences.
Use of defective products
Visually detectable small cracks that appear after installation, as a rule, do not have an effect and do not characterize the strength of the product - the slab has begun to work.
Shallow cracks formed during storage or transportation are sealed with cement-sand mortar - they are also not critical.
Important! If there are through cracks, the product must be rejected.
Reduced slab support depth
When the product is supported at a distance below that established by the standard, the load from the slab shifts to the edge of the foundation, reinforced belt or brickwork. This leads to destruction of the support followed by collapse.
Excessively increased support depth
With a significant increase in the depth of support, the slab gets pinched in the wall structure and begins to work incorrectly under the influence of loads, resulting in tearing the wall masonry.
An end located too close to the outer surface of the wall leads to increased heat loss in the house.
Missing or incorrect anchorage device
Anchoring, that is, the ligation of slabs with adjacent structures and among themselves, is sometimes performed illiterately, or they completely forget about its necessity. As a result, the rigidity of the floor is reduced, and risks of movement of the floors and walls become possible. The stability of the building as a whole is also reduced, and there is a risk of destruction at the slightest seismic impact.
DIY monolithic floor slab for home
Slabs used in houses are usually made of reinforced concrete. These are typical ready-made factory structures that only need to be placed correctly during the construction process. They have good performance properties, but there is an option with better characteristics. This is a monolithic floor slab, and it is quite possible to make it yourself, without ordering from construction companies. Such a slab is not only an order of magnitude superior to conventional reinforced concrete ones, but also does not require special skills or specialized complex equipment for its manufacture.
Compared to standard reinforced concrete slabs produced in factories, monolithic flooring has several advantages:
- The structure will not have seams, which adds strength to it, since the load on the foundation is distributed evenly over the entire surface. This improves the overall durability and safety of the building.
- Monolithic pouring makes it possible to experiment with the layout of the house, since it rests directly on the columns. You can create various corners and crannies for which it would be quite difficult to select individual floor slabs. This opens up wide scope for design ideas.
- Finally, the monolithic design allows you to equip a safe balcony without any additional support. Creating a balcony is not mandatory, but many people want to have one in a country house, so why not do it.
You can create a monolithic floor slab with your own hands, without hiring a team of workers or using complex equipment. It is enough to do everything step by step, carefully and in compliance with safety precautions. In addition, you need to choose high-quality materials for your structure.
Technology for constructing a monolithic floor slab
In order to make a monolithic slab, you will need a drawing. Any construction begins with a diagram and calculations. It is better to place an order at a construction office and entrust the calculations to professionals. The result will tell you what the correct dimensions of a slab suitable for construction should be, what reinforcing reinforcement to choose for it, and which of the existing grades of concrete is best to use. You can try to perform all the necessary calculations yourself; there are diagrams on the Internet that can be used to perform this operation. An ordinary country house, as a rule, has a span of no more than 7 meters, for which a slab with standard dimensions and a thickness of 180 to 200 mm is suitable, this is the most commonly used size.
To make a new monolithic slab you will need the following materials:
- Steel reinforcement having a diameter of 10, or, alternatively, 12 mm and a bending device for it.
- Concrete marked M 350. You can also make a concrete solution yourself by mixing sand, cement and crushed stone.
- Formwork and supports to support it, you will need one support per square meter.
- Plastic stands for reinforcing reinforcement for fixation.
The pouring process necessarily includes several points that are performed sequentially:
- If the existing span of the building is significantly larger than the standard 7 meters or the project being carried out clearly involves support on columns, you will have to calculate the floor slab.
- The first step is to install the formwork to begin work.
- The slab is reinforced with steel rods from which the frame is assembled.
- Concrete is poured.
- Using an internal vibrator, compaction is performed to enhance strength.
Once the height of the walls has reached the required level, you can begin to create a floor slab.
Installation of formwork
Conventional formwork used in construction is sometimes called a deck, and this is what is needed to create the slab. You can simply rent a ready-made, removable one, which is made of metal or plastic. You can also easily make it yourself from boards or plywood sheets. Of course, renting is much simpler, since the formwork is removable and collapsible, which means it can be easily removed. In addition, it has a telescopic device that allows you to adjust the height.
To create formwork manually you need to take sheets of plywood or boards. Structures made from boards must be well knocked down, carefully adjusting the wooden parts. If there are cracks and holes left, you need to use a waterproofing film and wrap it around the formwork.
How to install formwork?
- First you need to build vertical supports. If this is a rented formwork, then their role is performed by metal racks with a telescopic height adjustment system. You can take wooden logs. The distance between the posts used is one meter. The racks must be at least 20 cm away from the wall.
- Crossbars are placed on top of the installed racks - these are special longitudinal bars necessary to hold the formwork.
- On the crossbars there will be a deck made of moisture-resistant plywood. The horizontal beam should rest tightly against the adjacent wall without leaving any holes.
- The top edge of the structure used must match the existing top edge of the wall, so the height of the studs should be adjusted to an acceptable level.
- The location and exact horizontality must be checked using a construction level.
In some cases, for convenience, the formwork is covered with a film with waterproofing properties or lubricated with automobile oilif it is made of metal. This is done to make it easier to remove the formwork and make the surface of the resulting concrete slab smoother. Telescopic rented racks are preferable to homemade wooden ones, since they can withstand significant weight - up to 2 tons, do not break, and cracks do not appear on them, as can happen with homemade supports. Temporary rental of such racks costs approximately 3 USD. that is, one square.
Slab reinforcement
When metal or homemade formwork is installed, you need to tie a frame of reinforcement mesh into it. For this purpose, strong steel rods marked A-500C are used. The size of one cell of the resulting mesh should be about 200 mm. The rods are connected using wire. Usually the length of the rod is not enough to cover the entire space, so you have to connect several pieces. To make the mesh strong, the rods must be overlapped by at least 40 mm.
The mesh must be applied to the walls, the norm for brick structures is 150 mm or more, for walls made of aerated concrete - at least 250 mm. There should be a distance of 25 mm between the protruding ends of the arranged rods and the installed formwork.
Additional reinforcement of the future slab is consistently carried out using a durable frame made of reinforcement. There are two meshes, the one at the bottom is carefully placed at a distance of 20-25 mm from the bottom edge, the other mesh, the top one, is placed lower at 20-25 mm from the top edge of the slab.
Plastic clamps are placed under the bottom tile to hold it at the required distance. They are located in increments of 1 meter, at those points where the intersection of the frame rods is located.
The total thickness is pre-calculated in a ratio of 1:30, where the first number means the thickness of the future product, and the second – the span length. For example, if the standard span is 6 meters, then the width of the slab will be exactly 200 mm. Since the reinforcing mesh is located at some distance from the edges of the slab, it is necessary to separate them, there should be a gap of 120-130 mm between them.
Stand clamps are needed to space the laid out reinforcement mesh in the frame at a distance from each other. The size of the upper shelves of the clamp should be 350 mm, while the vertical dimension is 120 mm, the location step is 1 meter, the fixing elements are arranged in a checkerboard pattern, alternately.
The end fixing element in the structure is installed in constant increments of 400 mm, directly at the ends of the frame. With its help, the slab will rest on the wall.
The mesh connector is needed so that the two meshes accept the load as a single reinforcing device. The installation step should be 400 mm, and when moving to the support area, you need to reduce it to 200 mm.
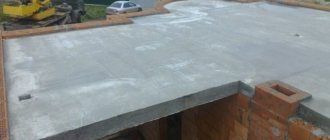
Pouring the slab
The best option is to purchase suitable concrete at the factory, from professional companies engaged in the manufacture of goods for construction. This greatly simplifies the task. In addition, if you carefully pour concrete evenly and using a mixer, the surface of the slab will be smooth and very even. But manual pouring will require an inevitable break while preparing a new portion of the mortar; accordingly, hardening will proceed unevenly, which can lead to defects in the finished slab. It is better to fill in an even layer, approximately 200 mm, acting without delay.
Before pouring concrete, you must remember to install special technical boxes in the formwork, designed to create chimneys or ventilation. After pouring, you need to use a special deep concrete vibrator. This will make the structure of the slab more durable, so it will be reliable and of high quality. You then need to be patient and allow the poured surface to dry and gain strength over a period of 28 days.
The emerging surface should be carefully monitored in the first week after pouring and moistened with plain water, but only moisten it and not pour it generously. The formwork can be carefully removed from the slab a month after pouring. After this, the new monolithic slab will be completely ready.
The total cost of materials and devices required to obtain a monolithic floor slab, as a rule, takes into account the costs of reinforcing reinforcement, possible rental of formwork, purchase of concrete and short-term rental of a construction mixer, as well as a deep vibrator. According to average estimates, it turns out to be approximately 45-55 USD. per square of constructed floor.
Tying slabs with reinforcement
The rules for laying interfloor slabs provide for the anchoring of slabs according to the following schemes:
- outer plates - diagonal tying with wire 3 - 5 mm;
- adjacent panels - U-shaped lintels made of smooth reinforcement A240 with a diameter of 10 mm;
- slab/wall – L-shaped anchor with a bend of 30 – 40 cm;
- longitudinal connections - between the slabs resting on the internal load-bearing wall, smooth reinforcement 10 mm.
Scheme of anchoring floor slabs.
Thus, the prefabricated horizontal disk of the floor receives additional spatial rigidity and connection with walls made of bricks and concrete blocks.
Attention: The standard support for PC slabs is 6 – 12.5 cm. In the event of seismic activity, the anchors will ensure the evacuation of people from the building, preventing individual slabs from collapsing.
For normal connection of the PC with internal load-bearing walls, it is enough to place 3 longitudinal anchors for each linear meter of length. All elements are joined to the mounting loops by welding in accordance with SP 70.13330 for enclosing and load-bearing structures.
Monolithic floor slabs for garage
Even building structures such as floor slabs can be made with your own hands. Let's look at the garage floor design. We will be covering a span of 4300 mm long, so the slabs will be made 4500 mm long. On each side the slab will rest on a 100 mm brick wall.
Materials for making the plate
How to make floor slabs with your own hands? To make a slab we will need:
- corrugated sheet H75/750 x 4500 mm, it will be used as removable formwork;
- wooden boards 150 mm high and 25 - 30 mm thick;
- fittings with a diameter of 16 mm;
- mesh with a cell 100x100 with a diameter of 5 mm;
- screed with a diameter of 8 mm, 2 pieces per slab;
- concrete class B20.
The process of making a slab with your own hands
A sheet of corrugated sheets is laid on a rigid base. You need to place cross members (wooden boards, 4 pcs) under the sheet. We arrange formwork from boards around the perimeter of the sheet.
We place reinforcement in each sheet tray (5 pieces). The protective layer of concrete should be 25-30 mm. We attach loops (4 pieces) to the same reinforcement bars for transporting the slab (in our case, raising it to the height of the garage floor level). We lay a mesh at the top of the slab, which should also be protected by a 30 mm layer of concrete.
In order for the corrugated sheet to adhere well to the concrete, it must be lubricated with oil (working off) or covered with plastic film. Concrete consumption per slab will be 0.4 m3. Concrete is prepared in a gravity concrete mixer, poured and compacted with a vibrator. The slab can be removed only after 7 days, when the concrete has gained 70% strength.
It is also possible to install ceilings directly on the walls. Sheets of corrugated sheets are laid, reinforcement is performed and formwork is installed. The concrete is lifted by crane into a bucket and poured in a continuous layer. It is necessary to install supports under the ceiling while the concrete gains strength. This method will be more expensive, since the corrugated sheets remain in the ceiling.
How much does it cost to make a floor slab?
Now let’s calculate the costs of manufacturing slabs with a total area of 29 m2 and a height of 150 mm. The cost of concrete is $335, the price of H75 corrugated sheeting is $400, fittings are $235, crane services are $135. As a result, we get the amount of $970. This cost will be if you make the slab directly in the garage, that is, the corrugated sheet remains under the concrete floor.
If you make floor slabs with your own hands on the ground, then the cost of the floor will be slightly cheaper; we remove the cost of corrugated sheets. The total will be 705 $.
Thermal insulation of joints
After laying the slab, the perimeter of the foundation is leveled with brickwork. This material is a cold bridge by default, so it is necessary to lay bars of extruded polystyrene foam or mineral wool between it and the floor slab. Only in this case will heat loss through the floor be minimal.
Scheme of insulation of the ends of floor slabs.
It is allowed to use solid strips along the entire length of the wall, assembled from pieces of insulation. If there are cracks, it is necessary to fill them with polyurethane foam, the characteristics of which are almost similar to the specified heat insulator.
Pros and cons of panel structures for flooring
Among the advantages of wooden panels, many note low cost, ease of installation and resistance to dynamic loads. Although such structures are inferior to reinforced concrete in strength and rigidity, in seismic zones the flexibility of wood-based materials turns out to be a very valuable characteristic. If we talk about the disadvantages, then floor panels of this type are very sensitive to fire and biological destruction. Of course, technologists also calculate such nuances, processing the structure of the material accordingly. But even during operation, the user himself will have to regularly monitor the condition of the structure, performing procedures for its comprehensive protection with special means.