One of the most inexpensive fences for a summer house or private home is made from corrugated sheets. Its design is simple - dug-in pillars to which transverse joists are attached. A corrugated sheet is attached to this grille using self-tapping screws or rivets. Everything is really simple, especially if you know how to use a welding machine. Although there is a technology without welding - on bolts or on wooden crossbars. In any case, you can build a fence from corrugated sheets with your own hands. If necessary, you can do all the work alone, but when installing sheets it is more convenient with an assistant.
Construction with metal posts
The simplest production is a fence with metal posts dug into the ground. You can use round or square pipes, but it is more convenient to work with square - profiled ones.
Construction of a fence made of corrugated sheets with posts
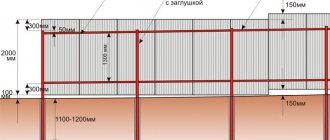
The length of the pillars is taken depending on the desired height of the fence, plus 1 to 1.5 meters are added for penetration into the ground. It is necessary to bury it in the ground below the freezing depth of the soil. For each region, the soil freezes to a different depth, but in central Russia it is about 1.2 m. When determining the depth to which you bury pipes, it is better to play it safe and make the holes deeper. Otherwise, the forces of winter heaving will simply push the posts out, and your fence will collapse (see photo).
Insufficient depth of the support posts led to the fence sagging
For pillars, a profiled pipe with a cross section of 60*60 mm and a wall thickness of 3 mm is usually used. The distance between the pillars is from 2 to 3 meters. The greater the thickness of the profiled sheet, the less often you can install pillars. If the soil is difficult to dig, it makes sense to make the distances larger, otherwise you can save on purchasing metal - the thinner, the cheaper and the difference in price is significant.
Logs for a fence made of corrugated sheets are made from a profile pipe 40*20 or 30*20 mm. The second option is wooden blocks 70*40 or so. When using wood, a significant amount is saved, but the wood disappears faster, and besides, it warps from moisture. Most likely in a few years you will have to change the logs, and they will already be metal. But it will work as an economical option for several years.
Fence made of corrugated board on wooden logs
When making a fence from corrugated sheets with your own hands with wooden logs, do not forget to thoroughly treat the wood with an antibacterial compound (for example, Senezh Ultra). It is better to do this in the bathroom - immerse the bars completely in the solution for 20 minutes. This way they will last longer.
The number of logs depends on the height of the fence. Up to 2 meters - two are enough, from 2.2 to 3.0 meters you need 3 guides, even higher - 4.
Read more about choosing and building a foundation for a fence here.
Gas welding
A distinctive characteristic of this type of welding is its simplicity. To make a fence from corrugated sheets, you do not need to purchase equipment that is difficult for a non-professional to use, or constantly use electrical energy. Gas welding is not advisable when the material is thick. At the same time, its productivity decreases.
It becomes less productive compared to arc welding when it is necessary to join steel parts whose thickness exceeds 6 mm.
Among the disadvantages of gas welding are the following:
- The price of acetylene with oxygen is higher than the cost of electricity;
- Improper handling of equipment, calcium carbide, oxygen, and flammable gases creates a fire or explosive environment in the workplace.
Gas welding is used in the repair or manufacture of steel products with a thickness of up to 3 mm. It helps to seal cracks or weld patches. It is suitable for making fence units from metal pipes with thin walls.
It is used to connect high-strength cast iron. But for a task such as welding a fence structure, this is not the best option.
Return to contents
Methods for attaching joists to poles
Metal logs are welded either between the pillars or in front. The first method is more labor-intensive, and produces more waste: you have to cut the pipes into pieces. But with this arrangement of the logs, the structure turns out to be more rigid: each post serves as a support for the sheet and it “walks” less; if desired, a couple of additional fasteners can be placed along it.
If you weld pipes in front of a pole (from the street side), there is less work, but you will still have to cut and there will be waste: it is necessary that the weld of two sections falls on the pole. Unless you adjust the distance so that they lie flat. Then you purchase materials in advance, and then calculate the installation step of the pillars.
There are two ways to weld metal logs to poles
To fasten wooden blocks, holders are welded in front or on the sides - metal corners or U-shaped guides. Holes are then drilled into them and fastened with bolts or self-tapping screws.
There is an option to assemble a fence from corrugated sheets without welding. For this there is a special fastening element called an X-bracket. This is a cross-shaped plate with curved edges, which is attached to self-tapping screws.
X-bracket for a fence made of corrugated sheets without welding
This is what everything looks like when installed
Preparatory stage before welding the fence
To begin assembling the structure, you need to make blanks:
- Clean square or round pipes.
- Pipes are being cut for the future fencing structure.
- Assemble the finished frame.
- They grab some elements by welding.
The preparatory stage assumes that the person who is building the fence has determined the dimensions of the structure in advance. Only in this case will he be able to calculate how much material he will need. A sketch of the structure will allow you to preliminarily calculate possible costs.
The cost of the fence will be significantly lower if the welding of the future fence is done by yourself. Using a level, carefully check the corners to ensure that the finished structure is as strong as possible.
Return to contents
Corrugated sheeting for fences
For fences, corrugated sheets marked C are used - for fences and walls. There are also N and NS, but they are not suitable for fences - these are more roofing materials. It is rare to see A and R markings; A profiles can be used for fences.
In the marking, after the letter there is a number - from 8 to 35. It indicates the height of the rib in millimeters. So C8 means that the profiled sheet is intended for a fence, and the wave height is 8 mm. The higher the wave height, the more rigid the surface will be. In strong winds, take at least C10, or even C20.
Sheet thickness - from 0.4 to 0.8 mm. The best option is a thickness of 0.45 mm or 0.5 mm. They are suitable for fences up to 2.5 m in height. If you need a higher one, take at least 0.6 mm.
The height of the sheet is usually around 2 meters, you can find 2.5 m. The width can be very different - from 40 cm to 12 meters. Different factories produce corrugated sheets of different formats.
Standard color palette for painting profiled metal sheets
Corrugated sheeting can be galvanized or painted (painted ones are 15-25% more expensive than galvanized ones). There are two types of paint applied: powder and polymer coating. Powder coating is more durable, but also more expensive.
There are sheets painted on one side - on the second there is galvanization, covered with a gray primer, there are sheets on both sides. Double-sided coating is naturally more expensive than single-sided painting, but it looks better and has a longer service life.
This is a view from the yard to a fence with double-sided painting
Support pipes and fence logs are usually primed and then painted. And somehow it became customary to paint them with dark paint. By then attaching a corrugated sheet painted on one side to them, you get a clearly visible “skeleton” on a light gray background. In a small area this can be critical. Please note that when building a fence from corrugated sheets with your own hands, paint the supporting frame light gray. The result will please you: it looks much better from the yard.
Selection principles
When purchasing metal fences, you need to carefully inspect the finished products. They should not have any irregularities, deep scratches, cracks, or areas with rust.
If you need to protect your area from unwanted views of passers-by, you need to choose fences made of solid sheets of metal.
Advantages and disadvantages
Positive sides:
- Long service life with a protective coating against rust.
- Reliability, strength, wear resistance.
- Easy to care for.
- Ease of installation. Anyone can do it without practical skills.
Negative sides:
- Without a corrosion coating or special additives, the service life of structures is reduced.
- Forged and cast structures weigh a lot.
Rust will form in areas where the protective coating has been damaged. To prevent destruction of the material, you need to regularly inspect metal surfaces and treat defects with special compounds.
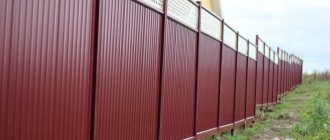
Welded fences (Photo: Instagram / grada39)
Manufacturers and prices
Russian manufacturers:
- "Steel TD".
- DMD;
- "MegaFence".
- "MDK".
- "Metal Structures".
The price depends on the type and height of the structure, the presence of decorative elements. The approximate cost for 1 meter of picket fence is 1100 rubles.
How to attach a corrugated sheet to a frame
The sheet is secured with self-tapping screws or rivets. Self-tapping screws for corrugated sheets are galvanized and painted. They are selected to match the color of the fence. Tighten with a screwdriver using an attachment.
The installation step depends on the wavelength and height of the fence. The higher the fence, the more often you need to install fasteners. It holds normally if you fasten it through a wave, to increase strength, with two lags you can fasten it in a checkerboard pattern, and not one above the other.
When installing, it is important to align the first sheet vertically. Then everything else will install without problems. When laying sheets, the next one goes onto the one already installed on wave 1. Attach to the bottom of the wave. The self-tapping screw must be installed strictly perpendicularly. Then the hole is blocked with a washer and precipitation will not cause the paint to peel off.
To see how one can attach a corrugated sheet to a fence, watch the video.
Disadvantages of welded structures
But some “pros” also have a downside. Thus, a fence made of welded mesh or reinforcement allows snow, dust and wind to pass through, and also does not block what is happening from prying eyes.
Resistance to mold and mildew at low and high temperatures is offset by a significant “minus” - metal is afraid of corrosion and requires a protective coating.
There is one more nuance. Not every homeowner can work with a welding machine. First, you need equipment. Secondly, considerable work experience is important.
DIY corrugated fence: photo report
A fence from neighbors and a front fence were being built. The total length is 50 meters, height 2.5 m. Brown corrugated sheet is used on the front, galvanized sheet is used on the border, thickness 0.5 mm, grade C8.
In addition, the following materials were sent:
- for poles profiled pipe 60*60 mm, wall thickness 2 mm, pipes 3 m long;
- 80*80 mm with a 3 mm wall were installed on gate posts and gates;
- logs 30*30 mm;
- gate and wicket frame 40*40 mm;
One person built the finished fence from corrugated sheets with his own hands.
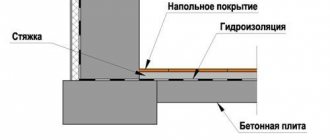
The fence is installed on metal posts, between which the base is then poured. The owners need it because they plan to plant a flower garden in front of the fence (you can see the fence made for it). It is also needed to prevent water from flooding the yard during heavy rainfalls. Metal sheets are not attached immediately from the ground, but slightly retreating. This gap is closed with a die-cut tape that remains in some industries. This was done on purpose so as not to block the access of air, so that the earth dries out faster.
Inside view of the finished fence
Metal preparation
The first stage is preparing the pipes. A rusty pipe arrives from a warehouse; in order for it to serve for a long time, you have to clean off the rust, then treat it with Anti-Rust and then paint it. It is more convenient to first prepare all the pipes, prime and paint, and then just start installation. The rust was removed with a metal brush mounted on an angle grinder.
Pipes need to be cleaned of rust.
There were only 6-meter pipes in the warehouse. Since the height of the fence is 2.5 meters, another 1.3 meters need to be buried, the total length of the post should be 3.8 meters. To save money, they cut it in half into 3-meter pieces, and the missing parts were welded with various scrap metal available on the farm: cuttings of corners, fittings, pieces of various pipes. Then everything was cleaned, primed and painted.
Installation of pillars
The two corner posts were installed first. The holes were drilled with a drill purchased from a store. The soil was normal; it took about 20 minutes to complete one hole 1.3 meters deep.
Post hole drill
The first pillar was placed horizontally and so that it rose above the ground to a height of 2.5 meters. To set the second one, it was necessary to recapture the height. A water level was used. You need to fill it in such a way that there are no bubbles - from a bucket, not from a tap, otherwise it will lie.
They placed the second post along the marked mark (they put it on a plank that was placed next to the hole) and concreted it. When the cement set, twine was pulled between the pillars, along which all the others were aligned.
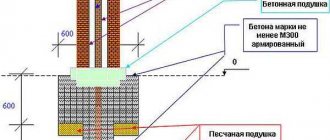
The filling technology was standard: a double-folded roofing material was installed in the hole. A pipe was placed inside, filled with concrete (M250) and placed vertically. The level was controlled by a plumb line. It is very important to position the posts correctly, otherwise the entire fence will warp.
During the work, several times it turned out that the concrete was poured not inside the rolled up roofing material, but between it and the walls of the pit. It was a little pleasure to scoop it out from there, so the protruding part was cut into petals and nailed to the ground with large nails. Problem solved.
This is how the roofing material was fixed
After the concrete had set, we made portable formwork from boards covered with thick film. With their help, the basement was filled. To make it stronger, reinforcement bars are welded along the bottom to the pillars on both sides. Formwork was placed around them.
Formwork for plinth
Installing jumpers
Cleaned, primed and painted pipes for the crossbars were cut and welded. They cooked between the pillars. They also need to be leveled to make it easier to attach.
We cook jumpers
After the welding is completed, all welding areas are cleaned with a wire brush, treated with Anti-Rust and then painted.
Installation of corrugated sheets
Since the top lintel runs along the very top of the fence, and it is welded exactly level, there were no problems with leveling and installing the sheets. First they fastened along the edges, then installed intermediate screws. To make it easier to place them evenly, a thread was pulled between the outer ones.
Evenly installed fasteners are also beautiful
Afterwards the gates were welded and attached. As a final touch, additional elements were installed on top - a U-shaped profile covering the top of the fence and plugs for the pipes.
The final view of a fence made from corrugated sheets, made independently
As you understand, there is nothing particularly complicated. It is important to align the posts evenly and weld the frame. This is the main task. A lot of time - about 60% - is spent preparing pipes - cleaning, priming, painting.
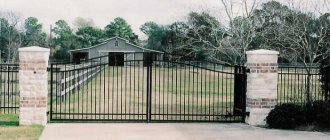
Metal fence - overview of options for a suburban area
An iron fence is a strong structure that can serve its owners for decades. Such a fence fully performs barrier functions and is capable of hiding the interior of the site from prying eyes. In addition, such a fence can decorate the area.
In order to choose an excellent fence for yourself, you need to take into account a number of important parameters:
- design;
- material of manufacture;
- installation method;
- price policy.
Today, the choice of various designs is so large that choosing the right option for yourself will not be the slightest difficulty. The fence is easy to fit into any environment, making it a harmonious continuation of the facade. For example, if the house is built in the style of minimalism or hi-tech, use transparent horizontal fencing, where vertical and horizontal stripes alternate with each other. Such a fence will not hide the area from the eyes of strangers, but at the same time it will emphasize the general style of the buildings.
If you need to decorate a wooden building, a neat design created in a rustic style will do. A picket fence or other material whose surface is designed to look like wood is suitable here. In addition, you can use chain-link mesh here.
If you need to create a worthy frame for a luxurious building, you cannot do without appropriate fencing. Here it is worth considering options with decorative elements, forging, and original details.
If the owner prefers strict Gothic style, you can erect a metal fence with forged elements and pointed peaks soaring up.
A classic facade will definitely be decorated with a simple metal structure; here you can use simple wood, forging, and metal siding.
Fence made of corrugated sheets with brick pillars
The corrugated sheet in combination with brick pillars looks solid
Of course, a fence with brick pillars looks more decorative. If you wish, you can do it, but it will take more time. There are two options:
- Make a full-fledged strip foundation. But it is long and expensive. On well-drained soils, you can make a shallow foundation; on heaving soils, you will have to dig below the freezing depth of the soil. And although the tape will not be wide, there is a lot of work - digging a trench along the entire length of the fence, installing formwork, tying reinforcement, pouring it and then finishing it. Place brick pillars on top. Durable, reliable, but expensive.
- Make according to the scheme described above: load-bearing pillars with a base. Bricks are laid around the pillars. This method is less expensive. Read about how to lay brick pillars here.
Schematic illustration of a fence structure with brick pillars
The whole technology is the same, only the reinforcement will be more rigid - two belts of two rods with a diameter of 10-12 mm. It will be necessary to install embedded elements in the pillars to which the guides will be attached. They (mortgages) can be welded to the pipe after it has been exposed and the solution has set.
Product care
To make the fence last longer, you must:
- Regularly inspect metal surfaces for damage to the protective coating. If there are any, they need to be coated with a special anti-corrosion compound.
- Renew the decorative coating every year.
- Replace damaged items immediately.
Dirt can be removed with a wet cloth. If this is not enough, it is recommended to add detergent. After this cleaning, you need to wipe the surfaces with a dry cloth to remove any remaining moisture.
Metal fences are installed around park areas, educational institutions, industrial enterprises, hospitals, private houses, etc. If you wish, you can assemble fences from individual elements with your own hands, so as not to spend money on ready-made structures.
Photos of the design of fences made of corrugated sheets
Often a profiled sheet is combined with forging, sometimes a frame is made from a profile pipe, a profiled sheet is mounted into it and the whole thing is decorated with metal patterns - forged or welded. Another option to make the fence non-standard is to install the wave not vertically, but horizontally. It would seem like a small change, but the appearance is different. Some ideas in the photo gallery below.
Horizontal fence made of corrugated sheets
Beautiful combination of stone, forging and red-brown sheet
Pillars made of a round metal pipe, strips are welded to them on the back side, to which the sheet is attached
Forged and polycarbonate inserts
More variations on the theme of forging
Color may not be uniform
You need to tinker with the non-linear top
Stages of welding work
Welding a fence requires special tools, protective equipment and skills.
To preserve life and health, it is strictly prohibited to carry out welding work without observing safety precautions. You need to weld the joists correctly using a level and a vice. Thanks to a reliable clamp, the structure will remain level, without distortions, and the seam will be stronger. You can take an assistant who will support the crossbars during welding.
When installing fences, manual arc welding is most often used. This old but universal method has not ceased to be in demand today. Its principle is quite simple.
Due to the short circuit, the electrode and the surface of the welding material begin to melt, mixing in the welding pool. The result is a strong seam.
When welding the frame, it is necessary to take into account the presence of stiffeners, which will add strength to the structure and will not allow the corrugated sheet to deform from a strong wind flow.
All that remains is to properly weld the fastening on which the corrugated sheets will be held. After welding is completed, the pipes must be carefully coated with anti-corrosion enamel or paint to protect them from moisture.
The top of the supports made of profile pipes is closed with a plug to prevent the ingress of drops of water and snow . The frame is ready, you can begin installing the corrugated sheets.
When installing the fence, corrugated sheeting with a thickness of at least 0.5 mm is used. This thickness will provide the required rigidity of the structure. The sheets are fastened using roofing screws; the sheets are overlapped. Also, the leaf itself must be at a height of at least 1 cm from the ground.
After completing welding and installation, it is worth reviewing all seams and joints of the fence, checking for strength and painting over open elements, if any remain.
Features and some “tricks” when installing welded fences
When preparing pits for supports, it should be noted that their depth must be at least 40 cm. When filling with cement mixture, the support should be compacted with pebbles or crushed stone. It is very important that the support ends up perfectly level.
Next, the actual installation of the welded fence takes place. For this procedure you will need: gloves, a welding machine, a set of electrodes, an angle grinder or other equipment for cutting metal.
In the manufacture of such fencing, mesh is in greatest demand among buyers. When making a welded fence from mesh with a special coating, you must remember that welding must be carried out continuously, because it will not be possible to weld the mesh or rods again.
When considering various options for a welded fence, it is recommended to look at photos of finished welded fences of each type on the Internet or on the websites of companies involved in the creation and installation of this type of fence, in order to have a visual idea of the differences between different types of welded fences from each other.
The content of the article:
Without any doubt, metal fences are a worthy decoration not only for personal plots, but also for public places such as recreation parks, kindergartens and stadiums. Metal structures are found at every turn, and this is no accident, because such a fence can easily fit into a personal plot. In addition, it is not only aesthetically beautiful, but also a reliable object. In this article we will look at everything related to metal fences, and also tell you how to make one without the help of a specialist.
What materials are fencing sections made from?
Choosing a fence based on the material from which it will be created can take a long time. First you need to study the characteristic features of certain types of construction.
Profiled sheet (metal profile)
Corrugated sheets or metal profiles are sheets made of steel, shaped like a wave. This relief gives the surface strength; in addition, it is coated with special anti-corrosion compounds and painted.
Such a fence will not fade under the influence of sunlight, it is lightweight and does not create difficulties during transportation and installation work.
Fence
A metal picket fence is made from iron strips, additionally coated with a polymer composition, which can be of different shades.
Manufacturers of such a picket fence provide a guarantee for it for up to thirty years. Profile elements can be of different lengths and bends, their average thickness is about half a centimeter, width from 10 to 12 cm.
Today, imitation wood is very popular, which always looks great. Without getting closer, it is difficult to determine what material such a fence is made of, metal or natural wood.
The owner of the site, using a picket fence, can himself regulate the level of transparency of such a fence. To do this, he can use fewer or more elements, or increase or decrease the step between them. To prevent damage to the coating, it is imperative to use self-tapping screws with a gasket that will protect the polymer from destruction. In addition, it is necessary to take into account the likelihood of the structure being skewed, so all work is carried out only after preliminary marking of the fasteners for each of the planks.
Forging
A wrought iron fence always looks chic, but its cost is quite high. However, the durability of such a structure and its appearance largely justify the high costs. Forging elements can last a very long time, they are reliable and attractive.
For such framing, experts recommend using massive pillars made of stone or brick. Such a fence will be an ideal frame for a country house or cottage. If we are talking about fencing an ordinary dacha, it is better to choose a budget option.
Net
The mesh can be of different types, which differ from each other in characteristics and appearance. Let's take a closer look at each of them.
Chainlink
This canvas has a number of characteristic features:
- affordable price;
- the possibility of use not only for fencing a site, but also for framing flower beds, parts of a vegetable garden, a pen for livestock, poultry;
- light weight, which facilitates the installation process;
- transparency that does not create unnecessary shadows for plants growing nearby;
- the possibility of construction on your own without the need to involve professionals.
The chain-link can be of different types:
- Non-galvanized: a cheap option with a short shelf life, can quickly rust when exposed to large amounts of moisture.
- Galvanized: has a protective coating that does not allow weather changes to affect its properties.
- Coated with polymer: a suitable option for constructing a fence that will last a long time.
For the fence, a chain-link is often used, the diameter of the cells is from 40 to 50 mm. The structure can be designed with spans, the frame is assembled from a metal profile, and a piece of mesh is placed inside it. Sometimes the chain-link is fastened between the posts, using clamps or clamps.
Gabion
This type of frame is a metal network, which is filled with natural stone (without reference to a specific rock). This option is ideal for zoning different areas of a dacha; it can also be used to fence off the entire perimeter from others.
The gabion design is an excellent way to frame a loft-style yard.
Welded Gitter
Among metal fences, a special place is occupied by the gitter type fence. This option has a number of features:
- affordable price;
- strength;
- is a connection of wire rods using welds;
- can be sold in rolls, cards;
- placed on support pillars, secured with special elements;
- ease of installation, which you can handle yourself;
- the presence of a 3D option that has a curved shape, creating the effect of a three-dimensional fence.
carved
A carved fence is an excellent alternative to a wrought iron fence. This direction is considered relatively young, here each section is an independent picture.
A carved fence can be either solid or through. It can be supplemented, reinforced with polycarbonate or a profile, which will completely eliminate the possibility of viewing from the street. For a carved fence you will need a parapet, which is created from natural stone and brick.
Among other things, carved designs always go well with wood.
Reinforcement (rod)
The rods can be connected using welds, which allows you to create a web in the form of a lattice. Such a fence is supplemented with sharp tips or forging. The cost of such a fence is at an average level, and it looks somewhat more attractive than the same chain-link or welded mesh.
How to make a welded fence yourself?
It is quite possible to make a sectional welding fence yourself. To carry out the work of creating a welded fence with your own hands, you will need to make pillars to support the structure, calculate the height and width of the sections, and pour the foundation for the load-bearing supports.
Brick, metal, stone, pipes or steel strips are suitable as materials for supports. At the same time, when choosing the latter, you also need to take into account their thickness or width, because a support that is too thin can bend or break under the weight of the fence.
Useful tips
Finally, I would like to present to your attention useful recommendations, the observance of which will help preserve the appearance and quality of such a welded structure for a long time.
- If you decide to make such a fence with your own hands, then you should choose the fencing that is as simple in design as possible. To create a beautiful fence with a complex design, you need to have not only additional materials, but also certain skills. For the same reasons, you should not try to create a structure on screw piles yourself.
- It is imperative to ensure that the support pillars have protective caps or plugs. They will prevent dirt, debris, dust and precipitation from penetrating inside and destroying the stability of the structure. Typically, factory fences are already equipped with them. If they are not available, then you should either make the plugs yourself or purchase them at a specialized store.
We install supports and frame
Support installation options
The procedure for arranging support posts and crossbars remains the same for all fences, except for mesh fencing.
Set for work.
- Shovel or drill.
- Roulette.
- Rods and rope for marking.
- Level.
- Crushed stone.
- Sand.
- Cement.
- Welding machine.
- Supports. Metal pipes will do. You can use round or square (rectangular) pipes. The diameter or cross-section of the pipes must be at least 70 mm.
- Lags. To make them, we buy a flat profile 40 mm wide and 25 mm thick. We will fix the logs horizontally. Thanks to them, rigid fastening of profiled sheets will be ensured.
First step
We study the layout of the site. We choose the most convenient places for the future arrangement of gates and gates - we will leave them empty.
Second step
We mark the territory. To do this, we drive rods around the perimeter of the fence and stretch a cord between them. At the same stage of work, we mark the locations of the support posts. The optimal step between such elements is 3 m.
Third step
We dig holes for the posts with a diameter of about 200 mm and a depth of approximately 100-130 cm.
Fourth step
We install the supports, carefully checking their level.
Fence installation
Usanova fence supports
Usanova fence supports
Fifth step
We pour a 20-centimeter layer of crushed stone or gravel at the bottom of each hole and fill it with cement mortar. We give it 3 days to dry. Immediately put cone-shaped caps on the supports. They will protect our pouring from rain.
Sixth step
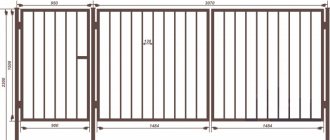
We install cross beams. To make the fence more reliable, we do this using a welding machine. We select the required number of crossbars in accordance with the planned height of the fence. For example, for a fence up to 180 cm high, two crossbars are enough. If the fence is higher, we increase the number of joists accordingly.
Fence crossbars
Fence crossbars
Fence crossbars
We install cross beams.
Installation of forged fences and decorative elements
Welded fences and enclosures that are planned for many years are best ordered from blacksmith shops. Forged structures have an impeccable appearance, fully meet your requirements and are assembled very quickly (using sectional fence technology).
But the cost of these products is unreasonably high. Therefore, there is a certain compromise. Order individual forged elements and weld them to your fence yourself. It can be:
- peaks,
- patterns or images,
- various figures,
- edging for decorating the frame,
- plugs for support posts.
Each of the elements separately costs much less than the finished structure and can be installed independently without any problems.
Where to start?
Before starting work, take the necessary measurements of the site, dig recesses for the foundation of the supports, install them and fill them with cement mortar. When calculating the height of the supports, take into account the distance to which they will go underground.
For a standard fence height, poles 3 meters high are suitable; if you choose a different height, you should order the support cut directly in the store when purchasing them, this will greatly simplify transportation and installation work.