Plastering walls is a fundamental process of any renovation. If you have smooth walls, then even cheap furniture will fit harmoniously and fit against the walls and corners without gaps. If you have already decided on the choice of plaster and calculated the required amount of material, then let’s talk about the preparation and the plastering technology itself.
Why do you need to plaster the walls in your apartment?
Even a loft-style interior is just an imitation of untreated wall surfaces using concrete-like plaster. Plastering walls in an apartment solves many problems in a comprehensive manner.
Plaster coating:
- strengthens brickwork;
- protects concrete and aerated concrete surfaces from the penetration of moisture from the air;
- prevents the formation of fungal or moldy lesions;
- protects wood from cracking, rotting, insects, rodents;
- levels uneven surfaces of walls and ceilings;
- serves as additional insulation;
- absorbs noise;
- creates a comfortable microclimate in the apartment;
- monolithizes the internal surface of the apartment, sealing the seams and joints of structures;
- protects wood from fire;
- protects building structures from external influences;
- Levels surfaces in accordance with state standards, which makes tiling or plasterboard, wallpapering, and painting easier.
Replacing a wall or partition is more expensive than replacing or repairing plasterwork. Modern plaster compositions are durable - service life reaches 25 years or more. Plastering the walls of a house simultaneously solves many problems.
Special solutions
When working with this group of plasters, you need to have documentation on hand with the design of the room and research on the chemical composition of the solution. Their use is quite expensive and labor-intensive, and also requires certain skills. There are two types of special mixtures:
- Solutions with protection against various types of hazardous radiation. These include the well-known barite plaster, which is used to decorate X-ray rooms and various laboratories. It is rarely used to protect residential buildings. Before plastering the walls in an apartment for painting with barite plaster, you need to take care of the reliable finishing of the material in order to avoid toxic fumes.
- Acid-resistant mixtures are used in industrial premises where chemical fumes are active and can be harmful to health. In everyday life they are used as a finishing touch. This plaster is not afraid of chemical exposure, so it can be washed with any household products without harm.
What are the application methods?
Depending on the size of the surface to be plastered, as well as the included components, methods of applying plaster can be:
- manual (trowel, roller, trowel, ladle or just hands);
- mechanized (using a hopper, plastering machines).
The choice of application method is often dictated by how much plaster can be applied per pass. When performing work manually, some types of mixtures are applied in a layer up to 6 cm thick. Mechanical application is limited to creating a layer of up to 20 mm.
Among the manual methods of plastering walls, there are different application methods:
- technical (leveling) finishing with or without beacons;
- decorative (application with various tools, shaping the surface using various techniques) finishing.
Manual application
Plastering walls with your own hands involves applying a solution to the base with a hand tool, leveling, smoothing or forming a textured surface in one pass, or sequentially creating a multi-layer coating. Manual plastering of walls is usually carried out with a small coverage area, a total thickness of the leveling layer of up to 10 - 12 cm, and a final textured finish. With multi-layer finishing, each layer is dried.
Mechanized application
It is rational to use this method of performing plastering work when there is an optimal combination of plastering speed, low cost of materials (part of the money is saved on expensive machine work), and a large volume of coating.
Plastering walls using a plastering machine is more economical in terms of:
- expenditure of effort;
- time spent;
- consumption of plastering materials;
- financial expenses for the purchase of plaster mixtures, which are cheaper for machine work.
Other advantages:
- small volumes of waste;
- uniform application and improvement in quality, due to machine control of the SS-water ratio;
- supplying the mixture to the surface under pressure increases adhesion to the base;
- Due to the uniformity of mixing and layer application, the overall strength characteristics of mechanical finishing are higher than those of manual finishing.
Minuses:
not always, not applicable everywhere
Mechanical equipment for plastering varies in level of sophistication. They use small-scale mechanization (hoppers, sprayers) or even machine devices that mix the plaster mixture and apply it when air is supplied by a compressor.
Apply the mixture, holding the nozzle 20 - 30 cm from the wall, moving the working part of the apparatus along the surface at the same speed. After finishing work, all parts in contact with the solution are washed and dried. Be sure to use eye protection.
Sealing cracks
It is common for new buildings to undergo a shrinkage process within a year or two. Plastering new houses with mineral plaster solutions during this period leads to the appearance of cracks. Cracks also occur in houses with a long service life. All cracks need repair. Large cracks require special repairs. Such defects are “healed” using reinforcing mesh.
Cracks with an opening of up to 5 mm are considered small. They can be covered with putty or cement mortar, which is more liquid than masonry mortar. Medium cracks on the surface opened up to 10 mm are “treated” with a CPS solution (cement-sand), having previously been expanded. Large (more than 10 mm) formations are sanitized with a solution using crushed stone and reinforcement.
They try to pump the solution deeper into the crack, using a construction syringe for this. Before sealing the cracks with the solution, the area of the brick and concrete wall is cleaned of dust and moistened. A piece of mesh is placed over the area with the crack body covered, which is secured to the wall with self-tapping screws. Plaster the area over the mesh.
Joint jointing of brickwork
Sealing cracks with a construction gun
Fastening the reinforcing mesh
Plaster over mesh
What tool to plaster walls
I will note the main tools for manual application, and we’ll talk about them. And so, what we need:
| Tool | Description |
| Rule, cutter | Aluminum long tool for leveling plaster on the surface (see photos below). Available in different lengths up to 3m. Usually, for indoor repairs, we will need 3 cutters of different sizes (1m 1.5m 2.5m), if there are hard-to-reach places, then we can cut them to any desired length. |
| Level | It will be needed to identify deviations from the horizontal or vertical level of the surface, to set beacons, to check the finished wall, to set corners, etc. You can use either a bubble level or a laser level (it will speed up the process). |
| Spatula and smoother | For applying material to a surface. We will need a trowel with an average length of 30-35 cm. A spatula is 10 cm. |
| Trowel, trowel | Needed for throwing material. It has different shapes and types. To apply the mortar, a teardrop-shaped “drop” trowel is usually used, but often craftsmen also use square, mason’s trowels. A matter of taste. |
| Roller and bucket and brush | For priming and wetting the surface. |
| Polyurethane grater | For final grinding of cement and lime compositions |
| Trough, container for kneading and water | For kneading, you will need a 40 liter trough and a 10-15 liter bucket for water, or better yet 2 buckets, because you will need to wash the mixer or kneading whisk in one. |
| Mixer, whisk | Without a construction mixer or something similar, I do not recommend starting such a process as plastering walls. |
| Covering film, masking tape | In order to cover window sills, doors, windows, radiators or simply paste over adjacent walls. |
| Plastering ladle | If you don’t have the skill, then it’s better not to pick it up. We’ll talk about how to plaster walls with this tool in another article. |
How to prepare walls for plastering
Beginners will need to know how to prepare walls for plastering. Preparing walls for plastering begins with an inspection.
Need to find out:
- what material are the walls made of?
- how strong is the foundation?
- how tightly the plaster coating, if any, holds;
- are there any peeling places (check by tapping);
- are there any other defects that require elimination;
- How smooth are the walls themselves (measurements are taken).
General preparation
According to the standards, the base for plastering must be dust-free, free from foci of biological damage, oil and rust stains, efflorescence, and uninsulated metal parts (staples, nails, screws). The plaster coating has a considerable specific gravity.
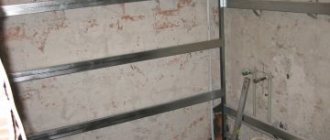
Before plastering the walls, they make notches with their own hands and deepen the seams to increase adhesion. The base is primed and then dried. In addition, preparation includes the installation of beacons if plastering is carried out along them.
Priming walls and installing beacons
Removing old plaster
If the old plaster coating is durable and adheres well to the wall, plaster the walls using the old plaster. The coating unnecessary for subsequent finishing is removed completely. This is required when the old plaster cover is severely damaged.
Before removing the finish, it is wetted using a sponge. If there is drywall under the plaster being removed, then it can be easily tapped. Having tapped and chipped the partially exfoliated area, peel off the adjacent plaster by inserting a corner of a spatula or chisel under it.
For complete dismantling you may need:
- Bulgarian;
- hatchet;
- hammer;
- putty knife;
- perforator;
- scraper;
- spray;
- safety glasses, respirator.
Necessary tools for dismantling old plaster
Sequencing:
- wet the plaster coating, give it time (15 - 20 minutes) to soak;
- use a spatula to check the looseness of the layer;
- remove the layer using possible means (with a spatula, chisel, hatchet, or sawing the finish into squares with a grinder, followed by chipping it off with a hammer drill with a chisel attachment).
How to prepare a concrete wall
Often inexperienced people have problems when plastering concrete walls with their own hands. Not every plaster solution adheres well to a base of this kind. Previously, plaster mortar was applied to concrete surfaces without the use of primers. Therefore, there is a possibility that the old coating may fall off the concrete wall along with the new one.
To prevent this from happening, the old finish is completely removed from the concrete walls. When the structure is exposed, the joints of the wall panels, which were usually simply covered superficially, are also exposed. Hollow joints are filled with foam before sanding.
Foaming concrete slabs and scoring before plastering
Also, before plastering, notches up to 3-5 mm deep are applied to the concrete surface with a hatchet, chisel, bush hammer or hammer. To apply notches, a light jackhammer with a bush hammer attachment is sometimes used. Unevenness increases the adhesion of dense concrete bases to joints.
If the electrical wiring is planned in grooves, then its installation is done before plastering. Fastening elements, such as hanging hooks, are installed in advance.
This eliminates unnecessary labor, time and materials costs later.
Preparing a wooden wall
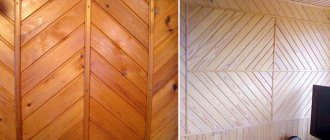
Wood especially needs preparatory work. It is not always rational to apply notches. Therefore, before plastering, wooden bases are covered with shingles - thin slats no wider than 20 mm. The shingles are nailed to the surface of the base, placing the slats at an angle of 45 degrees to the floor, at a distance of about 4.5 cm from each other.
The narrow or crooked shingles are filled first. The second row of shingles is nailed crosswise on top. To prevent the planks from splitting during the nailing process, the ends of the shingles are soaked.
In addition, at the ends the slats are not nailed close to each other, leaving a gap of 2 - 2.5 mm. Stuffing nails with wire weave along them helps to do without shingles.
To increase the heat and sound insulation of plank partitions, the boards are covered with burlap or matting before attaching the shingles, lowering the woven material until it touches the floor. Having nailed it along the bottom, tighten and attach the upper end.
These materials adhere well to solutions, serve as additional insulation for boards, and reduce wetting and warping of the boards. Then the plaster coating cracks less. The edges of the fabrics are overlapped.
Preparing a brick wall
In brickwork, before plastering, masonry joints are deepened by about a centimeter. This is done with a chisel, holding the tool at an angle of up to 45 degrees to the surface along the seam line. Bricks are cleaned from contamination with metal brushes. Then the wall is washed.
If, after washing with detergents, greasy or tar stains or efflorescence appear, they are treated with special agents or mechanically cleaned until the material is clean. After preparation, the base is dried.
Aerated concrete, gas block, foam block
How to prepare walls from these materials? It would seem easier with them. All protruding irregularities are ground off with a float designed for aerated concrete or a plane. After removing the dust, apply primer with a brush or from a sprayer twice. Dry between priming, allowing crystals to form and fill the surface pores.
Priming the wall
Installation of reinforcing mesh
Installation of beacons
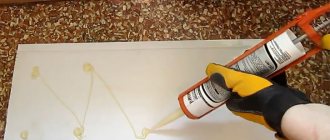
Partitions and walls made of foam and gas blocks do not shine with strength, therefore they can crack at the slightest subsidence of the foundation. To strengthen the surface, it is reinforced with a fiberglass mesh, which is attached to a 2-3 mm layer of tile adhesive. The glue is spread with a spatula and stretched with a trowel. Apply glue in a strip about a meter wide. Apply a strip of mesh to it, smoothing it from the center of the strip up and down.
Having installed the grid, beacons are installed. Before plastering, apply a layer of glue on top of the mesh with a spatula, combing it (to increase adhesion) horizontally with a notched trowel. Dry it.
Arbolite slabs
Due to their roughness, wood concrete slabs always adhere well to the plaster finish. Therefore, no additional measures are required. Some plasterers attach a metal mesh to the wood concrete to strengthen the wall itself.
Whitewash
It is impossible to plaster over lime whitewash, because the coating will not adhere firmly. Whitewash is always multi-layered, and plaster adheres only to the upper lime film.
Whitewash is removed in several ways:
- remove with a spatula (wet, painstaking method) - moisten the areas, after 15 minutes remove the soaked lime;
- remove with a grinder (the disadvantage of this method is that there is a lot of dust, you need to work in a respirator and goggles);
- Apply the paste with a brush in a thick layer to the whitewash. After drying, the pasty crust, which holds together the multi-layered lime mortar, is removed with a spatula (the most dust-free method);
- wash off with a soap solution (half a piece of grated soap in a bucket of water, 5 tablespoons of soda), repeatedly wetting the whitewash with a sponge or brush;
- washed with acid solutions.
Plaster on painted walls
According to generally accepted rules, paint should be removed before plastering. However, if the matter does not concern wet rooms, as well as stacks with a large dead weight, the durable paint film does not need to be removed. Light gypsum plaster applied over paint holds up well.
Methods for removing paint:
- soak for 20 minutes and remove with a spatula (for water-based emulsion);
- the use of special softening solutions;
- heating and softening with a hairdryer, scraping with a spatula;
- removal with a metal brush;
- removal using mechanical means - grinders, etc.
Preparation of painted walls for plastering includes:
- applying cuts on a base painted with enamel or oil paint that pass through the paint film;
- removing exfoliated areas with a spatula;
- removing the glossy layer with sandpaper or a sander;
- removing dust with a damp cloth;
- degreasing oil stains with a solvent;
- drying the prepared base.
Selecting ready-made formulations
Choosing the type of plaster - gypsum or cement - is just the beginning. Next, you will have to choose the manufacturer and the composition itself - there may be several products with slight differences.
There are many different brands of plaster in construction stores.
Good gypsum plasters
The most popular gypsum plaster is Rotband from Knauf. This is a really high quality product that is easy to use even for beginners. The same company has other products - Goldband and HP Start. They are cheaper, and the quality is quite decent.
The most popular type of plaster is Rotband.
NR Start is a gypsum-lime composition, Goldband is a gypsum composition. The difference between Rotband and Goldyuand is the thickness of the minimum layer. Rotband’s is 5 mm, the second’s is 8 mm. Otherwise, the technical characteristics are very similar - both consumption (8.5 kg/m3 with a layer thickness of 1 cm), and maximum layer (50 mm), and compressive and bending strength. The density in the hardened state differs slightly: ~980 kg/m3 for Goldband and 950 kg/m3 for Rotbabd. Scope of application: any residential and non-residential heated premises, including kitchens with bathrooms.
| Name | Purpose | Color | Layer thickness | Binder type |
| Knauf Rotband plaster mixture | For plastering smooth surfaces of walls and ceilings | White gray | 5-50 mm | Gypsum with polymer additives |
| Plaster-Adhesive Mixture Knauf Sevener | For restoration of old plaster surfaces, including facades | Grey | Portland cement with polymer additives and reinforcing fibers | |
| Plaster Bergauf Bau Interier | For plastering in rooms with normal humidity | Grey/White | 5-40 mm | Cement with polymer additives and perlite filler |
| Plaster Volma-Canvas | For indoor spaces with normal humidity | 5-50 mm | Based on gypsum with chemical and mineral additives |
Volma Layer, Osnovit Gipswell, Eunice Teplon, and Prospectors also speak well of gypsum plaster. They cost less, give good results, but it’s still easier to work with Rothband and the “company”. Based on the results of working with these brands, there are both positive and negative reviews, but in general, the quality is not bad.
Ready-made cement plasters
Cement plasters are available for manual and machine application. We will talk about compositions for manual application. For interior work, Forward, Weber Vetonit, Osnovit Startwell, Weber Stuk Cement are good. They fit well on a clean, pre-moistened surface. For better adhesion, it is better to pre-prime the walls and, after drying, begin the plastering process itself.
Cement plaster is also noticeably different
If you choose cement-based plaster for exterior work (including for plastering an open loggia or balcony), you need façade compounds. They differ from ordinary ones in the increased number of freezing/unfreezing cycles. Facade cement plasters - Yunis Silin facade, Osnovit Profi Startwell, Knauf Unterputz, Bergauf Bau Putz Zement. Ceresit CT 24 Light plaster is suitable for both facade and interior work.
Aerated concrete walls require special plaster. It has increased vapor permeability to prevent moisture from being trapped inside the wall. This is Ceresit CT 24, Knauf Grundband (contains the smallest particles of polystyrene foam, which increases its thermal insulation properties and reduces consumption).
Required tools and materials
List of what will be needed for plastering:
- for preparing the solution - containers, mixer, mortar mixer;
- for application - spatulas (in simple terms - spatula), ladle, trowel, trowel, rollers, brushes;
- for stretching, leveling - grater, grater, rule;
- for priming, forming a relief pattern, painting: rollers, brushes, brushes, sponges, stencils, other improvised means;
- for measuring, marking, installing beacons - level, plumb line, tape measure, masking tape, cord;
- for painting – brushes, sponge, rollers, spray bottle;
- for protection – glasses, respirator, gloves, work clothes
Materials you will need:
- components of plaster composition, SS or ready-made compositions;
- water;
- primer;
- shingles;
- lighthouses;
- reinforcing mesh;
- fastening parts - dowels, screws, nails;
Required material for plastering
Tools for working with plaster
For work we will need:
- An open tank or container with a volume of at least 20 liters;
- A wide (20-30cm) spatula, trowel, rule and a pair of wooden floats of various lengths, used for wet grouting of the plaster surface;
- building level and plumb line, about a dozen dowels, 50-70 meters of thick millimeter fishing line;
- Electric drill with a nozzle for mixing the solution.
If there are areas on the wall with fallen or chipped plaster, a falcon can also come in handy - a small board with a handle on which you put a couple of kilograms of plaster mass and use it to cover cracks and chips with a spatula, much like an artist would use a palette. When applying the finishing touch, it is more convenient and faster to use a tool to take gypsum plaster from the falcon in small portions than to bow a hundred times to a large container.
What is lighthouse plaster?
The technology for plastering the walls of a house includes options:
- under the falcon (alignment without rules, by eye);
- as a rule (does not allow you to easily achieve high evenness of the walls);
- along the lighthouses (high-quality finishing).
It will not be possible to plaster a crooked wall with high quality by eye (without beacons). Therefore, the falcon-like wall plastering technology is used only in new buildings with improved quality walls, or in utility rooms where the quality of the surface is not important.
A lighthouse is a plank, the surface of which serves as a guide for the rule, moved by the plasterer when leveling the mortar applied to the wall. Lighthouses are made of metal, plastic, wood, or mortar used for plastering. The beacons have a shelf height of 6–10 mm and are attached to the base with mortar or self-tapping screws.
The installation of beacon strips is carried out plumb or level strictly vertically after priming. First, the outer beacons are placed 30 cm from the corners of the walls. The surface of the planks forms a vertical plane, focusing on which the intermediate planks are installed. The distance between the planks is made less than the length of the rule by 20-30 cm. For beginning plasterers, it is more rational to place beacons in meter increments.
When plastering over beacons, the mixture is applied in layers until the solution rises above the planks. The protruding mortar mass is cut off with a rule tightly pressed to the beacons, moving it in a zigzag manner.
The excess is removed from the rule with a trowel or spatula and placed where the mixture is missing. As a result, the surface of the leveling solution forms a vertical plane. After the mixture has set, the beacons are removed, and the remaining grooves are filled with plaster mortar.
Choosing plaster based on wall material
When the customer decides to level the walls with plaster, it is necessary to decide what is better to plaster the walls inside the house, what type of plaster mixture to use in the bathroom and toilet, in the kitchen or in living rooms. The type of mixture depends on the material of the surface that is decided to be plastered.
How can you plaster the walls in the bathroom and toilet? It should be remembered that for rooms with high humidity, solutions based on cement and lime are used, and there should be twice as much lime in this mixture as cement.
Before plastering wooden walls inside a house, for example, made of timber, it is necessary to strengthen a metal mesh on the surface, which will serve as a frame for plastering and will allow adhesion, since in its normal state the solution does not adhere to wood.
If the surface has significant vertical differences , it is recommended to eliminate uneven areas using shingles or installing special removable beacons. In dachas and country houses that are not intended for permanent residence, the best option for preparing walls is plaster, since drywall is destroyed under conditions of temperature and humidity changes.
To level wooden bases, mixtures with a predominance of cement and gypsum are used; it is possible to use clay solutions with a high content of plasticizers and the addition of fiber.
How to plaster the walls inside the house if the masonry is made of aerated blocks or gas silicate blocks, which are fixed with special glue? In this case, you will have to fix the plaster mesh to the surface, and plaster the aerated concrete with cement and gypsum mortars.
To figure out how to plaster walls made of foam blocks inside a house, you need to remember that the usual rough finishing with cement mortars will not work in this case due to the complete lack of adhesion. A good option for leveling foam concrete and foam block walls, mixtures with a predominance of gypsum. For working with foam concrete surfaces, lightweight mixtures of Pobedit or Glims Velur gypsum are recommended.
For leveling brick or concrete walls, cement-based mixtures are best suited, which will ensure reliable adhesion of the mortar to obtain an ideal surface for painting, wallpapering or tiling.
Plaster reinforcement
Mineral plaster compositions do not have elasticity, and therefore, like natural stone materials, they can crack at the slightest movement of the base and form cracks during the hardening process, for example, if the plaster solutions are greasy. In order to reduce crack formation and their opening, the plaster is reinforced.
The same is done when repairing large cracks. The use of reinforcement increases the strength of the finish. Installation of nets is necessary in problem areas, for example, at the junction of bases made of different materials, for example, walls made of wood and concrete. Different characteristics of materials cause them to behave differently when temperature or humidity changes. Consequently, cracks will form in the joint area.
For reinforcement, meshes are used from:
- metal;
- plastic;
- fiberglass;
The choice of material and cell size of the reinforcing mesh depends on the main purpose of the reinforcement and the installation location. If powerful meshes are installed to reinforce facade finishing or create a plaster casing for insulation slabs, then for interior finishing, as well as where the plaster layer is small, plastic or fiberglass meshes are used.
Grids are a hidden structural element located in the body of the plaster closer to the surface. If the plaster coating is thick, two or more meshes are installed. When attaching the mesh to a wall or ceiling, a gap is left between the mesh and the base, which is filled with adhesive or plaster. This is done so that there are no air bubbles left around the mesh panel. The mesh must be recessed.
To secure the mesh to the walls, its panels are stretched, nailed or attached with self-tapping screws. Adjacent canvases are overlapped. It is important to tighten only so that there is no sagging, so that the wall does not turn out crooked. Do not overtighten.
If the mesh material can corrode during a chemical reaction, for example, with lime plaster, the mesh is protected by covering it with asphalt or coal tar varnish, oil paint, or laitance and drying.
How to do the preparatory work?
First of all, it is necessary to remove all old finishing materials and plaster, and then clean the surface from sagging. The result should be bare walls.
Technology for installing beacons for plaster.
If the wall is made of brick, then to improve the adhesion of the plaster solution to the wall, you need to increase the recesses in the openings between the bricks to 1 cm.
If the wall is made of concrete and has a smooth surface, then it will be necessary to make notches on it. To do this you will need to use a chisel and a hammer. Notches should be made 15 mm long and 3 mm deep. For every 1 m² of wall base there should be about 250 notches.
If the wall was made of wood, then shingles should be installed. It is possible to use planks of thin thickness or plywood cuttings; it is better to stuff them diagonally. The result should be a frame that will hold the plaster and serve as beacons. Instead of wooden shingles, you can use a chain-link mesh. It should not be fixed directly to the wall, but to plywood strips so that the distance between the wall and the mesh is at least 3 mm.
Plaster shingles: a - intertwined shingles, b - location of reed and exit shingles.
Next, you should clean the base and room from dust and dirt.
Walls made of wood and brick will need to be moistened with water. It is recommended to use a spray bottle for this, but a broom will also work.
Concrete walls will need to be treated with concrete contact primer. For walls made of ribbed material (foam blocks or gas blocks), you will need to use a deep penetration primer. If the base absorbs water strongly, then it needs to be treated 2 times. All these actions are done so that it is possible to improve the adhesion of the base of the walls with the plaster mixture.
All further work can be done only after the primer has dried.
Preparation of the solution
There are three possible options here:
- preparing the mixture by mixing the components yourself;
- dilution of the SS composition with water or a diluent;
- mixing the finished plaster dough before use (with or without adding a small amount of liquid).
If you prepare a mixture yourself from components purchased separately, then you need to follow the sequence of mixing the constituent substances.
DSP is prepared in the following order:
- Bulk dry substances (sand, cement powder, perlite, stone chips) are placed in the container;
- stir;
- prepare the liquid separately (lime milk, water with a plasticizer, etc.);
- while stirring, gradually pour the liquid into the dry mixture until the desired consistency of the solution is achieved;
- The composition is allowed to “rest” and brew for about 5 minutes, after which it is stirred again.
Preparation of dry mixtures
Mixing the solution
Ready-made solution
If the mixture is prepared in a mortar mixer, then it is permissible to first pour some water into it, then add other components. The remaining water is added little by little, controlling the consistency of the dough.
Purchased SS are closed following the manufacturer's instructions, which are in the detailed instructions on the package. The prepared mixtures in buckets are also mixed before use to restore homogeneity to the composition. If the plaster solution is painted, it’s time to add color.
Some plaster compositions have their own nuances. For example, perlite sand is very dusty. It is moistened before kneading. In addition to knowledge about the rules for preparing the base, you will need information about how to properly apply the plaster itself to the walls, in what sequence, how long and how it should dry.
Varieties
There are three large groups of plasters, which were formed due to the purpose of the composition, its composition and other features. They are as follows:
- Standard plaster.
- Decorative type.
- Special.
The most common option is standard building mixtures. The products are easy to buy and plaster the walls. It is divided into 4 subspecies:
- Universal composition. It is made on the basis of cement, gypsum or polymers. It has excellent characteristics: it serves as a protective layer against dampness, creates a thin thermal insulation layer, and has soundproofing properties.
- Heat-protective composition. It is made on the basis of cement or gypsum. Additional materials include foamed perlite, expanded polystyrene granules, vermiculite or foam glass. Characterized by a low thermal conductivity coefficient. Allows you to retain heat in the room. There are no soundproofing properties. Further finishing is required.
- Waterproofing material. It is made on the basis of cement and polymers. Characterized by moisture-proof properties. Protects walls from moisture penetration and the formation of dampness, mold and other microorganisms. An ideal method to protect the kitchen, bath, toilet and other rooms where humidity levels exceed 50%.
- Soundproofing composition. It is made on the basis of cement or gypsum. Characterized by noise suppression. It is rarely used for private housing construction.
Which plaster should I choose for the walls in my apartment from those provided? Usually they stop at universal formulations. They have collected the advantages of each of the subspecies. But, these are not all the options available on the market.
Special blends
This type of material is characterized by additional properties due to additional components in the composition. To carry out plastering, documents for the premises with the project are required, as well as research on the chemical composition of the mixture. The process is labor-intensive, complex and expensive.
There are two types of special plasters:
- Acid resistant. Used for industrial enterprises that contain active chemical fumes. In private housing construction, acid-resistant plaster is applied as a decorative finishing layer. It is characterized by resistance to any chemical attack and is easy to care for. The surface can be cleaned with any cleaning agents.
- X-ray protective. Acts as a protective layer against various radiations that can harm the body. This is barite plaster, but it is not used for furnishing apartments and private houses due to unnecessary reasons. Area of use: radiology rooms and laboratory rooms.
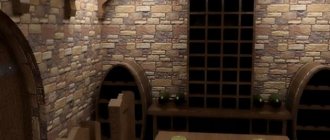
Finishing decorative mixture
Thanks to the fillers in the composition, after processing a certain texture, pattern or relief is formed on the wall. This layer can be additionally painted, even in two layers. It looks beautiful and protects the walls from negative influences. Examples of finishing: bark beetle, fur coat, lamb, Venetian plaster.
Plastering walls with decorative plaster is difficult; practice and basic knowledge are required. The finished layer is durable, strong, beautiful and practical.
How to apply plaster on walls with your own hands
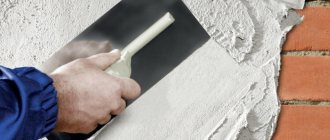
The mixture can be applied by pouring and spreading. Plastering surfaces using the first method is more dense; the finish adheres more firmly to the base. You can throw the composition with a ladle, a spatula (trowel) with a steel blade. The solution is scooped out of the container and thrown from the tool onto the base, where it lies down and sticks like a thick blot - a “slap”. Spread the dough with a spatula, trowel, or falcon.
The solution, applied to a spatula or trowel with an auxiliary spatula, is transferred to the wall with a stroke of a specified thickness. The plasterer places the tool with the dough against the wall at an acute angle, and moves it along the wall, decreasing the angle as the material is transferred to the base. If the smear begins on a previously made smear, the technique is called “wet to dry.”
If a smear begins on a dry spot and ends on another smear, the technique is called “from dry to wet.” Compliance with the techniques is important for decorative plaster. How to apply the final decorative finish can be found in another section of the site. Below we offer a detailed description of the method for performing rough finishing on concrete.
To perform improved and high-quality plastering of concrete walls, the technologies are similar. The first two stages of plastering walls are similar. The only difference is in the ending.
The first stage is spraying
For spraying when plastering, use a mortar mixture with a thinner consistency. The thickness of the layer for concrete, brick, aerated concrete, the thickness of the spray coating is 5 mm, for wood - 9 mm (with mesh).
Step-by-step instructions for spraying:
- We take the solution from the container onto a spatula or into a ladle and throw it on the wall between the beacons;
- we make sketches, filling with “slaps” an area about 100 – 120 cm high (from bottom to top);
- Having sprayed the area between the beacons, use a spatula to slightly level the “splashes” so that there is no empty space left in the area;
- we mark the surface of the layer with the sharp edge of a spatula to increase adhesion;
- we do the same, spraying to the top of the wall;
- Spray the following sections of the wall and leave to dry.
Second stage - soil
The main (base) layer applied on top of the spray is called primer. To create a thick multi-layer coating there can be several of them. For the soil, prepare a dough with a thick consistency. For application we use spatulas and a rule.
Execution of soil:
- Using a narrow spatula, place the dough from the container onto a wide spatula.
- We transfer the solution to the wall, lightly pressing it into the marked grooves of the spray.
- We remove the mixture protruding above the beacons from the bottom up using a rule, pressing it against the beacons and rocking it in the horizontal direction. We throw the solution removed according to the rule into a container or transfer it with a spatula to where it is missing.
- After running the rule from bottom to top a couple of times, we run the rule from top to bottom. After such wiring, the solution will not slide down the wall.
- We plaster the remaining part of the wall in this way.
- We wait for the solution to set, remove the beacons, and cover the formed channels with the solution.
The third stage is the finishing layer of covering
The coating composition is made with the same proportions as the base one. The consistency of a solution of normal fat content is less thick than for soil, and the sand is taken in a fine fraction (up to 1.5 mm). This mixture is easier to install and more flexible. When rubbed, it forms a smooth surface. Recommended thickness 1.5 – 2 mm.
Filling voids and applying a finishing layer
Step by step guide:
- If plastering was carried out without removing the poppies, then the covering is applied to the soil that has not yet dried. Dried soil can be moistened with a roller.
- Apply the covering, leveling it with the rule. In this case, the solution fills the resulting voids and small depressions. Excess mixture is removed.
Grouting plaster
This stage is final. The smallest errors are eliminated by grouting.
Leveling is carried out - compaction of the barely dried surface of the cover - grouting with a float. Do not press the tool too hard so as not to pull off the drying layer. Smoothing is carried out in a circular motion (grinding “in the round”). Only in the corners is the grater held and parallel to the corner. On elevated areas they press more, pressing down; on depressions the pressure is reduced.
Excess protruding mixture that collects at the corner of the grater or trowel is cleaned off. The drying layer of covering is sprayed with water from a spray bottle from time to time or moistened with a soft brush. It is possible to grout in a circle using a very small amount of mortar
After grouting, smoothing is immediately performed - grouting "in acceleration". Straight-line vertical movements (up and down) are made with a clean grater with rounded corners. The grater is pressed with equal force, without removing it from the surface. They process this square by square (areas of approximately 1 m2).
Smoothing (an optional operation) is performed in the same way as grouting, only it is done with a rubber, metal or felt-wrapped float. Treat the surface twice. Once, moving the iron (in one direction) from top to bottom, the second time - horizontally.
Finishing
Why and how to sand plaster? This procedure is performed to remove the slightest protrusions remaining after plastering or puttying, if painting or wallpapering is planned for the final finishing of the apartment. The paint layer is thin and reveals even the most minor flaws. They are removed by grinding.
For manual sanding, use sandpaper, sanding mesh or a sanding block. For wallpaper, it is enough to sand the surface with 60-grit sandpaper. For paint, you need to sand it again with 120-grit sandpaper. The result is a polished surface. After sanding and removing dust, plastering the walls with your own hands can be considered complete. A little information about how corners are made.
What is better to use: plaster or putty
It must be said right away that their purpose and composition are different.
Plaster
Refers to universal finishing materials. It can be applied to untreated concrete or brick surfaces, but with preliminary priming. The basis is coarse-grained particles. The thickness of the layer can reach 5 cm. The likelihood of cracks appearing after drying is minimal. Read more about different types of plasters here.
Putty
Rice.
1. Leveling the walls with putty. It is a powder or paste based on chalk, plaster, carpentry or flour glue and laundry soap. Purpose – final leveling of apartment walls before finishing with mandatory grinding and polishing.
Due to poor adhesion, the putty is not intended for application directly to walls. With its help it will not be possible to eliminate large differences in heights.
Once again, it should be repeated that plaster and putty are not interchangeable. The first helps eliminate depressions, the second prepares for subsequent finishing. At the same time, manufacturers offer types of plaster suitable for finishing decoration. This applies to Venetian, stone, silk and other varieties. Putty in any form is not used for finishing. It acts only as a basis.
Plastering corners
The words “husks” and “usenki” will not say anything to an ignorant person. Meanwhile, these are professional terms for plasterers, denoting internal and external corners, respectively. The technique for plastering them differs from applying plaster to walls.
The main techniques used by plasterers:
- using a profile corner;
- with lighthouses;
- with a counter-piece (perforated corner with an aluminum base));
- with serpyanka (ribbon mesh made of fiberglass or synthetics with an adhesive layer);
- without a contrarian.
Counter-shuls can be used to produce husks and usenki.
Step-by-step technology for making an angle using a contra-sharp:
- Cut the perforated corners to the required length.
- A contact solution is applied to the corner in a thick layer (the mixture is stretched along the entire length along the inner corner).
- The corner is placed against the corner, pressed most tightly in the most “protruding” place, then using the rule, the counter-shoulder is pressed so that it stands strictly vertical (check with a level or plumb line).
- The excess mixture released during installation is removed with a spatula. After this, the mixture is allowed to harden.
- After installation, the corner is aligned with the wall using a test. The corner shelves end up inside the plaster mortar. The corner counter protects the protruding corner from damage.
Applying contact solution
Installation of the corner
Removing excess solution
Aligning the corner with the wall
Making an external corner along a profile corner:
- Cut the profile corners to the required length;
- Beacons are installed on adjacent walls (the corner is plastered before work on the wall is completed);
- A contact solution is applied to the corner in a thick layer (the mixture is stretched along the entire length along the inner corner).
- Next (thicker) soil is applied on both sides from the corner to the nearest beacons.
- The corner is placed against the corner, the mesh is pressed against the mixture, using the rules, the solution is leveled along the beacons on one, then on the second wall.
- The excess mixture removed by the rule with a spatula is added to where it is missing.
- The profile corner and the mesh are inside the plaster layer.
Types of plasters
All types of plastering mixtures are divided into three groups: standard, special and decorative. Standard mixtures are sold in markets and specialized construction stores. This is the most popular type of plaster. In turn, standard formulations are divided into 4 types.
| Type | Compound | Properties |
| Universal | It is based on cement, gypsum or resins with the addition of polymer compounds. | This plaster protects the house from dampness and heat loss, and also has noise-absorbing properties. |
| Waterproofing | Base: cement with added polymers | Reliably protects the room from moisture and mold. Ideal for bathrooms and kitchens. |
| Soundproof | The basis of the plaster is gypsum or cement | Rarely used in residential areas. Popular for finishing cinemas, concert halls, sports and industrial premises. |
| Heat-protective | The base is gypsum or cement. Foamed perlite, foam glass, vermiculite and granulated polystyrene foam are also added. | Retains heat very well. Used for thermal insulation of the entire room and utilities. It does not have soundproofing properties and requires the application of finishing plaster. |
How to check the quality of wall plaster
The accuracy of the finishing is checked using a rule or a long two-meter strip. When carrying it along the surface in different positions (horizontally, diagonally or vertically), deviations from the plane are detected visually. In the dark, you can check the quality of the plaster by directing the flashlight beam parallel to the plane of the wall. Long shadows will reveal protruding irregularities.
By measuring and comparing the two diagonals of the room, you can check whether the corners of the room are right. The diagonals must be equal in length. The distance between parallel walls is the same along their entire length. The correctness of the angle can be checked by drawing vertically along a square with a side length of 50 cm.
The quality of the finishing surface is determined visually. There should be no darkening or other kinds of stains on it. The sashes of windows, vents and doors must open without interference. The areas around sockets, switches and door frames, along the perimeter of the floor must be level so that the overlay strips, baseboards and trims fit tightly against the wall.
If you are planning to renovate your apartment, but you do not have experience covering walls with plaster yourself, you should not despair. After reading the information presented and watching the videos, you have gained an idea of the main types and techniques of plastering work.
Detailed information about plaster compositions and how to apply decorative solutions can be found on the website. When contacting plasterers, you will know what to pay attention to, how the work should be performed, and why this or that stage is needed.
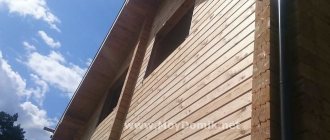
How to plaster facade walls
Plastering the walls of the facade is not much different from the technology inside the room. The difference is in the size of the walls, and the uselessness of lighthouses. The corners of the corners of the building and the window corners act as beacons on the façade of the cottage. We will pull the plaster along these corners. I’ll answer the question right away, “which plaster is better for the facade?” We use exclusively cement, it can be special for facades, or it can be universal. You cannot plaster the façade with gypsum materials! I allow lime plaster to be used only on the base of a building, where there are large differences and high humidity and serious reinforcement is required (although there are different cases, and many where this is not required).
The surface of the facade must be prepared. if your house is insulated, then it should already be covered with reinforcing mesh. All façade corners must be exposed and everything must be primed and dried. Now we mix the cement composition of normal consistency (so that it spreads well), preferably working in cloudy weather so that the solution does not dry out.
Apply the solution to the façade in a thick layer using a trowel 40-50 cm long. We pull together everything that was applied in the corners with the rule, the longer, the better. If there are no corners nearby, we tighten the large holes and smooth them out with the bulk of the mortar. wait until it dries a little and rub it with a foam grater (40-50cm long).
If you are asking the question “is it possible to plaster in the cold in winter?”, then the answer is definitely no! Even if there is a special plaster for working in cold weather, I personally do not recommend working outside in winter; plastering at 0 degrees is also impossible. after thawing, everything may fall off and lose its properties. You can plaster after +5 degrees, at least that’s what it says on the bags. But at night the temperature can drop lower, so do not take risks, but carry out work in good weather. Do not plaster in direct sunlight.