Choosing a suitable location
The barn can be combined with other outbuildings, or erected as a separate object. In this case, you will have to use a number of recommendations:
- The barn should be conveniently located in relation to other buildings.
- Do not be located on an area reserved for garden crops.
- Do not violate the general principle of landscape organization.
- Do not contradict the requirements for sanitary and fire regulations.
The owner has the right to resolve the first three requirements independently, but as for the last, a number of requirements must be taken into account. This is especially true if the barn is intended to contain small pets or poultry.
According to requirements:
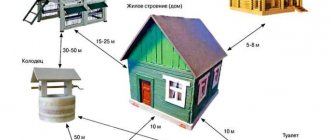
- The outbuilding must be located at a distance of 4 meters from the neighboring property.
- Should be located at a distance of 15 meters from a residential building.
- At a distance of at least 30 meters from a source of drinking water.
It is advisable that the barn be located on a hill, otherwise it may be flooded by melt or rain water. The shed can be positioned so that it serves as wind protection for garden crops.
It is also necessary to take into account the fact that the shed may disturb the neighbors, covering their area from the sun's rays. If this happens and the neighbors complain, the court will force the building to be demolished or moved to another location.
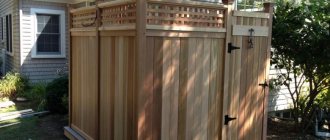
Materials and technology
Due to the low requirements for both technology and materials, the construction of a barn can be ensured by:
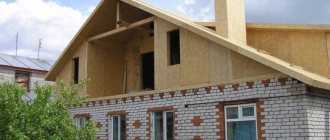
- Frame technology.
- Using concrete blocks.
Frame technology
This type of technology allows you to build any structure in a matter of days. To do this, it is enough to install and secure the frame on the prepared base; if necessary, fill it with insulation and decorate it with finishing materials.
Advantages of frame technology:
- The design turns out to be lightweight, so it does not require a powerful foundation; it is enough to get by with a pile or columnar foundation.
- The structure is erected quite quickly, since there is no wet work.
- Upgrading can be done with any decorative material.
- The room retains heat perfectly.
The frame structure, in addition to the fact that its construction requires a minimum of time, is also considered an economical structure. The disadvantage of this design is problems with fire hazard, since the main building material is wood.
Important point! You can increase the resistance of a structure to fire if it is treated with fire retardants and non-combustible materials, such as mineral wool, are used as insulation. It is under no circumstances recommended to use polystyrene foam, although it has excellent thermal insulation characteristics.
Alternatively, the frame can be sheathed with oriented strand boards, since this type of finishing material is quite practical and affordable. The boards are made from wood chips and polymer resins. Such a shed is used for storing gardening equipment, as well as for keeping animals in the summer. If the structure is also insulated, then animals can be kept at any time of the year.
Covered with OSB boards
Although OSB boards are considered moisture resistant, they are not intended for direct contact with moisture. In addition, direct sunlight destroys the polymer adhesive. In this regard, slabs require additional measures to eliminate these problems. As an option, the slabs are coated with waterproof paints or enamels.
Application of concrete blocks
Cinder block shed
Budget construction requires the use of budget materials, which include foam, expanded clay and slag concrete. Despite their (relative) cheapness and availability, such blocks are quite strong and durable, and are characterized by low thermal conductivity. The blocks, 20 cm thick, have the same characteristics as brickwork, almost half a meter thick. A room made of such blocks can also be used in winter.
If such blocks are used to build a barn, a strong foundation will be required compared to the frame option. As a rule, a strip shallow foundation with reinforcement elements is suitable for such a structure. The laying of concrete blocks is carried out according to the principle of bandaging the seams. In other words, the laying technology is the same as laying brick walls.
Important point! Walls made of porous materials, which are characterized by low frost resistance and high moisture absorption, require mandatory external finishing.
Foam block shed
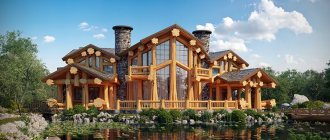
An option that combines high durability and reasonable cost, while foam concrete has very good thermal insulation properties, which will help avoid work on insulating the barn. Using siding or decorative plaster for finishing, ridding the walls of gloomy gray shades, will add attractiveness and presentability to the barn.
A foam block shed is an option that combines high durability and reasonable cost
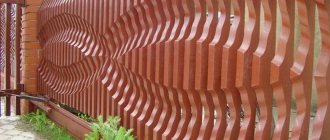
Brick barn
Schemes and drawings of sheds
Despite the fact that this is a barn, the structure is considered capital, so it is necessary to have a drawing as a basis for calculating materials and as a basis for construction. When drawing up a diagram, it is necessary to take into account a number of factors that will affect the final result, including in terms of saving materials and costs. It is imperative to take into account the actual dimensions of building materials in order to reduce the amount of waste. Therefore, the dimensions of the shed must be compared with the dimensions of both building and finishing materials.
As a rule, the drawing is made taking into account all projections, since all facades may have some differences. In this case, it is necessary to indicate all dimensions, both of the entire structure, and the dimensions of openings for windows and doors, as well as the thickness of the walls. If there are any structural elements that require special attention, then they are depicted additionally, indicating their technical features, indicating the dimensions in more detail.
Basically, the barn is not distinguished by the complexity of its layout, so it is necessary to provide all partitions if it is necessary to delimit the room depending on their purpose. In each room, depending on its purpose, at least one small window should be provided. Windows are especially necessary if you plan to keep animals in the barn. Access to sunlight has a beneficial effect on the development of animals and birds.
Construction of the foundation
If the structure of the barn is frame, then you can completely get by with a columnar or pile type of foundation. Block walls require a more powerful and reliable foundation. Such a foundation can be a shallow strip foundation, although in any case the type of soil should be taken into account. If the soil is clayey and heaving, then it is better to abandon the pile or columnar foundation altogether. During seasonal soil movements, the supports may simply be squeezed out or skewed. On weak peat bogs it is better to give preference to a pile foundation.
Marking stage
At this stage, the foundation is marked on the ground using a tape measure, a long cord, and stakes. Correctly, and most importantly, you can quickly mark the foundation using: Theodolite. Start marking from the longest wall of the building, fixing its position with a cord and pegs. After this, measurements are taken using a tape measure and, using stakes and rope, the position of all other walls is noted.
- Egyptian triangle. To do this, you need to pull the cord, after which a point is fixed at a distance of 4 meters from one of the base corners. Then from this point, 3 meters are measured in a perpendicular direction. There should be a distance of 5 meters between points. The second point is marked with a peg, adjusting its position. From this point further construction of the foundation is made.
Marking for the foundation
The correctness of right angles is controlled by measuring the distance between adjacent but diagonally opposite corners. If the distance is the same, then the angles are even.
More accurate fixation of dimensions is carried out using cast-offs, which are temporary posts and crossbars made of wooden slats, which are carried beyond the dimensions of the foundation. Nails are nailed to them, and a rope is pulled, which is removed before excavation work begins.
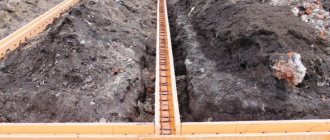
The process of constructing a strip foundation
The construction of a strip monolithic foundation consists of the following stages:
- Digging a trench half a meter deep and 40 cm wide.
- Pillow rashes made of crushed stone and sand, 10 to 20 cm thick, with compaction.
- Forming formwork from wooden boards.
- Laying the waterproofing layer.
- Installation of a metal frame (rebar).
- Concrete pouring.
After finishing the pouring, the foundation is covered with a film to avoid premature drying. This is especially true in hot weather. Alternatively, periodically water the foundation surface with water. After a week or a week and a half, it is permissible to begin further work. By this point, the concrete will already be able to gain initial strength.
As an option, not a monolithic type of foundation, but a prefabricated type of foundation, assembled from concrete blocks, is suitable. In this case, you should not use porous materials that have increased moisture absorption, which will lead to rapid destruction of the base.
Columnar foundation
To build this type of foundation, brickwork, concrete blocks, asbestos-cement or PVC pipes with a diameter of up to 150 mm, railway sleepers, etc. can be used as columns. Such posts are installed in the corners of the building, as well as every one and a half meters along the perimeter and under partitions.
If the columns are made of blocks or bricks, then they are made like this:
- First, holes are dug up to 40 cm deep.
- Sand is poured into the bottom of the pit in a layer of up to 20 cm and compacted.
- After this, blocks are laid or brick columns are laid out, measuring 40x40 cm and about 60 cm high.
- As the solution hardens, the columns are coated with waterproofing compounds.
A columnar foundation made of pipes is made like this:
- Using a hand drill, holes are drilled in the ground up to 1 meter deep.
- A layer of sand 10 cm thick is poured at the bottom of the wells.
- Waterproofing in the form of roofing felt is laid on top of the layer of sand.
- The pipes are installed and fixed.
- Fittings are placed inside the pipes, 3-4 pieces each.
- The inside of the pipes is filled with concrete.
- After the concrete has dried, the pit sinuses are backfilled.
In this case, the pipes act as formwork. If the soil is not problematic, then concrete is poured immediately into the prepared well with waterproofing.
Pile type foundation
Installing piles is a very labor-intensive process that requires special tools. Basically, screw metal piles are used, which are screwed into the ground. Here you cannot do without special equipment or special devices with levers for effort.
After installation, the piles are leveled by cutting, after which the pile cavity is filled with concrete. It is advisable to carry out compaction using a vibrator. After a week, when the concrete has hardened, work can continue.
Barn without foundation
If you plan to store only gardening tools in the building, which does not require a massive structure, then such a shed can be built without a foundation. Despite this, the structure will still have to be raised from the ground to a small height. For this you can use a wooden beam. The construction of such a shed does not require the construction of a foundation, which means you can save money on it, and there is no point at all.
In this case, the building area should not be more than 20 square meters and have a height of no more than 2 and a half meters. This is necessary so that the building has the lowest windage, otherwise a strong wind will easily overturn it. In this case, you need to take into account the nature of the soil, and it is better to equip the place with good drainage so that moisture does not accumulate under the shed, which can lead to rapid destruction of the beams. Such a shed will stand for many years on sandy soils that quickly absorb precipitation.
Naturally, the service life of such a building can be increased if the lower part is treated with antiseptics.
To build a shed without a foundation, you must adhere to a certain sequence, for example:
- First, the site is prepared by leveling, compacting and forming a drainage layer of crushed stone and sand.
- It is better to bury the posts in the corners into the ground to a depth of about 65 cm.
- To assemble the frame you will need a beam measuring 50x100 mm.
- It is enough to cover such a structure on all sides with planed boards, after which it can be painted.
The nature of the roof is single-pitched, made of corrugated sheets. This design turns out to be quite light, so the load on the walls and the ground is minimal. The design of the shed is not only simple, but also economical.
Preparatory stage
At the initial stage it is necessary to make a sketch or drawing. After all, any, even the simplest building needs at least some kind of project. First of all, you should decide on the size of the shed. Typically, a length of 2 m, a width of 1.5 m, and a height of up to 2 m are sufficient. The roof can be designed as a pitched roof. Having assigned suitable dimensions, it is easy to draw a sketch.
Drawing of a barn made of boards without a foundation
Then there is the question of choosing the material. Here we have already decided in advance that these will be boards. But what format? It is better to use unedged material - it will cost less. However, some of the boards will have to be purchased in the form of edged blanks. Good savings can be achieved if you make walls using the “toothed profile” principle. Sometimes this method is also called “herringbone” or “overlapping”. That is, unedged boards will be slightly recessed, and edged boards will be on the facing side. The main advantage is that you don’t have to worry about the boards drying out, since their edges don’t meet each other. However, first things first.
It is also necessary to calculate the length and number of boards. Let’s take as an example the dimensions we have already noted. The length and height of the barn are 2 m, and the width is 1.5 m, while the roof is pitched. First of all, we will need four vertical beams 2 m high with a margin of half a meter for digging into the ground. In addition, two of them must be longer to create a roof slope. Total: 2 bars 100x100 2.5 m each and 2 bars 2.8 m each or all bars 2.8 m each with a margin.
To tie these racks it is necessary to purchase beams of section 50x50 in the amount of 4 pieces of 2 m and 4 pieces. 1.5 m each, in accordance with the length and width of the barn, or all 2 m each with a margin.
To find out the number of boards for cladding the walls, you need to calculate the perimeter of the barn. We get P = 2+2+1.5+1.5 = 7 m. We will use boards 30 mm thick and 0.3 m wide. For unedged blanks, this value will be the minimum possible size. Thus, it turns out that we will need 7/0.3 = 23.3 pcs. So, you need to prepare 24 boards about 2.3 m long. Of these, 12 are edged.
The same lumber is suitable for roof sheathing. Taking into account the roof overhangs, the slope and the width of the building, which is 1.5 m, the length of the roof will be about 2 m. Since the main dimension of the barn is also 2 m, we will cover approximately 1.5 m with sheathing. This means that for the roof we will need 1.5/ 0.3 = 5 boards with a length of at least 2 m. Total: the total number of boards with a reserve will be 30 pieces, of which only 12 pieces are edged.
However, we still need to lay out the floor. And for this you only need cutting material. Moreover, you will have to cover the entire surface area with dimensions of 1.5 x 2 m. That is, you will need to prepare another 1.5/0.3 = 5 edged blanks. Then the total quantity will increase to 35 pieces, and the sum of edged boards to 17 pieces.
We will lay roofing felt on the sheathing according to the dimensions of the barn, that is, 1.5 x 2 m. Total: two meter-long paths of 1.5 m each. This means that we take the amount of roofing felt equal to 3 m. On top of this laid out material we will attach a sheet of corrugated sheeting with dimensions like a barn - 1.5 x 2 m.
It remains to choose the appropriate material for insulation. You can use mineral wool for this purpose. But it pricks your hands unpleasantly, and its cost is quite high. There is another very cheap and environmentally friendly method of insulation. It is enough to get a few bags of sawdust somewhere. This simple, almost free material is mixed with a small amount of lime and placed in plastic bags. And then you can fill the walls with these bags.
Advice. A few weeks after the shed is built, the insulation will probably shrink. Then it’s better to take a little more material and fill in the gaps that arise.
The amount of insulation can be calculated by determining the area of the walls. Since our perimeter was 7 m, the total area is approximately 7x2.3 = 16.1 m2. If we now take the thickness of the insulation to be approximately 0.1 m, then the total volume of the material will be approximately 1.6 m3.
Here is a summary table in which, for clarity, all materials are indicated with quantities relative to our example:
| Material used | Size | Quantity |
| timber | 100 mm x 100 mm x 2.8 m | 4 things. |
| timber | 50 mm x 50 mm x 2.0 m | 4 things. |
| Unedged board | 300x30x2300 mm | 18 pcs. |
| Edged board | 300x30x2300 mm | 17 pcs. |
| Ruberoid | track width 1 m | 3m |
| Corrugated sheet | 2 x 1.5 m | 1 PC. |
| Insulation | 0.1 m | 1.6 m3 |
You need to purchase as many nails as possible, about 1 - 2 kg. If there is a shortage of material resources, some of the boards can be torn off from brick pallets, if you got them for free. After all the materials have been prepared, you can safely get down to business.
Which roof is better
When installing the rafter system, the same materials are used as for the frame. After manufacturing the rafter system, it is strengthened with the help of lathing, which is made with an inch board. You should not use wane, as such boards quickly become unusable.
To make a roof in a barn, you can install:
- A pitched roof, when the roof rests on opposite walls, and the heights of the sides have different heights. A pitched roof is considered optimal if the span does not exceed 6 meters.
- Gable roofing, when the roof rests on opposite walls at the same height, while the roof slopes are connected at the highest point, called the ridge. It is used for span widths greater than 6 meters.
The angle of inclination of the roof slopes depends on factors such as the intensity of wind and snow loads.
For example:
- The more intense the wind loads, the smaller the slope of the slopes.
- The heavier the snow load, the greater the slope should be so that the snow that accumulates on the roof melts off faster.
In addition, it is necessary to take into account the recommendations of the roofing material manufacturer.
Shed with pitched roof
Since large barns are not built, you can use a pitched roof, but it is necessary to ensure a minimum angle of inclination for a particular type of roofing material.
For example:
- Slate will require at least 20 degrees.
- For a soft roof, you can get by with 5 degrees.
- For corrugated sheeting, this parameter is 8 degrees.
- For tiles this is at least 25 degrees.
If a barn is being built from concrete blocks, then a support beam-mauerlat should be installed and secured on opposite walls. As for frame structures, the role of support beams is performed by the upper strapping beam.
Rafter boards are installed starting from opposite walls. The pitch of laying the rafters depends on the size of the beams, so for greater reliability, all elements are connected in pairs. Fastening to the support beam is carried out using a tie-in, as well as using metal plates.
The final stage is installation of roofing material:
- Slate is fastened with nails to the upper wave, metal tiles - with roofing screws to the lower one.
- The sheets are laid with longitudinal and transverse fly patterns.
- For better sealing of joints, EPDM rubber gaskets are used.
- The minimum weight of the roof is 50 mm for slate, 100 mm for thin sheet materials.
Barn with gable roof
The technology of assembling a rafter system of 2 slopes is no different. The only differences are that the ridge knot is formed:
- With an overlay at the top of the corner.
- With additional spacer bolt.
- With fastening of rafters at the point of the ridge run.
- Attached to the top of the ridge beam.
Although a gable roof is more complex, it is more resistant to wind loads. In addition, there is enough space under the roof to be used for various purposes.
Assembly diagram of a gable roof of a barn, dimensions 3.5x3.65 m
about the village - MULTIFUNCTIONAL BARN / HOW TO MAKE IT WITH YOUR OWN HANDS EASILY / agricultural vlog / EVERYTHING IN YOUR MIND
Do-it-yourself utility block 5x3
▲Frame house $500\Do it yourself frame house for 30 thousand rubles
Floor is an important element of construction
The floor in a pigsty requires special attention if you want it to be not only warm, but also durable. You can do it:
- concrete;
- brick;
- wooden.
Concrete floors are practical and durable, and are very easy to clean. However, if you plan to keep pigs all year round, then such a foundation is not the best choice. The fact is that concrete tends to cool quickly, therefore, animals will freeze and gain weight much more slowly.
Brick flooring is considered the “golden mean” when it comes to thermal insulation and durability. That is why this option is often used by farmers. But this also has its drawbacks: laying a brick floor yourself is quite difficult and costly from a financial point of view.
Wooden flooring is the most popular and affordable, usually made from smooth, thick boards. The pigs will be quite comfortable on it, even when the temperature outside is sub-zero. However, the durability of such a coating leaves much to be desired.
The wooden floor in the pigsty provides dryness and warmth well, but wears out quite quickly
There are also combined flooring options that allow you to create a warm and at the same time durable surface. Let's consider one of them.
First you need to knock down a dense wooden board and drill holes in it with a diameter of 10 mm. Then you can begin to implement the second stage of work, the essence of which boils down to pouring concrete onto a surface that has a slope of 5 degrees towards one of the walls. A concrete trench is made under this wall, which in turn is slightly inclined towards a special container (“bath”) for waste. Next, the shield, which was discussed just above, is tightly laid on the screed. Thus, you get a warm floor that will last longer than a conventional wooden covering. The pigs' urine will flow through the drilled holes towards the drain due to the subtle slope of the floor. When the wooden frame becomes unusable, it can be replaced with a new one, which is much easier than re-laying the floors.
The owner of the farmstead must understand that such a floor should be made only in the case when the room for pigs is supposed to be heated during the cold season . In an unheated pigsty, animal waste in cold weather will form ice on the surface of the panels and under them, which will negatively affect both the sanitary condition and the microclimate of the room.
You can watch how to build a pigsty with your own hands in the following video: