Residents of regions with little snow, where no more than 10 cm of precipitation falls during the winter, can calmly admire the thin layer of snow dusting their buildings. But for those who live in the middle zone and in the north of the country, a roof with snow does not seem cute at all.
Removing snow from the roof becomes a real nightmare for owners of dachas and country houses. After all, if you hesitate and miss a heavy snowfall, a greenhouse can fold in half under the load of frozen water, or the roof of a barn or house can break. And unplanned snow falling from the roof can lead to a lot of troubles - from broken ebb and flow to blocked doors.
Why do you need to clean your roof?
Freshly fallen snow is an excellent insulation material that reduces heat loss from the building through the roof. But as it accumulates, settles and becomes denser, it carries serious dangers:
- Firstly, heavy snowdrifts can damage the rafter system and lead to its collapse. This is especially true for old houses, where the wood has already rotted from time to time or been damaged by wood borers.
- The second threatening fact is frequent leaks in the spring or during a thaw. The ice crust forms a strong shell over the melting snow. As a result, pressure increases in the thickness of the snow-water mass, and water instantly rushes into any, even the slightest, cracks.
- The third reason why you need to clean your roof is spring floods. Flowing melt water can wash away the soil under the foundation and cause uneven settlement of the house. In regions with a heavy snow load, it is recommended to remove snow from the yard. If it is impossible to take it out with special transport, then at least take it further out into the street.
When snow avalanches occur spontaneously and icicles fall, there is a possibility of injury, damage to cars standing below, and gutters protruding from the façade of structures. Therefore, removing snow from the roof is an important procedure that needs to be given special attention.
Rules
Falling icicles
Do not go close to buildings and premises where ice blocks hang from the roofs and snow deposits are visible. Keep an eye on the children. Explain to them the dangers of ice on the roof . In case of heavy snowfall, especially if the snow is sticky and wet, do not linger at the entrance. Walk quickly to a safe distance of 5 m.
When approaching the building, take the time to look up and make sure there is no ice hanging from the canopy. You should not walk along the walls of buildings. The safest route is on footpaths. If you see fences and a sign about snow removal from roofs, go around this area. Listen to the instructions of utility workers.
If previously fallen snow or frozen puddles from dripping icicles are visible on the ground, then this is a warning sign that it is better to avoid this place. It is potentially dangerous.
How to clear snow from your roof
The most common roofs in private housing construction are pitched; flat structures are much less common. The optimal angle of inclination of the slopes ensures unhindered drainage of sediments, but this is fully true only for water in the liquid phase. With alternating frosts and thaws, ice forms, onto which wet snow sticks, sometimes accumulating in alarming quantities.
There are various ways to remove snow from the roof of a private house. The choice of option depends on the number of storeys of the building, the possibility of accessing it from the attic or attic. In some cases, you can clean the coating from the ground without going up to a height.
The first method is the old one
You will need a snow shovel (plastic, wooden), a hammer or a sledgehammer to break ice build-ups. It’s good when the roof is equipped with a hatch or dormer window, from where it will not be difficult to get out yourself and pull out the tools. Otherwise, you will have to use a ladder, which is unsafe at high altitudes.
Important. In any case, it is not recommended to clean the roof alone without help. You need to work with insurance. To do this, tie it with a strong rope or fasten it to a mounting belt.
Method two - with a special scraper
With the help of a simple device you can remove snow from the roof of a house, gazebo, shed, garage or shed. Manufacturers produce special snow removal equipment - scrapers or scrapers - with a metal telescopic handle, the total length of which can reach 6 m.
The tip is made of plastic or aluminum. It is recommended to clean metal tiles with a polymer coating, soft roofing made of ondulin or flexible tiles with a scraper with a rubber pad.
The design can have more than just the shape of a traditional scraper. The original idea of cutting snow rather than moving it is used in frame scrapers. The essence of the method is that the snow mass, when the frame-knife moves, falls on a strip of film material attached to the lower contour. The cut layer of snow smoothly slides down.
Method three - using a rope
This option is used for removing soft, not yet compacted snow. One end of the rope is fixed to a protruding roof element, for example, a chimney or ventilation pipe, the second is laid around the snow-covered area of the roof as close as possible to the ridge and lowered down.
When pulling the twine, the layer of snow is cut and shifted. You just need to quickly move away so as not to be covered by an avalanche.
This method can be used on roofs of a fairly simple configuration and a small area. It is advisable to carry out the event together - one person secures the rope on the roof, the other gradually pulls it from below.
The fourth option is sawing
If the snow is very dense and hard, you can’t pick it up with a shovel, much less with a rope. The compacted mass can only be cut.
This must be done very carefully, in small sections. They begin to develop the formation from below the cornice and gradually move towards the ridge. Each piece is first sawed along the borders, not reaching 10-15 cm from the roofing, and then thrown down.
To cut snow, use a hand saw with a gasoline or electric motor. When working, it is necessary to observe safety precautions. Safety harnesses or ropes are required. If there are snow guards on the roof, you need to mark their location in advance.
Methods of preparation
Roof preparation occurs in several stages :
- Cleaning the roof from dirt and debris.
- Assessment of the condition of the roof and rafter system and, if necessary, repairs.
- Checking the condition of the attic and insulating it if necessary.
- Laying the heating cable.
- Installation of vibrators.
- Installation of snow retainers (snow catchers).
Cleaning the roof from dirt and debris
The difference between a clean roof and a dirty one is that any precipitation comes off much easier . Therefore, cleaning the roof makes it easier for snow and ice to move across it.
If the roof is covered with moss or some kind of dirt, then ice growths quickly form on it, which interfere with the movement of snow. Even if there are automatic roof cleaning systems, moss and dirt, not to mention various branches and sticks, make it very difficult to remove snow and ice.
Another problem associated with debris and dirt is the inability to properly clean the roof in winter, even manually. Called climbers or housing office workers will not be able to cut off the ice around these contaminants, and without removing these growths, it will not be possible to properly clean the roof.
Therefore, the roof is cleaned of debris and dirt twice a year - in the spring, after the snow melts, and in the fall, before the first snow falls.
Where does debris and dirt come from on roofs? In any populated area, the air is filled with dust, that is, highly crushed earth or clay.
When it rains, drops of water carry dust particles with them and bring them to the roof. The water then evaporates, leaving the dissolved soil behind.
Over time moss begins to grow , as well as other unpretentious plants, because their seeds are also transported by air from place to place. Sticks and branches fall onto the roof during a strong wind, which tears them from the trees and lifts them from the ground, throwing them onto the roof.
Therefore, regular cleaning of the roof from dirt is mandatory.
Cleaning is carried out using shovels and brooms . Then they use a broom and shovels to collect soil and various debris and throw it down.
It is important to follow safety precautions - be sure to fence off the area of the sidewalk under the roof while cleaning it.
Ideally, after such cleaning, rinse the roof with a stream of water , but this is not always possible.
Assessment of the condition of the roof and rafter system
During this operation, a specialist or experienced roofer carefully examines the condition of the roof and rafter system.
A thorough inspection can reveal various types of malfunctions or damage.
All identified defects must be eliminated before the onset of frost.
Such malfunctions include:
- cracks and holes in slate or tiles;
- damage to the protective coating on the metal;
- rusted areas of metal;
- delamination or swelling of the soft roof;
- dampness under skates;
- cracks or other damage to rafters ;
- cracks and other damage to retaining bars ;
- cracks or other damage to sheathing boards .
Roof repair
During roof repair, all detected damage is eliminated. Broken or cracked slate is replaced with new one .
If this is not possible, then a piece of the required width is sawed off or broken off from the old slate and placed on the damaged area, moving it under the top sheet of slate.
Such repairs are permissible only in the spring, and in the fall the temporary patch and damaged slate must be replaced .
Roof tiles with cracks or holes are replaced immediately.
On a flat soft roof, the damaged area is cut out and roofing material is laid in several layers.
On pitched roofs with a bitumen-based coating, the damaged area is cut out and replaced with a new one, after which another layer is applied along the entire length of the roof.
This method of repair is guaranteed to protect against leaks .
To replace damaged deck boards, entire sections of the roof will have to be removed. The slate, metal and tiles are then laid back, and the soft roofing material is re-laid.
Damaged elements of the rafter system are replaced either with or without dismantling the roof, depending on their location.
To change the rafter, you need:
- remove the entire roof along it;
- disconnect the sheathing boards from the rafters;
- support the sheathing;
- cut out the damaged section of the rafter or pull it out entirely;
- install repair linings or the entire rafter.
Damaged supports are knocked out of their places and replaced with repair ones; there is no need to dismantle the roof for this.
To replace the ridge beam you need:
- remove the roof around it;
- remove the sheathing next to it;
- cut the timber in the area of the rafters either in the damaged area or along the entire length;
- remove the cut pieces;
- remove the fasteners from the rafters;
- put the entire end or repair beam in place;
- if a repair beam is installed, then apply reinforcements to it;
- attach the rafters to the ridge beam;
- lay the sheathing;
- lay the roof (soft roofing must be laid with an overlap on an undamaged roof; for this, roofing material is laid not vertically, but horizontally).
Attic check
One of the main reasons for the rapid appearance of ice is weak or damaged insulation of the ceiling of the last floor.
The heat rising from rooms or apartments heats the air in the attic, causing the roof to heat up.
The snow melts, and at night, when the air temperature drops noticeably, the water spread over the roof freezes , turning into ice.
Ice thickness increases as you approach the edge of the roof and is greatest at rain gutters.
When inspecting the attic, it is necessary to check the condition of the insulation and the serviceability of the ventilation windows.
However, insulating only the lower part of the attic cannot reduce heat loss in apartments to an acceptable level, because the attic must be well ventilated , which means the temperature in it will be only slightly higher than the street temperature.
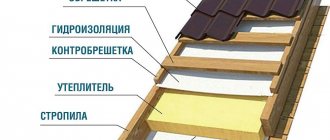
To reduce heat loss in apartments on the top floor, it is necessary to insulate not only the attic, but also the roof.
Insulation, which is polystyrene foam or mineral wool, is placed between the rafters, protected from condensation using various films. After such insulation, the temperature in the attic will be noticeably higher than the street temperature , which will lead to a reduction in heat loss from the apartments on the upper floor.
Another result of such insulation will be a decrease in roof temperature , because the warm air of the attic will no longer affect it. Therefore, proper insulation of the attic increases the comfort of living in apartments on the upper floors and reduces the heating bills of their owners.
Proper roof insulation reduces ventilation requirements, so only small openings are enough , which cannot seriously affect the temperature in the attic and, especially, in the room.
All this will allow you to save your time and nerves, finding out who should knock down dangerous icicles from roofs and balconies.
Laying the heating cable
Heating cable is used to combat ice and icicles , as well as to heat gutters and drains.
It can be installed on any type of roof.
Usually it is used to heat the lower part of the roof slopes (30–60 centimeters); this is associated with high energy consumption.
An inexpensive heating cable consumes about 180 watts per meter of length, while a more expensive self-regulating cable consumes 20–40 watts per meter of length.
The advantage of the heating cable is that after it is turned on, only icicles fall to the ground, and not large blocks of snow. After all, the bulk of the ice melts, turning into water and flowing down the drains.
A serious disadvantage of a heating cable is its high price and high electricity consumption. To protect the hipped roof of a house with an area of 100 square meters and dimensions of 10x10 meters, at least 100 meters of cable .
The average price of an inexpensive and not very high-quality cable is 200 rubles per meter, that is, you will have to spend at least 20 thousand rubles .
In addition to the cable itself, you will need various electrical appliances that control its operation, as well as payment for the services of an installer who can secure the cable without damaging the roof or gutters.
Even a self-regulating cable of this length will consume 4 kilowatts of electricity, which is too much for homes with worn wiring or weak electrical connections.
Installation of vibrators
To protect roofs from ice, two types of vibrators are used:
- affecting the rafter system ;
- affecting ice .
Vibrators acting on the rafter system are attached to one of the rafters.
Such a vibrator consists of a low-power electric motor (50–100 watts) and an eccentric mounted on it.
During operation, the vibrator creates sound vibrations with a frequency of 10–50 hertz, which affect the entire roof.
Despite its low power, the impact of this vibrator is enough to clean a roof area of up to 200 square meters .
This method is safe for the rafter system, but can cause headaches during long-term work, because a barely audible shaking will be felt in the rooms on the top floor.
The vibrator acting on ice operates in the ultrasonic range (20–25 kilohertz) and has a power of 1.5–4 kilowatts. A powerful electromagnet is connected to its output, to which is attached a circuit made of a steel rod with a cross-section of 4–7 millimeters square.
This circuit is constantly in a tense state, which eliminates sagging of the metal.
Under the influence of the ultrasound generator, the circuit begins to vibrate, which leads to the destruction of ice . The advantage of this method is that when the generator is turned on, it operates silently , so it does not disturb the residents of the upper floor.
disadvantages to such a generator:
- high cost of equipment;
- complexity of installation;
- the need for constant supervision;
- attractive to thieves;
- high energy consumption;
- negative impact on animals.
The cost of mechanical (electromagnetic) ultrasonic generators starts from 150 thousand rubles , so not everyone can afford the purchase of such a unit.
In addition to the generator itself, you will need to lay electrical wiring and install a switchboard with the necessary devices.
Then you will have to create a stressed contour from a steel rod and attach it to the roof using special brackets.
With large circuit sizes, there is a high probability that the generator will not be able to produce a signal of the required frequency for the circuit to enter resonance, and without resonance its efficiency drops hundreds of times .
Therefore, such systems must be installed and connected by specialists who are well versed in these issues. Otherwise, you will get an expensive but completely useless toy.
While operating in resonance, the circuit will emit ultrasonic vibrations of enormous power, which can change the behavior of pets , because they are very sensitive to ultrasound of even low power.
Installation of snow retainers (snow catchers)
During a thaw, not only icicles fall from the roof, but also ice blocks weighing hundreds of kilograms . To prevent the fall of such blocks, snow catchers are installed, which do not allow a block detached from the main mass of ice to move directly to the edge of the roof.
As a result, the broken blocks begin to gradually melt and collapse, turning into water and not posing a great danger to people and cars.
Snow guards are installed on any type of roof, except horizontal . On such a roof, even a piece that breaks away from the main mass of ice will not move anywhere, but will begin to melt and collapse.
Alternative Methods
Snow removal is not an easy job, and many would like to make it easier with the help of devices that eliminate the need for much physical effort. How to remove snow from a roof without ever swinging a shovel occupies the minds of many inventors. Some methods really work, while the benefits of others are highly questionable.
Vibration
A controversial method of removing snow from a roof, but some people use it. The equipment is made simply - a load - a metal block or a hockey puck - is attached to the shaft of a motor, for example from a washing machine.
To operate, the device is screwed using clamps to the rafter system. When starting, the motor creates vibrations, which in theory should lead to snow melting.
Important. Perhaps this method of cleaning can be used on small roofs with a thin snow cover. But home owners should be warned: vibration has a detrimental effect on wooden structures, prematurely destroying components and fastenings.
The rafter system constantly experiences dynamic loads from winds, temperature and humidity fluctuations. There is no need to further test it for strength.
Heating
Local heating using a gun or a hair dryer is an energy-consuming and ineffective procedure. You can damage the waterproofing, which is usually laid under metal tiles or corrugated sheets. In roofs made of other materials, which themselves are thermal insulators, it is almost impossible to melt and remove a significant mass of snow.
Another thing is laying the heating cable. It is installed in places where there is intense icing:
- along the eaves;
- around openings;
- near the ends;
- along the intersections of slopes (ends).
Installation of cables on the roof can be carried out both at the construction stage and on the finished coating. When the power supply is turned on, ice and snow heat up. Melt water moves into the drain and then into the storm drain. Heating works effectively when wires are installed together on the roof and in the elements of the drainage system - gutters and pipes.
Anti-icing systems are very popular in Europe. They are looped with heating of paths, blind areas, and stormwater communications. This ensures uninterrupted drainage during the most unfavorable seasons of the year.
The heating cable can only be laid in the drainage system separately from the roof. It does not save the roof from snow drifts, but it helps cope with melt water during winter-spring thaws.
Climbers' Challenge
It is almost impossible to clean a large, complex roof, and even at a considerable height, on your own. The way out of this situation is to call a specialized team of climbers.
The equipment of professionals includes various equipment for industrial mountaineering. When climbing to heights, Big-Shot slingshots, safety systems with high-strength ropes, and reliable lifting and descending devices are used.
Climbers remove snow with ordinary shovels or scrapers, clearing the roof section by section. This is an unsafe job that requires serious physical effort and a trained body.
Removing snow from the ground
The best way to clean a roof from a safety standpoint is to remove snow from the ground. But it can only be used if the height of the house is no more than 1 floor. Factory scrapers or homemade devices are used, which are easy to make with your own hands from scrap materials.
Making a simple device
By analogy with a scraper produced on a machine, a sufficiently effective device can be made.
You will need:
- a piece of galvanized steel sheet for a knife;
- metal profile pipe for the frame;
- pole for a handle - a tube, a rail, a handle from a garden tool;
- fasteners - bolts with nuts, self-tapping screws, studs, linings, brackets;
- rollers;
- strip of reinforced polymer film or oilcloth;
- hammer, grinder, welding machine, drill, screwdriver.
Manufacturing procedure:
- Bend a piece of galvanized steel in the shape of the letter P. It is advisable to make the edges two-layer so that the structure is more rigid.
- Cut grooves in the metal pipe for bends according to the size of the knife.
- Weld the frame and attach the pole holder to it.
- Place the finished frame on the knife, drill and tighten with bolts.
- Mount the rollers on the sides using pads, selecting the height in accordance with the profile of the roofing material.
- Install brackets for a ladder at the bottom of the cutting contour, along which the snow will slide.
- Insert a long pin into the holes in the bracket.
- Fold the edge of the film and secure it with a stapler.
- Thread the pin into the lapel and secure it to the knife using self-locking nuts, which prevent the connection from unwinding.
- Insert the pole into the holder, screwing it with self-tapping screws.
The DIY scraper for removing snow from the roof is ready. You can start working.
Rules for cleaning the roof from the ground
Before removing snowdrifts, you need to carefully knock down the icicles. You cannot do this in a big way, applying too much force so as not to damage the roofing material. The best way is a side impact 10-15 cm below the roof overhang.
If the snow is compacted, cleaning is carried out in layers. First, cut through the upper, softer mass in the direction from bottom to top. In this case, care must be taken to ensure that sliding pieces do not fall on the worker.
The bottom layer is cut off in several passes. You may have to put in quite a bit of physical effort. It’s easier to work without rollers, but the risk of damaging the roof increases, so you should act carefully.
Important. If the roof is flat, the snow will not be able to slide down the film under its own weight. To remove it, you need to grab the bottom edge of the ladder and pull the device down. Then the entire chopped mass easily slides off in a whole layer.
How to avoid damaging your gutters
To ensure that the drainage system does not sag in winter or completely come off due to snow melting, technological requirements must be observed during installation. They provide for the installation of gutters with a gap of 20-30 mm relative to the plane of the slope, which ensures the free movement of snow with minimal risk of breakage of the drain.
The diameter of pipes and gutters in areas with large amounts of precipitation should be at least 125 mm. To strengthen the fastening, the brackets are installed every 40 cm instead of 60, which increases the load-bearing capacity of the system.
Some owners, out of fear that an overflow will occur during rain or water will flow past the gutter, raise the outer edge of the drain during installation. There is no need to do this. This does not affect the throughput, whereas when snow melts, the moving layer can get caught on the protruding edge, deform or completely tear the structure away from the fastenings.
A serious problem is icing of gutters. When snow melts and freezes, huge icicles are formed, which, growing, turn into blocks of ice. They can and should be fought.
The main reasons causing severe icing of drainage systems:
- poorly insulated roof, when flows of heated air provoke increased formation of condensation on the surface of structures and accumulation of ice;
- the angle of inclination of the drain is less than the standard 3 mm per 1 m, which leads to stagnation of water in the gutter;
- laying roofing material without a ventilation gap;
- clogging of the system with leaves and debris, interfering with normal drainage during thaws;
- too much snowfall.
Effective ways to help avoid icing:
- insulate the roof itself as much as possible;
- install gutters in compliance with technology;
- regularly clean the channels from blockages;
- use protective nets or grilles;
- use heating cables.
How to choose a snow guard
The choice is, first of all, determined by the snow load that the supports of the protective system can withstand. It, in turn, depends on the following factors:
- roof size;
- slope angle;
- type of roofing material;
- frequency and abundance of snowfalls.
It is clear that a small flat roof, on which snow falls several times a year, does not need particularly strong protection.
Statistics say that snow catcher supports can withstand loads ranging from 70 to 500 kg. But this is similar to the average temperature in a hospital. The lion's share of products on the market can withstand a load of no more than 150 kg. The calculated value of this parameter must be indicated by the manufacturer in the product passport.
It is believed that supports supporting 75 kg should be installed in 3 rows. A support capable of holding 300 kg can handle large amounts of snow on its own.
The strength of the coating itself must also be taken into account. If it is not able to withstand the load that the support can handle, under the influence of excess snow mass for a given covering, the fastening will be torn out and the roofing material will be damaged. It is equally important to evenly distribute the load over the surface. If the entire weight of the snow is concentrated on a small area of the eaves, it may not be able to withstand it and the roofing system will be damaged.
It is advisable to combine snow catchers. This is insurance in case a large amount of precipitation falls in a short time, which is not typical for the area. Under normal conditions, for example, a lattice fence is sufficient. If you add toothed snow catchers, they will help cope with unexpected heavy snowfall.
Modern innovations
Utility workers are mastering new technology, which can also be used in private housing construction. This is an innovative anti-icing development “Anti-Ice”, which is a liquid polymer solution with hydrophobic action.
The product is applied with a brush or spray onto the roof and gutters. As a result, water or melting snow rolls off the surface, losing its ability to adhere.
How to remove snow from a greenhouse
Greenhouse coverings are usually made of translucent materials - durable film, glass, polycarbonate. They transmit sunlight well, but are not designed to withstand heavy snow loads. The accumulated snow mass can cause deformation of the coating and even destruction of the structure's frame. You can remove snow from the roof of the greenhouse from the outside or from the inside.
External cleaning
Plastic or wooden scrapers and homemade devices are used. Care must be taken that they do not scratch the surface of rather fragile materials.
Although polycarbonate is much stronger than film, it is coated on the outside with a thin protective UV layer. Even minor damage causes rapid destruction of the polymer and reduces the service life of the greenhouse. It is forbidden to remove ice with force or use sharp objects for cleaning.
Removing snow from the inside
If the coating is film, you can clean it with a regular mop with a soft rubber or textile pad. Apply light blows to the underside of the film, moving from bottom to top. The snow crumbles into separate pieces and slides off the surface of the greenhouse.
For polycarbonate arched structures, another method is used, also based on vibration. You need to gently knock on the frame, and the mass of snow itself will rush down. This method is especially relevant for long-span greenhouses, where external cleaning causes difficulties.
Removing snow from a flat roof
Smooth (low-slope) roofing is becoming increasingly popular in suburban construction. It looks fresh and modern, but in winter a lot of snow accumulates on a flat surface, which you need to worry about removing in advance.
There is an opinion that it is not necessary to clear snow from a flat roof, but this is not entirely true. Heavy loads in the event of extreme snowfalls or heavy ice formation can cause negative consequences:
- deformation of underlying structures;
- clogging the internal drain with ice;
- the flow of melt water into coating defects and, as a result, leakage of joints.
If the first event from the list occurs extremely rarely, since the architectural and construction project is usually calculated taking into account the current snow load in the region, then the last 2 cases are very probable scenarios for the development of events.
Quite a lot of snow can accumulate on the roof of a house measuring 10x10 m. Every 10 cm of snow cover height is 10 cubic meters of snow mass. Cleaning is carried out both by labor-intensive manual methods and by mechanized methods using snowblowers. Units with a gasoline or electric engine weigh no more than 90 kg and are capable of throwing snow at a distance of up to 15 m. They are purchased not only for clearing roofs, but also paths, yard areas, and parking lots.
Important. You cannot sprinkle salt mixtures on the snow, as the aggressive impact destroys the roofing material and metal elements of the gutters.
Types of snow guards
Currently, many devices have been developed for retaining snow, which vary in design. Some products hold all the snow accumulated on the roof until it completely melts. Such devices are called snow impellers or snow catchers.
The other part passes through small parts into which the snow cover is crushed when melting; they are called snow cutters.
Structurally, the following types of protective systems are distinguished:
- tubular;
- lamellar;
- lattice;
- point, they are also yokes;
- toothed;
- corner;
- polycarbonate;
- network;
- logs on hooks.
Each of them has its own area of application, limited by the material and design of the roof, and climatic conditions.