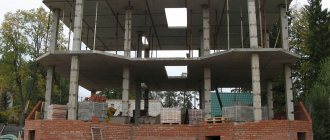
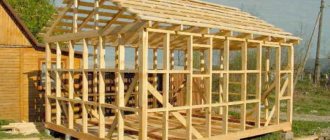
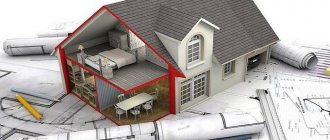
When building a reliable frame house, you need to know the main rule - installing jibs. The jib is an important, one of the main elements to ensure the rigidity and stability of the structure of your wooden house. Without the detail, the house will be shaky, easily susceptible to the forces of nature, and its service life will be reduced tenfold.
Frame house, the role of the jib
In Russia, frame houses began to be built after many years of their construction in America and Europe. Canadian and Finnish frame technologies have been formed. We have accumulated vast experience in frame construction. All mistakes, shortcomings and their impact on the operation of houses are summarized in the Rules or Code. Some of its provisions have been translated and included in the Code of Rules for the design and construction of frame houses, valid in Russia. The vault allows you to use other people's experience and build frame houses without errors from available materials. Unfortunately, in practice the rules are distorted due to the desire to reduce the cost and simplify construction. Reinterpretation occurs at the level of design, choice of materials, and construction itself. As a result, consumers form a misconception about frame technology and the performance qualities of such houses.
Sergey Yurievich
Construction of houses, extensions, terraces and verandas.
Ask a Question
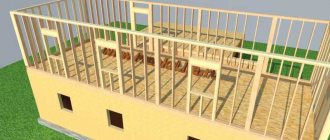
Racks, joists and ceilings are at right angles or parallel to each other. Without the use of special stabilizing elements, the house may collapse. Such an element is a jib, a bar installed and secured at an angle to the racks. A house with walls containing such strengthening elements can withstand any gusts of wind or earthquakes.
Difference between American and Scandinavian technology
Canadian houses are a classic “platform” based on a frame structure. This house is assembled on nails and is famous for its highest diagonal rigidity, that is, it can withstand strong winds and earthquakes.
The differences lie in the monolithic foundation in the form of a basement floor and platform covering for all floors. The frame is made of calibrated dried boards 150 or 200 mm. The spacing between the posts in the center is 600 or 400 mm.
A characteristic feature of American frames are walls with a single frame at the bottom and a double frame at the top. The real “bible” of the builder of Canadian houses is considered to be Building Codes or the Russian set of rules SP 31-105-2002.
The Finnish house is a typical Scandinavian technology for constructing frame houses, aimed primarily at noise protection and energy efficiency. Structurally, there is no basement floor, and the USHP and UFF foundations also serve as the ceiling for the first floor with a heated floor.
The frame skeleton is built from first-class calibrated boards, dry, planed, from 200 mm wide. The pitch of the racks is 600 mm. The frame of a Scandinavian house is elegant and light, with a crossbar under the top trim, running from the outside or inside of the racks.
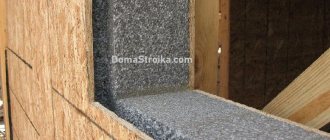
Useful: Walls of a frame house
The organization of communications is very convenient: the cross frame behind the vapor barrier layer of the external walls accommodates electrical and plumbing. After installation of communications, the cross frame is insulated and imitates timber.
No jibs
Among Russian builders, the opinion has spread that jibs for a frame house are optional. Despite this, such an element of the foundation of the house is extremely necessary. Sheathing with slabs can replace them only when creating small buildings for utility purposes. The absence of jibs for a residential building threatens destruction, which begins with deformation of the interior and exterior finishes and displacement of the heat-insulating layer.
In frame houses built at the beginning, jibs were not always used. Instead, the house was sheathed with boards set at 45° in a herringbone pattern. Many years of experience have proven the unreliability of this method; it is used for non-residential buildings of a small area.
Manufacturing the roof of a frame shed and installing the roofing covering
The rafters of the barn roof are made of boards with a section of 10x5 cm.
Seats are cut out at the lower and upper ends for a tight fit to the upper trim.
The flooring is “inch” board.
A corrugated bitumen sheet is laid on top.
sashauzer
When I covered the nail heads on the corrugated bitumen roof, it turned out that they fit very tightly. Hammering is not an option. I'll split it. I found a way out - I heated them with a hair dryer, and they snapped easily.
What to consider when installing a jib
In order for the jib to reliably strengthen the frame of the building, when installing it, you must follow the rules:
- The thickness of the plank is up to one-fourth of the wall thickness.
- The jib is cut flush into the trim boards and wall posts.
- At least two elements are installed on one wall in different directions: one tilted to the left, the other to the right.
- If the jib is installed before the wall is raised, in a lying position, then it should not be fixed rigidly, so that after installing the wall in a vertical position, the bar can be adjusted.
- It is more rational to install jibs on the inside of the wall from the point of view of the formation of cold bridges. It is more convenient to mount from the outside. The choice of wall side does not affect the diagonal stiffness.
Ways to increase the rigidity of the foundation of a house
To increase the stability of the frame, use:
- The wooden jib is installed at an angle of 45°. If adjacent walls, door or window openings do not allow this angle to be maintained, it is increased to 60°, sometimes more. The increase in angle should be compensated by installing more elements on the wall. To reliably stabilize the frame, a 25 x 100 mm board, embedded in the boards of the upper and lower trim, is sufficient. The use of planks with a larger cross-section leads to unreasonable costs for materials. The lower edge of the plank is placed closer to the center of the house, the upper edge - to the perimeter. Wooden jibs are strong, slightly weigh down the frame, and can withstand tensile and compressive loads.
- Metal jibs are most common in North America; in Russia they are rarely used due to their significant weight and susceptibility to corrosion. They are attractive due to their low cost and speed of installation. Metal jibs are also cut into the upper and lower skins, but they are installed in a cross. This is due to the fact that metal strips can only withstand tensile loads and cannot withstand compressive loads. Installing two elements in a cross allows you to compensate for loads in any direction.
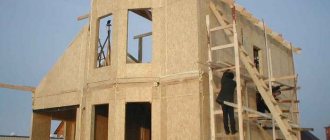
- External sheathing with plywood or oriented strand boards. Attached to the posts and boards of the lower frame, they form a triangle.
Which method to choose depends on specific conditions: building area, climate, purpose, number of floors. A combination of jib materials is possible.
Temporary elements
Temporary jibs support the walls after they are erected until they are permanently secured to the floor joists and the sheathing is installed.
Temporary miters are not installed flush; they are attached from the outside so that they can be easily removed without compromising the appearance or strength of the structure.
There is a widespread opinion among people that installing jibs is a waste of time and money - a harmful myth. Their absence shortens the life of the house, making it vulnerable to climatic conditions and wind loads. This is a necessary element of a reliable building frame, responsible for its rigidity; savings are inappropriate. In most cases, it cannot be replaced with sheathing. In order for the jib to cope with its task, it is necessary to strictly follow all the rules when installing it.
You can ask your question to our author:
Metal shed
Basic materials:
- walls and door - corrugated sheet C8 or C10 with a sheet thickness of 0.4-0.45 mm;
- roof - corrugated sheet C20 (C21) with sheet thickness 0.4-0.45 mm, ondulin, slate;
- load-bearing frame of walls and roof - pipe 50x50x2;
- piping and intermediate posts - pipe 50x25x2.
Note. It is better to make the frame of a large shed from a pipe with a cross-section of 80x80.
Additional materials are needed for the interior lining.
You may also need cement, crushed stone and sand if you plan to lay a strip foundation and install a concrete floor on the ground. But more often, a barn in a dacha is placed on a columnar foundation, which requires 200x200x400 foundation blocks and cement mortar.
Preparatory stage. Laying the foundation
First, draw a design diagram. A simple freehand sketch is sufficient, but indicating the exact dimensions of the structure as a whole and each element separately, taking into account the slope of the roof and the dimensions of the doorway.
Then the pipe is cleaned of rust, degreased and primed - this is easier and faster to do in advance than on a finished structure. Damage to the protective layer that occurred during installation of the frame is treated before covering.
While the primer on the pipe dries, prepare the area for installing the foundation pillars:
- Markings are made using pegs and twine.
- Check the diagonals.
- Mark the location of the holes for supports at angles. If the long side is more than 2.5 meters, then lay one more support for each wall and an additional support in the center. For a 2x3 m shed there should be 7 supports - 6 around the perimeter and one in the center.
- They dig holes for supports, removing the fertile layer of soil and going deeper another 20-30 cm. The centers of the corner holes should lie at the intersection of the walls, the intermediate ones - on the axes of the walls and in the center of the perimeter.
- Compact the bottom of each hole.
- Fill with a cushion of sand (or sand and crushed stone).
- The corner pillars of the foundation blocks are first laid out dry. Align them to the same level by adding sand to the bottom of the hole.
- Blocks are removed. Place doubled pieces of roofing felt at the bottom of the pits. Place the corner posts on the solution.
- They stretch the string between the corner posts and diagonally, lay the intermediate posts dry, level them, and place the blocks on the mortar.
Making the bottom trim
The bottom frame (base) and the supporting structure of the wooden floor are made on a flat area:
- They cut a 50x50 pipe to the size of the perimeter of the shed (taking into account the deduction of 100 mm on the short sides, which fall on the corner joints).
- Jumpers are cut from a 50x50 pipe to enhance the rigidity of the piping and the floor structure (they act as floor beams). First, solid crossbars are made parallel to the long side, then short sections of crossbar pipes are prepared. The result should be a cellular structure with the sides of each element measuring no more than one meter.
- Cook the piping pipes, setting right angles and checking the equality of the diagonals.
- The long strips are boiled first, then peppered.
- Clean the welds and treat them with a metal primer.