Pouring a garage floor with concrete is a simple and relatively inexpensive solution to the problem of installing a high-quality coating indoors for a car. The concrete floors obtained as a result of such pouring not only have high strength and durability, but also protect the garage from groundwater and cold. However, in order for a concrete coating to have all these properties, it is very important to pour it correctly, adhering to simple technology. Let's look at how to fill a garage floor with concrete with your own hands correctly.
Features of concrete floor
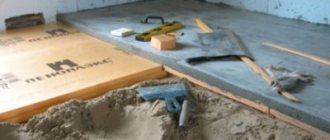
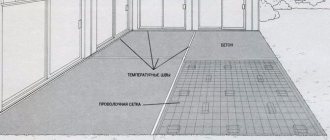
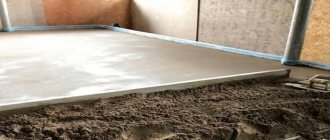
Figure 1. Concrete floor in a garage
Concrete floors have the following features compared to bulk and wooden floors
- Resistance to mechanical loads
- Solidity
- Insensitive to moisture, microorganisms, various insects
- High density and hardness
These features make concrete garage floors the most convenient, reliable and durable coating. Advantages and disadvantages
The advantages of this coating include the following qualities:
- High strength
- Abrasion resistance
- Durability
- Moisture resistance
- Resistance to fungi and various insects
The disadvantages of such a coating include its high cost, which is paid off in the future by the long service life of the concrete floor.
Which brand of concrete is better to choose?
The most suitable brand of concrete for pouring the foundation and floor in the garage is M250. Having good strength and frost resistance, such concrete is most often ordered from specialized organizations that deliver it in automobile concrete mixers (mixers). The growing popularity of this particular service every year is due to the following reasons:
- saving money - the cost of concrete delivered by a truck mixer is less than the total cost of renting special tools and equipment, as well as paying a team of hired workers;
- saving time - pouring a concrete floor in a garage using a car mixer takes only a few hours. The most efficient team of hired workers will need at least half a day for the same amount of work.
- High quality concrete - the proportions of the main components of concrete in mixers are observed very accurately. When pouring a concrete floor by a team of not very conscientious hired workers, part of the most expensive and popular component of concrete - cement - can be appropriated. Instead, sand can be added to the composition, which will make the hardened concrete floor fragile and prone to cracking.
Therefore, experts advise that when deciding what kind of concrete is needed for the floor, give preference to specialized construction companies and private entrepreneurs. The overpayment at the stage of ordering concrete will be fully repaid in the future by the long service life of the poured floor, its high strength and reliability
What is concrete
Concrete is a mixture of four constituent materials: cement, sand, crushed stone and water. The components of concrete are mixed in special proportions, forming a thick construction mixture, which, after hardening, forms a durable, monolithic product. Due to its fluidity when mixed, concrete can be given any shape using the so-called formwork.
The proportions of cement, sand, crushed stone, water in the concrete solution are strictly calculated, but are not constant values. Depending on the proportions of its components, concrete is divided into concrete grades. The main difference in concrete grades is the strength of the resulting concrete product and, as a result, the different areas of its application.
Calculation of layer thickness
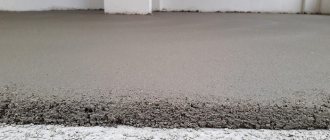
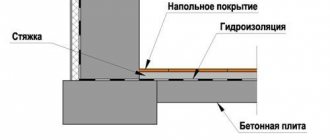
Figure 2. Pouring a concrete floor
When the pit has been dug and the zero level of the floor has been marked, we begin to calculate the thickness of the layers of sand, gravel and concrete. The calculations are based on the following thicknesses of these concrete floor layers:
- the thickness of the concrete screed capable of supporting the weight of a car or trailer is 10 cm;
- the minimum thickness of crushed stone bedding is 10 cm;
- The minimum thickness of the sand layer underlying the crushed stone bedding is 5 cm.
Thus, it turns out that the thickness of a standard concrete floor in a garage and the minimum depth of the excavated pit should be at least 25 cm. If the hardened screed is painted or treated with hydrophobic impregnation, this depth of the pit will be sufficient. When laying an additional coating on top of a concrete floor, the depth of the pit is increased by the thickness of this material.
Based on the linear dimensions and thickness of the layers, the need for basic building materials necessary for pouring the floor is determined. To do this, the thickness of each individual layer is multiplied by the garage floor area. If the volume of the bulk foundation is too large, the bottom of the trench is covered with clean soil and construction waste. If the pit turns out to be shallow, it is deepened by excavation.
In order to control their thickness when filling layers, marks are made on the walls of the garage. If the width of the garage does not exceed 2 meters, these marks will be sufficient. If the width is more than 2 meters, then several pegs are used to apply markings, which are driven into the middle of the walls. The location of the upper part of these pegs in one plane is checked with a level. If a level is not at hand, use the following method - apply a flat bar to the marks made on the wall, on which a long building level is placed. If all the marks lie in the same plane, the air bubble in the level window will be in the middle.
Preparation
Before you begin installing the floor system, you need to check the soil for compliance with technical standards. The soil at the construction site must be dry and motionless, and groundwater must not approach the surface closer than 4-5 meters.
Concrete floors are best made for buildings with basements or basement floors. The final quality of the work performed also depends on the degree of heating of the home.
In poorly heated private houses, the soil under the floor freezes strongly, which leads to deformations and increased load on the foundation.
Setting the level
The concrete floor surface matches the bottom of the doorways. It should maintain a uniform thickness over the entire area of the room. Marks on the walls made a meter from the bottom of the door will help achieve this. After placing the first marker in such a place and distributing the marks along all the walls of the room, meter-long lines are again measured down from them.
By connecting these lines with perpendicular segments, you can determine the boundary up to which you need to pour the concrete mixture. For ease of orientation, nails are driven into the corners of the room, along which the cord is pulled.
Clearing the base
Before removing the top layer of soil, you need to clean the room, getting rid of construction debris and large items. Since the concrete floor consists of several layers with a total thickness of about 40 centimeters, a similar volume of soil will need to be removed to lay it.
Finishing work is carried out only on a flat surface, and therefore the soil after excavation must be compacted with a special vibrating plate. If you do not have the necessary equipment, you can use a simple log, nailing handles to its top and a wooden board of a suitable size to the bottom. To prevent the base from being washed away by groundwater, the treated soil can be covered with clay.
Laying bulk material
The previously prepared soil is covered with a layer of gravel 5 to 10 centimeters thick, watered and compacted. Sand is placed on top of it in the same amount. The next layer is crushed stone 4-5 cm in size, which also needs to be compacted and sprinkled with sand. Stone fragments with sharp edges that come to the surface will need to be removed or placed on their side, otherwise it will interfere with the future screed.
Thickness control is ensured using several rows of pegs driven into the base soil and leveled. At the end of the work they can be removed.
Installation of film covering
After making sure that each layer of material is backfilled and leveled, the future concrete floor will need to be waterproofed. A 200 micron thick polyethylene film or similar waterproof membrane is suitable for this.
The laying technology involves placing it along the entire perimeter of the building with the edges raised 10-20 centimeters above the zero level. They will be trimmed after the finishing screed is completed. Separate sheets are laid overlapping, gluing along the joints with mounting tape. If waterproofing work cannot be carried out at this stage, water protection is carried out by coating the rough floor screed.
Reinforcement
Laying a concrete floor on the ground involves strengthening it with a mesh of metal or plastic, reinforcing rods or thick wire. The reinforcement frame is placed on wooden stands with a height of 2 to 4 centimeters. If you pour mortar into it, it will pass through the mesh, cover it, and harden to form a durable surface.
Required materials and tools
In order to pour a concrete floor in a garage with your own hands, you need the following materials:
- Sand or sand-gravel mixture (SGS)
- Gravel
- Concrete
- Reinforcement mesh
- Damping tape or foam
- Waterproofing materials – thick polyethylene film, waterproofing
- Insulation
- Knitting wire
The following tools will be required for pouring:
- Buckets or garden wheelbarrow
- Bayonet shovel
- Concrete scraper
- Bulgarian
- Laser level or hydraulic level
If you plan to prepare concrete for pouring the garage floor yourself, you will need a gravity concrete mixer with a 200 liter hopper.
Preparatory work before pouring concrete on the garage floor
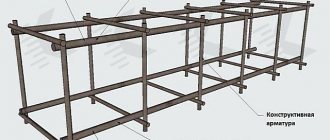
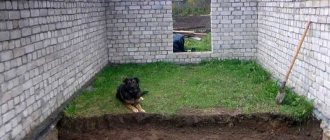
Figure 3. Scheme of a concrete floor In garages, the concrete floor is poured over the ground.
However, since most soils do not have high bearing capacity and density, the construction of a concrete floor in a garage begins by making a bulk base on top of the soil - a two-layer sand-crushed stone cushion. Before backfilling, the top fertile layer of soil is removed using a bayonet shovel, exposing the underlying mineral soil - sand, sandy loam, clay. This is done to remove all organic matter and microorganisms living in the fertile soil. If this operation is neglected, then in the process of their vital activity these microorganisms can cause subsidence of the cushion and destruction of the concrete screed located on it. In clean soil, there is very little organic matter and microorganisms living in it.
Marking
The small rectangular pit formed after the removal of the fertile soil layer is filled with crushed stone, sand, and concrete reinforced with a reinforcing frame. The depth of this pit is not arbitrary. It depends on the zero floor level. Often this level is made level with the threshold of the entrance gate box. Much less often the floor is poured slightly below the threshold. With this method of filling, it is necessary to install drainage pipes or gutters to drain melt and rainwater entering the garage.
To mark the zero level use:
- laser level - for this, the beam of the device is switched to the horizontal plane display mode and fixed at the level of the threshold of the entrance gate. After this, along a clearly visible beam on the surface of the wall, lines are drawn that will be the boundary between the floor and the wall.
- hydraulic level - the height of the threshold of the garage entrance gate is transferred with marks to all four walls. All marks are connected using a ruler, a long and even rule, or a wooden slat, resulting in a zero floor level. Also, to connect the marks, a long bubble level is used, which can be used to additionally check the correctness of the markings and the absence of distortions.
Materials for backfill
In order to make the concrete floor in the garage high-quality and durable, it is very important to choose the right materials for backfill. So, instead of gravel, which is often used in construction work, it is better to use crushed stone. This is due to the fact that rounded gravel compacts much worse than angular crushed stone. When using gravel, the base for pouring a concrete screed will be unreliable and unstable, which can lead to the formation of cracks and deformations in the thickness and on the surface of the reinforced floor slab.
60-70% of crushed stone for backfilling a concrete floor should be of medium fraction and 30-40% - fine.
Any kind of sand can be used to make bedding. The main thing is that there are no clay inclusions, fertile soil impurities, or very large stones in it. However, even if such impurities are present in small quantities in the sand, they can be easily removed by sifting it once.
Backfilling of sand and crushed stone cushion
The process of backfilling a cushion for pouring a concrete screed consists of the following steps:
- Carefully leveling the bottom of the pit with a bayonet shovel, filling in depressions and depressions.
- Compacting the bottom of the pit using a vibrating plate or manual rammer.
- Filling with 3-4 layers of crushed stone, the thickness of each of which should be 3-4 cm. After backfilling, each layer is leveled with a rake and thoroughly compacted using a vibrating plate or a manual tamper. The crushed stone bedding is compacted very carefully. This is necessary to ensure that as much crushed stone as possible is pressed into the soil, further compacting it, increasing the bearing capacity and reducing the risk of subsidence. A well-compacted and leveled crushed stone bedding should be so dense that no traces remain when walking on it.
- Backfilling the sand cushion - the estimated volume of sand is filled in 2 layers 2-3 cm thick. Each layer is leveled with a rake, thoroughly moistened and compacted.
When the bedding is leveled and compacted, they begin laying the walls of the inspection hole. They are laid out slightly above the floor level so that water does not get into the hole.
Floor waterproofing
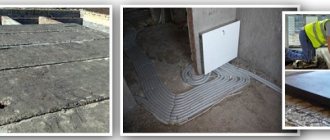
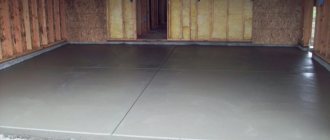
Figure 4. Waterproofing the floor
Depending on the groundwater level, two options for waterproofing a concrete garage floor are used:
- if the groundwater is deep, a durable polyethylene film with a density of at least 250 microns is used as the main waterproofing material. This method of waterproofing is necessary to ensure that moisture from the concrete slab does not escape into the sand cushion. After all, when concrete loses moisture, it becomes brittle and begins to crumble and deteriorate very badly.
- If groundwater is close to the groundwater, the concrete slab is protected from its influence using a material such as waterproofing or its high-quality analogues
In each of the options, panels of material are joined together with an overlap of 10-15 cm. To make the joints airtight and waterproof, they are glued with mounting double-sided tape. When laying, the waterproofing material is placed on the walls, slightly above the level of the damper tape. Trim off excess waterproofing after the concrete floor slab has been poured and cured.
Reinforcement
Since the concrete floor in the garage will experience very heavy loads, it must be reinforced - reinforced with a mesh frame made of reinforcement placed in the screed. To reinforce the pavement for passenger cars, a factory-made mesh of reinforcement with a diameter of 8 mm and a mesh size of 15 cm is used. When laying the mesh, its location is a very important point. In order for the screed to be strong, the reinforcement frame must be located in its thickness at a depth of 3-5 cm. A frame laid on waterproofing material will not fully strengthen the concrete slab. In addition, the mesh reinforcement that is not covered with concrete will be very susceptible to rust.
In order to raise the reinforcement stack above the waterproofing layer to a height of 3-6 cm, use special stands or halves of a single red brick. The supports are placed under the reinforcement frame so that it does not sag.
Pieces of reinforcing mesh laid on stands are connected using plastic ties or soft knitting wire.
Installation of beacons
Leveling the concrete floor in the garage is done using a long aluminum rule and beacons. Various available materials can serve as beacons - pipes, angles, dry wooden slats, special profiles that can be purchased at any hardware store.
Beacons are mounted from a blank wall towards the entrance gate. The distance between two adjacent guides should be 25-30 cm greater than the length of the rule that is planned to be used to level the concrete screed. The distance between the outer beacons and the walls should be 30-35 cm.
To fix the beacons, a cement-sand mortar is used - it is placed in small piles under the guides, after pressing or lightly tapping them with a hammer, they are adjusted to the level.
Beacons are often laid with a slight slope (5-10 mm per meter) towards the entrance gate. This is done so that if the roof leaks or heavy condensation forms in winter, all the moisture will flow out of the garage by gravity and onto the street.
Beacons are temporary elements - after the concrete has hardened, they are removed, and the resulting depressions are sealed with quick-drying cement-sand mortar.
How to make a concrete floor screed with your own hands
Regardless of whether you choose a wet or semi-dry method of installing subfloors, the technology involves preparatory work. They need to be carried out before ordering, or prepare a solution.
Surface preparation
Regardless of whether the screed is installed on previously laid concrete or another surface, leaks should be eliminated by first filling the through cracks with the solution, removing loose pieces of stone. After the solution hardens, the surface is primed.
To prevent cracking of the monolithic slab, a damper tape is installed to the walls of the frame. It is the elastic gasket that will absorb the thermal expansion of the slab.
On the ground floor and in damp rooms, a waterproofing layer that protects against the penetration of dampness into the room is required.
If the screed is floating, before installing heated floors, a layer of both hydro and thermal insulation must be laid underneath. When heated, the monolith transfers heat only under the front flooring. Without thermal insulation, heating costs will be significantly higher. Solid porous slabs or expanded clay are used as an insulator.
Reinforcement
If pouring a floor screed with concrete requires reinforcement, the mesh is laid before pouring, on special bosses so that it is inside the stone. Add fiberboard fiber to the concrete mixture. Intertwined randomly, polypropylene fibers create a durable monolithic frame. You can do without a reinforced frame, but not under heated floors. The purpose of the frame is to increase the tensile strength of the screed and prevent it from cracking.
Reinforcement is used:
- when installing heated and floating floors;
- thickness of the rough layer from 5 cm;
- the screed is installed on the base in the form of soil;
- high mechanical load is expected.
The metal frame is installed on special plastic stands for installing one or 2 layers of metal mesh. It must be recessed into the concrete by at least 0.5 cm. The thicker the reinforcing bars, the stiffer they will create the frame, the stronger the screed will be. Most often, the reinforcement is a road mesh with cells 100x100 and 150x150, with a rod diameter of 5 mm. But for loaded surfaces, 8-16 mm reinforcement is used, and the concrete layer above the frame must be at least 3 cm.
Sequence: first the heating circuit is laid, followed by the reinforcement frame.
Marking the subfloor level and installing beacons
Using any method using instrumental measurements, you need to establish the highest and lowest points of the subfloor. This allows you to approximately determine the average thickness of the monolith and material consumption. Concrete never lays evenly, and even an experienced craftsman cannot complete the coating without beacons.
Horizontal reference point - the highest point on the surface is taken as zero. Solid horizontal lines are drawn on the walls and the presence of protrusions relative to them along the entire floor is determined. Leveling lines are drawn taking into account the thickness of the subfloor. It is at their height that the upper heads of the markers should be installed and this will be the zero line.
Homemade slats or professional benchmarks are used as beacons. The main thing is that when distributing the solution over the surface, they should all be at the same level - be flush into the concrete.
It is better to use profiles or pipes as slats along which the rule moves when leveling the concrete mixture. After hardening, they are removed and the gutter is filled with construction mixture. The beacons are secured with self-tapping screws and screws on the concrete substrate to create a horizontal line.
But the concrete base needs to set, it takes time. Therefore, more often the marking line is installed on self-tapping screws that are adjustable in height; they can be left thick, and the narrow seam from the strip can be easily rubbed out.
Benchmark beacons are professional equipment. The device is represented by a rail on tripods with height adjustment. The rule moves along the guides, so they must be secured. The distance between the control lines is 100-150 cm. The contour should be 30-40 cm away from the wall.
Step-by-step instructions on how to pour concrete on a garage floor
The process of pouring a concrete floor with a solution delivered by truck mixers is quite simple:
- A long and narrow box is knocked together from thick boards - a receiving tray. It is installed at an angle, directing one of its ends to the center of the garage.
- The concrete solution supplied from the mixer through the receiving tray is evenly distributed over the entire surface of the floor using a shuffle shovel or a special concrete scraper.
- Using the rule, the concrete mixture is leveled along the installed beacons.
- The poured concrete screed is compacted with a submersible vibrator - this allows you to remove air bubbles from the concrete, as well as make it more liquid and fluid.
Important. The garage floor must be concreted in one day. When pouring screed in separate pieces, there is a high probability of cracks forming at the joints of sections poured at different times.
Production of concrete mixture
To produce a concrete composition for floor screed, a well-known set of components is used:
- cement;
- water;
- crushed stone;
- sand.
Production of concrete mixture.
A solution of cement and water forms stone. However, without the other components, this stone will quickly develop defects in the form of large shrinkage. Without crushed stone, the mixture with the addition of sand is called cement mortar.
By varying the proportionality of the components, the mixture acquires the necessary properties. If the emphasis is on strength, add more cement. For the production of lightweight concrete, expanded clay is used instead of crushed stone. To increase the setting speed, various additives are used. In this case, the replacement of crushed stone will be limestone, granite or gravel (in accordance with the required structure). In private construction, gravel is in great demand. It reduces the cost of the mixture without depriving it of the required strength properties. With its inclusion, stamps are produced even up to M450.
Nowadays topping is popular, where M300 is involved.
Methods of hardening and dust removal
In order to make the concrete floor in the garage more reliable and durable, to prevent the destruction of the top layer, the following methods are used to strengthen it and remove dust:
- Ironing - with this method of hardening and removing dust, a mixture of dry cement and sand sifted through a fine sieve is distributed over the surface of the concrete screed. Layer
- Painting is the uniform application of a layer of oil paint to the surface of a concrete slab. Paint the hardened concrete floor using a roller or a wide flat brush.
- Priming - the concrete floor is primed with a special primer, which, by clogging the pores in its surface layer, prevents it from absorbing moisture and dust
- Backfilling - a special primer is applied to the hardened concrete slab on top of which a 5-7 centimeter layer of marble or granite chips is poured. To ensure that the crumbs do not lie in a uniform and dense layer after backfilling and leveling, I treat them with the same primer that was applied to the concrete subfloor.
- Strengthening a concrete slab with topping is an improved ironing process in which special liquid or bulk compositions are used instead of dry cement. Most often, dry bulk mixtures are used, which are applied to a freshly poured concrete screed in two stages. First, 5-7 hours after pouring the screed surface, 2/3 of the volume of the composition is evenly scattered. When the topping applied to the surface of the screed begins to moisten, add the remaining 1/3 of the composition, rubbing it into the concrete using a special machine - a “helicopter”. After the concrete has completely set, its surface is subjected to finishing grouting and treatment with special moisture-resistant impregnations.
- washed washed concrete - with this method of hardening, slabs of cement-sand mortar are laid on the rough concrete floor,
- laying porcelain tiles - ceramic tiles that are resistant to high loads and abrasion are laid on a well-primed concrete base, fixed with tile adhesive or cement-sand mortar.
Proportions of a classic DSP screed
The classic mortar for floor screed, as already mentioned, is cement with sand diluted with water. The proportion (the amount of sand per unit of cement) depends on the required strength of the screed and the brand of cement used. To make the floor surface durable, use expensive Portland cement grade M400 and higher.
Proportions of mortar for floor screed for M150, M200 and M300 when using different grades of cement
For screeding floors in utility rooms, you can also use the cheaper M300. It will cost a little more, but there will be savings. It is better not to use such cement for the foundation of a house or apartment under modern coatings. The rework will require significantly more savings on cement.
Beginners in the construction business think that if you take more cement, there will be a stronger screed. But no. For strength, the correct ratio of all components is important, and an excessive amount of cement can cause a decrease in strength. If you want a stronger screed, use high-quality cement and accurately measure the proportions. By the way, you shouldn’t take more water either. This will increase the fluidity of the solution, but will increase the number of shrinkage cracks. So once again: in order to get strong and reliable concrete, you need to strictly observe the proportions.
Which sand to take
It is better to take river sand, washed, of at least two fractions: coarse and medium. Why river? Because it has sharp edges, and this reduces the likelihood that it will settle into the lower layers. This is understandable. Why washed? It contains minimal dust. The less dust, the higher the strength of the solution. Sand is also needed in different sizes so that the strength of the solution is normal.
To screed the floor you need sand: washed river sand, two fractions (not fine)
If you are going to lay an expensive coating on the floor with high requirements for the strength of the base (parquet, parquet or engineered boards, vinyl tiles), it is better to take this kind of sand. There will be fewer problems.
Kneading sequence
When making a floor screed solution, first mix the dry ingredients - cement and sand. When mixing manually (in a trough), there is not much difference between what to throw in first - cement or sand. If you use a concrete mixer, immediately add sand and spin it for a couple of minutes without cement. Then, gradually, usually with shovels, cement is added. After each portion, wait until it is more or less evenly distributed, then add the next one. After adding the entire amount of binder, mix until a uniformly colored mixture is obtained.
You choose how to prepare the solution yourself: order it at the factory/workshop, mix it yourself
When the dry ingredients are mixed until a homogeneous gray mass is obtained, add water little by little. It is calculated based on the amount of cement. Usually 0.45-0.55 parts of water are taken for 1 part of cement. Why don't they indicate exactly? Because the amount of water depends on the moisture content of the sand. It is advisable to pour a minimum amount of water: this way there will be fewer cracks when drying.
Ready-made mortar or sand-cement mixture
Those who have at least once mixed DSP or concrete on their own are more often inclined to buy ready-made concrete. And not a mixture of sand and cement in bags, but concrete from a concrete mixer. Yes, it costs more money, but it requires much less time and effort. Another advantage of this solution: filling without cold seams. This means fewer cracks and problems in the future. The next plus is that concrete mixers can deliver the solution to the desired floor. Imagine that you have to move a couple of tons of sand and cement. Even if there is a freight elevator, it is not easy. It can also be costly if you pay helpers. Climbing stairs “on your shoulders” is generally a problem.
So that you do not care about the proportions of cement and sand, you can buy ready-made mixture in bags
What are the advantages of buying ready-made sand-cement mixture in bags? The fact is that the proportion is kept exactly, sand is used in several fractions and in the right quantities. That is, the screed is guaranteed to have the required strength. The downside is the price. You can buy the same amount of cement and sand for a much smaller amount. This is if you don’t bother with sand fractions. If you take care of this, the savings will become smaller: not all factions are cheap.
Curing
After pouring the concrete screed, you must follow the following simple rules for caring for it:
- If it’s hot outside, close the entrance gates tightly and cover all the windows in the garage with curtains. To prevent excessive evaporation from the concrete at this time, it is covered with thick plastic film or abundantly moistened burlap.
- During the first 7-10 days after pouring, the concrete is watered abundantly. If the screed is covered with plastic film, remove it before watering. When used as a covering material, burlap is watered over it. When watered in this way, the moistened fabric will release moisture to the concrete for a long time, thereby preventing its premature drying and the formation of cracks.
- water the concrete until it turns dark gray;
- For irrigation, nozzles are used that spray water to a fine droplet state.
Use of additives
More often, classic material without specific additives is used for interior concrete work. However, in a number of cases their use is justified, especially if the object is in an unfinished stage of construction and is exposed to external environmental factors.
Currently reading: Concrete grade M450, class B35
Typical Additives:
Plasticizers. They give the product additional elasticity, compact the structure of the plastic mass, increase frost resistance and moisture resistance after the product hardens. Antifreeze. They are added to the material when it is laid in the autumn-winter or early spring period, when the average daily temperature drops below 0 degrees Celsius. The substances prevent the liquid in the solution from freezing. Hardening accelerators. Used as an auxiliary component to speed up the hardening process of the concrete mixture and gain its critical strength. Hardening retarders. Used for quickly setting concrete used in conditions of low humidity and high temperature. Expanders. Prevents shrinkage of products after pouring. Other types. Waterproofing additives, anti-corrosion additives, coloring pigments, biocidal extractors, polarizers, air-entraining compounds, porosizers and much more.
Insulating a concrete floor in a garage
There are two options for insulating a concrete floor in a garage:
- laying insulation on top of a concrete slab with pouring a screed - insulation is laid on top of a concrete floor lined with a layer of roofing material or other waterproofing material, and a thin 4-5 centimeter screed is poured;
- laying insulation under a concrete slab - 2 layers of insulation are laid on top of the waterproofing, after which stands are installed on it and reinforcing mesh is mounted.
The most suitable thermal insulation material for this option for insulating a concrete floor is extruded polystyrene foam (abbreviated as EPS). This insulation is very well suited for floor screed - it is durable, moisture-resistant and vapor-tight. To further protect the insulation from increased loads, it is covered with a layer of geotextile - a non-woven membrane used in the construction of highways.
When using extruded polystyrene foam, its minimum thickness should be at least 5 cm, optimal - 8 cm. Laying is done in two layers with the obligatory displacement of the seams.
Concrete works
To create a durable and uniform surface, all concrete must be used in one go. High-quality construction mixture can be ordered from the factory, but if this is not possible, you will have to prepare it yourself. The optimal composition for the subfloor of a private house will be a solution of lightweight concrete B7.5 (M100) or B10 (M150) with the addition of crushed stone of fraction 5-20.
If a waterproof bedding was used for compaction, concrete grade M50-M75 can be used. It must be thoroughly mixed in a concrete mixer and kept until installation begins.
Fill
Covering with liquid concrete begins on the side opposite the entrance opening. Several cells are filled with the mixture at a time, after which the solution is smoothed with a shovel and leveled with a special rule that is installed on the guides and pulls towards itself. The removed excess concrete, in turn, fills the free cells.
The resulting rough screed should be five centimeters thick. The permissible horizontal difference is 4 millimeters. To make a floor with tight shrinkage, you will also need to use a construction vibrator. It will compact the concrete and ensure its solidity.
Finishing
Further technology for the work being carried out requires the removal of guides and individual parts of the formwork from the areas subjected to leveling. The voids created during this process are also filled with the building mixture.
After the concrete is evenly distributed over the entire area of the future floor, you need to check its slope with a bubble level and cover it with a layer of polyethylene. The period for complete hardening of the rough screed is about a month, and during this period the concrete must be constantly moistened.
Vapor barrier
To prevent the screed from being exposed to the harmful effects of moisture, the concrete floor will need to be protected from steam and condensation. A polymer-bitumen membrane, polyester or fiberglass film is well suited for this. PVC sheets will be more expensive, but their cost is justified by their high durability and resistance to rotting. Insulation can be done using polyethylene, but under a layer of insulation and finishing screed it will be subject to heavy loads and may lose its integrity.
Insulation
Covering concrete with a layer of high-quality insulation will reduce the cost of heating a house by a quarter. Popular insulators are polystyrene foam derivatives. To give the material additional strength, it is covered with layers of polyethylene, laid overlapping.
You can make high-quality installation using extruded polystyrene foam. It has low compressive deformation and can be freely used in rooms where the floor is subject to heavy loads.
Another insulation option could be mineral wool. Due to its vulnerability to water, such an insulator will need to be protected with a polymer film and laid in a pre-created frame.
Finish floors
Finish concrete screed is carried out after completion of all concrete work. It is used to level the floor surface, improve heat absorption in a private home, and also create the desired slope on the floors. Before you begin reinforcing and pouring concrete, you will need to clean the subfloors from dirt and construction debris. Cracks in the supporting layer are covered with cement mortar, and large cracks at the joints of surfaces are isolated with damper tape.
To strengthen the structure, it is necessary to reinforce it by installing a metal mesh 3 mm thick and 10x10 cm in diameter at the bottom of the floor. This mesh is installed from below with a rise of 2.5 cm on the walls. When the reinforcement is completed, you need to prepare guides for pouring concrete. They are seated on the plaster and checked with a bubble level. The final slope of the floor depends on the correctness of their fastening.
A popular method of finishing concrete screed is monolithic pouring. A mortar is prepared for it from one part of cement (usually Portland cement M400 is used) and three parts of sifted quartz sand. The amount of water is determined as the kneading progresses. Its volume should be slightly more than half the volume of cement used (1 to 0.55). The mixture should not be too fluid.
To ensure that the mixture sets well and is homogeneous, it is better to pour it into a concrete mixer rather than knead it by hand. Having ensured that the reinforcement and floor preparation processes are correct, you can proceed to the main concrete work.
The pouring process is similar to installing subfloors, but for maximum effectiveness, the cement must be used within two hours. The period of complete hardening is about thirty days. You cannot force it to accelerate - the internal connections may be broken, and the drying composition will lose its strength.