Advantages of thermal protection
Thermal insulation of a wooden door provides a range of benefits that must be carried out. They consist of improving the indoor microclimate.
Such work makes it possible to protect housing from extraneous noise. With their help you can change the design of the structure. Carrying out this work will make the door more reliable.
Do-it-yourself insulation
It is not always possible to purchase the necessary design, but you can make a new and insulated one from an old cold door. If you have certain skills, this will not be so difficult. As a result, such a fabric will help you survive the cold winter months in warmth.
If high security indicators are required, it is recommended to purchase a metal or even armored door. Among them there are also insulated structures that can keep the room safe and warm.
If you need to choose a suitable model among several insulated doors, it is recommended to trust the manufacturer whose products have been tested by time. It is important to check the certificates and read reviews before the transaction, because this purchase is not made for one season.
Materials
Builders advise how to insulate a wooden entrance door in a private house for the winter. Different materials can be used for this:
Izolon or foam rubber
You need to apply glue to the outside of the door, and insulation or foam rubber on top. Also, such materials can be glued to liquid nails. Glue is used to prevent the insulation from moving during work. Foam rubber is not toxic.
Styrofoam
Method 1. Place polystyrene foam or polystyrene foam 30 mm thick on top of the canvas, fix it with liquid nails, and then cover it with finishing material.
Method 2. Place a frame made of dry timber with a cross-section of 20x30 onto the plane of the door. Auxiliary stiffeners are formed from the same timber inside the frame. The base must be treated with a primer. Place polystyrene foam inside the cells. It is then coated with finishing material.
Styrofoam
Mineral wool
It is possible to follow the second method with polystyrene foam, or you can do it frameless. That is, nail it to the surface of the door leaf using a stapler. It is imperative to use a hydrobarrier film, because it protects the insulation from excess moisture.
Mineral wool is light in weight, so it is easy to work with. Not recommended for use on metal doors.
Dermantin
It is necessary to place it on the door leaf and secure it with nails or regular staples. Place dermantine on top and attach it with decorative nails. You can tuck it in and thereby form protective cushions against drafts.
How to insulate a metal street door in a private house?
The process of thermal insulation of a metal entrance group includes the following steps:
- dismantle the door leaf, remove the fittings;
- remove the casing (lining), remove the old insulating layer;
- the internal cavity of the stiffeners is filled with polyurethane foam;
- if thermal insulation from mineral wool is planned, the base is equipped with a hydrobarrier made of polyethylene;
- cut the insulation with a small margin to eliminate the risk of the formation of cold bridges;
- lay the insulation using polyurethane foam or liquid nails;
- if necessary, the layer is supplemented with waterproofing.
Next, they begin to attach the metal lining and install the door hardware. After inspecting the box and laying the seal, the canvas can be hung on the hinges.
Criteria for choosing building materials
If you carry out insulation yourself, it is preferable to purchase a self-adhesive version. Craftsmen advise having foam rubber or felt available. Using them is not difficult. A sash equipped with this gasket can be closed without any effort. The sealing material – rubber is characterized by high wear resistance.
Soft rectangular, tubular rubber seals are also in demand. Their service life is 5-7 years. They protect the room from odors and extraneous noise. The thermoplastic-based profile is resistant to temperature changes.
Craftsmen focus on the choice of filler for insulating the sash and the space around the frame. This process must be conscious, since it is difficult to change them. When choosing, you need to pay attention to the thermal conductivity coefficient. It determines how the material will handle heat retention. For wooden products, thin fillers are a good option. The use of soft insulation greatly simplifies the work. Its advantage is that it covers the surface with a margin and shrinks as much as necessary. It is important to measure the thickness and dimensions of individual structural elements with increased accuracy.
How to repair a cracked door
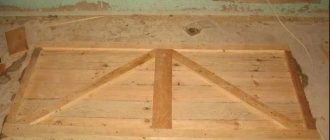
I bought an inexpensive pine panel door, 40 mm thick, for my dacha. I didn’t paint it right away, somehow there was no time. So she stood through summer, autumn and winter, and in the spring she was all gone, she dried up. It was a pity to throw it away, so I decided to repair it myself. He took the door off its hinges, stood it on its side, twisted the hinges, handles and lock. Then he laid the door flat on the stools.
I cleaned all joints of paint and glue on both sides. Since the door led, I had to measure the geometry - length, width and diagonals.
The diagonals did not match (they should be the same), and I had to knock the door in the corners several times until the dimensions matched.
Then I took self-tapping screws 30-32 mm long and at each corner and on the middle ligament I screwed in 4 pieces with a recess (but so that they did not protrude onto the opposite side). I turned the door over and checked the geometry again - the diagonals remained the same. I again tightened the screws in the corners and in the middle, 4 pieces each, making sure that they did not get on the screws screwed in from the front side.
After that, I sanded all adjacent surfaces of the panel with the strapping (necessarily only along the fibers - not in circles). A couple of panels were “dangling” in the trim at the ends, and I had to take glue (“liquid nails”) and press it into the grooves. After 10-15 minutes, I removed the excess glue with a cloth. After 4 hours, I did the same on the back side of the door.
There was also a large crack on the door. Then I mixed very fine sawdust with the same glue (you need to take the sawdust from under the cutter or replace it with chalk mixed with dye to match the color of the wood) and covered the crack and the heads of the screws.
When it had all dried, I sanded the repaired areas again with sandpaper. I cleaned the entire door and then covered it with 2 layers of drying oil (you can also coat it with stain to match the color of the wood). I inserted chopi-ki (wooden dowels) coated with glue into the holes from under the hinges. The door was painted (can be varnished if desired). Now it stands like new! A. POLITOV, Smolensk
© Author famous master I. Kalinin
TOOLS FOR CRAFTSMAN AND CRAFTSMAN, AND HOUSEHOLD GOODS VERY CHEAP. FREE SHIPPING. THERE ARE REVIEWS.
Below are other entries on the topic “How to do it yourself - for a homeowner!”
- DIY flower container made of wood - drawing How to make a wooden container for...
- How you can measure the required amount of fertilizer using improvised means. Memo for the gardener - mass...
- Do-it-yourself solutions for processing and spraying seedlings How to prepare solutions for seedlings...
- How to prepare pest repellents for your garden and vegetable garden with your own hands - folk remedies Infusions and decoctions for pests...
- Modern light sources instead of light bulbs How to light a house instead of light bulbs...
- How to help trees after: hurricane, hail, rain and heat: table-reminder ELEMENTS IN THE GARDEN: ELIMINATING THE CONSEQUENCES...
- Laying floor joists - calculation table How to calculate the thickness of the boards and...
Subscribe to updates in our groups and share.
Let's be friends!
With your own hands › Repair and design › Interior decoration › Doors › Do-it-yourself insulated (“warm”) door
Installation of seal in door frame
This method of insulating a wooden entrance door in a private house is the simplest. For this purpose, a rubber profile is used. Easy installation thanks to the adhesive backing. It can be replaced with dermantine-based tape folded in several layers.
It is possible to select a tape based on measuring the indicators and the width of the slots. Such indicators make it possible to determine the length and quantity of tape. It must be pressed close to the structure.
Reasons for the formation of cracks
Interesting: Finishing the slopes of the entrance door
Option #2. How to seal a door frame
In this case, insulation consists of a tighter fit of the canvas to the box. Due to a loose fit, cracks can form in the harness, through which cold air currents actually penetrate into the home. And to get rid of these cracks, you will need a sealing material, which can be either “store-bought” or made by yourself.
- The industrial seal is a hollow rubber profile, sticky on one side, which is glued along the entire perimeter of contact between the sheet and the box, as a result of which all gaps are eliminated
- For your own seal, you will need a faux leather ribbon. The width of such a tape should be 100 mm, and the length should be equal to the perimeter of the door frame.
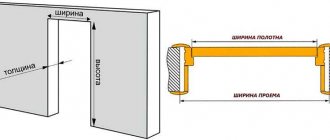
So, the tape should be nailed to the box so that it touches the canvas when closing it. So how to insulate a wooden entrance door using this technology? Very simple. First, determine the thickness of the slots, the perimeter of the door frame itself, and also the width of the folds - the areas in which the canvas touches the structure and where, in fact, you will glue the tape. This is necessary to find out the required volumes of materials.
As already noted, the length of the sealing tape should correspond to the perimeter of the box. The width should correspond to the same folds, while the thickness should correspond to the gap between the structure and the canvas.
Attention! When doing this, you must take into account the compressed thickness of the material!
Regarding the procedure for gluing the tape itself, everything is quite simple: first, pieces of the required length are cut, after which the seal is gradually pressed against the folds, and the paper on the back side of the material is still gradually removed.
The procedure for upholstering wooden doors with insulation
Work must be carried out in stages, drawing up a plan and following it. First, the door is removed and placed on a support. Locks, handles, and hinges are also removed. Experts recommend using the necessary tools:
- furniture nails;
- dermantine for the decorative layer;
- insulation.
To perform the work correctly, you need to treat the structure with an antiseptic. They are also waterproofed. Builders recommend installing layers of insulation into a frame made of beams. Insulating building material should be laid in them. They are fixed using a construction stapler, nails, and glue.
Upon completion of the work, the insulation must be covered with a layer of decorative fabric (dermantine), which must be secured. Afterwards the locks and handles are put back into the door. It is worth checking that everything opens and closes properly.
Interesting: Which interior doors are better for an apartment?
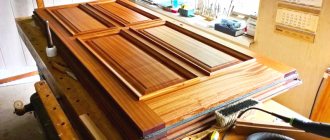
Assembling the door
We assemble and glue together the parts of the future facade using clamps.
While the frame is not assembled, it is convenient to install the latch. To do this, we make markings on the block, drill holes and cut out a rectangle with a jigsaw. After inserting the latch, we mark the outline of the installation area. It is convenient to select the recess using a router with a cylindrical cutter.
We assemble the door structure using glue. The frame is smaller than the facade frame: this is how the projections of the door vestibule are formed. The outer sides of the frame bars and the protrusions of the façade are varnished before gluing, but only where there is no glue.
Glue the inner bars, pressing well. Carrying self-tapping screws is also indispensable. Although this is a departure from carpentry traditions, the box has been significantly strengthened. All 12 screws are in a vertical position in the plane of the door and are not “cold bridges”.
The decorative insert must fit into a groove that is 6.35 mm (quarter inch) wide, so it is better to look for 3 mm plywood. And if there is no such thing (usually only 4 mm is on sale), then perhaps the back side will have to be lightly sanded around the edges.
Related link: Saving heat in the house and finding heat leaks
Insulation with sealing rollers
In those situations in which it is not possible to remove the structure from the hinges, upholstery is done with rollers. In this case, the insulation is wrapped in dermantin. It is necessary to nail from the side from which the material is folded in half.
It is important that the structure fits tightly to the rollers. They do not need to be nailed to the threshold, as they will wear out quickly. This must be done relative to the bottom edge of the door.
Option #3. We seal the doorway using rollers
It may happen that it will not be possible to remove the door leaf from the hinges. In such cases, for insulation (if, for example, cold weather has already set in), you can use the same roller. To significantly increase the thermal insulation properties of the structure, nail it directly to the door frame.
This must be done according to the same scheme as discussed above. It is only important that the location of the roller be calculated as accurately as possible, so that the door leaf adjoins it when closed.
Attention! It is strictly not recommended to nail this roller to the threshold, otherwise the latter will soon become unusable. The best option is to attach it to the lower end of the canvas.
As a conclusion
So we looked at the main ways to insulate a wooden entrance door. Of course, not all of the described methods give a 100% effect, and each of them also has its own disadvantages. However, if you have not previously purchased insulated doors, then this is the only way to spend the cold winter in warmth and comfort. Now you know how everything needs to be done, so get to work. Good luck!
Sheathing
Instead of insulating building material, you can sheathe the structure with dermantine. This is relevant when insulating a room from the outside. The work is carried out following a certain sequence. Upon completion, you can make the following design:
- as functional as possible;
- stylish;
- attractive.
The sheathing is laid on top of the insulation. In this regard, you can use genuine leather or dermantine. The material needs to be laid on the door leaf and the edges folded. It is attached to it with a stapler.
Builders recommend watching closely to ensure that the building material does not sag. This will prevent it from moving. To avoid such troubles, you need to start fastening the upholstery from the center and gradually move towards its edges. At the end of the work, you need to secure the curved edges of the upholstery. Holes of appropriate sizes should be cut in the areas where the lock is located.
After completion of the repair work, all fittings are installed in their places. Installation of an insulated door is carried out at the place of its use. The completed work will be the key to a beautiful and warm door.
Interesting: How to make a lightning rod in a private house
Methods of foam insulation: what you need to know?
The first thing that needs to be determined before starting work is the method of insulation, depending on the material from which the door structure is made:
- A wooden door
refers to the warm filling of the doorway, so the insulation process is the simplest. The only drawback of wood is the permeability of the material to moisture and air, which is why the cold penetrates indoors. The main thing when thermally insulating a wooden structure is to take into account the opening option (inward, outward) and follow the sequence of work. - A metal door
is a cold structure, the insulation of which will take more effort and time. In most cases, the structure is made of metal plates and corners, which conduct heat well. For thermal insulation of a metal door, it is recommended to use polystyrene foam and self-adhesive foam rubber.
Note!
Regardless of the method chosen, it is important to get rid of all gaps, especially in the space between the frame and the door structure! When eliminating significant gaps, it is necessary to blow out the space with foam.
In addition to measures for thermal insulation of the entrance door, it is recommended that owners of premises on the first floors ensure automatic closing of the structure - additionally install a door closer
.
In addition, when insulating any structure, you can use a proven method of reducing heat loss - installing a second door
: thanks to this solution, a heat-insulating vestibule is formed between the structures, which will significantly slow down heat loss.