Interior doors are often installed independently, since this does not require much effort. The weight of the interior door is small, and no one wants to let strangers into the house again.
If you follow a strict sequence in the upcoming manipulations, it becomes possible to independently install interior doors of the chosen design. The slightest mistake can negatively affect the subsequent quality and service life of the structure. The main rule that should be followed when installing doors is an even horizontal and vertical position. This is the only way to ensure acceptable and unhindered closing and opening of doors.
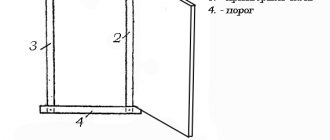
Simple instructions for installing interior doors without a threshold will help you cope with the upcoming work. First of all, you should deal with the installation of the door frame itself.
Rules for installing interior doors
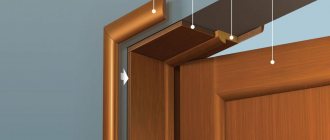
Particularly important characteristics include the presence of identical sized gaps around the door frame and the door itself. A gap of 2-3 mm along the entire length of the vestibule is considered to be an excellent indicator, provided that opening and closing the doors is not accompanied by creaking or clinging.
Recommended clearances between the door and the doorway
Much will also depend on the door reception itself and the quality of the preparatory and other work carried out. If there is a high vertical deviation of the wall with the opening, it will not be possible to install a quality door on your own, even if you have the appropriate experience in this matter. When installing interior doors, the master will orient himself along one of the verticals and align himself with the plane of the wall. And if the wall is not level, then the vertical will in any case go beyond the boundaries of the wall. Accordingly, during operation, the platband used will be tightly adjacent to the wall on one side, while on the other it will significantly move away from it. This will look unpresentable, and the structure will become dangerous.
To avoid accidents and poor-quality installation of doors, finishing work should first be carried out to level the wall.
The door frame is installed first, and after that the surface adjacent to the structure is leveled. During the repair work, the door is removed, and the box should be covered with mounting tape, which is based on the use of ordinary paper, which will not damage the coating. With its help you can even paste wallpaper, from which it can be easily removed afterwards.
Complete set of interior doors
Installation of interior structures should begin after leveling the walls and ceiling. At the time of installing the doors, the surface of the subfloor must be ready, level and completely clean. Skirting boards are attached after installing the doors. The basic package includes:
- Fully assembled unit. All components and additional elements must be correctly adjusted, after which all that remains is to install the structure in the doorway, adjust it to the level and fix it.
- The canvas and the box itself. Both elements must fit each other perfectly; you will need auxiliary lumber from which to make planks that will help assemble the structure together. When installing interior doors, additional additions may be necessary, but this point is thought out in advance.
- Canvas without lumber and boxes. In this case, you should buy everything separately. Lumber is selected and strips are made from them to match the size of the doorway. The corners are filed. When using a standard box, you should select a canvas of the same size. Before going to the construction market, you should take preliminary measurements to avoid additional modifications. This way the installation will not hit the family budget.
An example of a complete set of interior doors
Provided that a person knows how to install an interior door themselves, any kit will do. If you are working with such structures for the first time, then you should give preference to the first option, as the simplest. The last option is the most economical, but only specialists can work with it. It will not be possible to make additional adjustments to such structures.
Dimensions of door frames
Each country has its own standards, which can vary greatly. Based on the standards established in Russia, the dimensions of swing doors are as follows:
- 90 cm;
- 80 cm;
- 70 cm;
- 60 cm.
Similar standards are applicable in Italy and Spain. The difference with the French will be 1 cm on the smaller side. The choice of standard to be applied will depend on the purchaser. The Russian manufacturer has a wider choice, which should be taken into account. When purchasing non-standard models, it will be difficult to install them later. Based on GOST, door leaves and doorways applicable in the configuration will depend on the type of room in which installation will be carried out:
- for residential premises, the height will be 200 cm and the opening width will be 60-120 cm;
- in bathrooms the width will be at least 60 cm, while the height is 190-200 cm;
- for kitchens, the width of the doorway will be 70 cm and the height 200 cm.
However, these are just standards, and in real life, the characteristics of the building itself should be taken into account. In some cases, it is better to use sliding door designs. You will need to measure the opening to determine the required dimensions of the canvas and box. Only after this can you begin to select a block. The size is selected a little smaller, which will make it possible to mount spacers and fasteners. The parameters are important and should be taken into account before installation work begins.
Below is a table of recommended panels for interior doors, based on the size of the openings:
| Blade size, mm | Opening size, mm | ||
| width | height | width | height |
| 550 | 2000 | from 630 to 650 | from 2060 to 2090 |
| 600 | from 680 to 700 | ||
| 700 | from 780 to 800 | ||
| 800 | from 880 to 900 | ||
| 900 | from 980 to 1000 | ||
| 1200 (600×600) | from 1280 to 1300 | ||
| 1400 (600×800) | from 1480 to 1500 | ||
| 1500 (600×900) | from 1580 to 1600 | ||
When taking measurements, you should carefully inspect the surface of the walls. Strengthening and repairs are carried out as necessary. This way it will be possible to secure the structure better. Particular attention is paid to the condition of the walls if it is planned to install a heavy structure. A wooden beam is attached to the wall, which is then plastered (if possible). This way you can carry out the installation without any complications. The thickness of the timber used will be 50 mm. After such manipulations, the installation of interior doors without a threshold will proceed without any difficulties.
Anyone who has previously understood the intricacies of the upcoming work and correctly calculated the dimensions of the structure being installed can carry out the installation. An important factor is depth. Based on GOST data, it will be 7-8 cm, but in modern houses this figure is significantly higher. A little trick is needed here. Installation of doors without a threshold in a room should be flush with the wall, however, provided that the opening and slopes will not be an obstacle to their subsequent opening.
The remaining section of the wall is finished and plastered, like the rest of the walls in the room. It is possible to use add-ons. You can install a strip that will not differ in color from the main canvas and the trim used. The assembly of the platbands is carried out according to the attached instructions.
When you can't do without them
Separately, it is worth mentioning several cases when the installation of conventional floor thresholds is justified by necessity.
- Differences in floor level in different rooms.
- The rooms have different floor coverings in color, texture or type of material.
- Safety function against leakage and flooding - when installed in a bathroom, toilet, kitchen, loggia (balcony).
- When laying a laminate floor, thresholds are needed to fix the covering and prevent the formation of gaps between adjacent elements and bulges.
After weighing the above pros and cons, you can definitely decide for yourself whether thresholds are needed in your apartment or not, and in which rooms to install them.
What materials and tools will be needed
To carry out the work you will need:
- Hammer
- Screwdriver
- Building level
- Hammer or drill
- Hacksaw
- Stationery knife
- Construction tape
- Set of dowels with impact screws (length 12 cm, size 0.7 cm)
- Several pieces of blank cardboard and wooden wedges
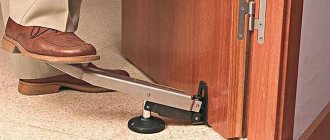
The tight fit of the door frame to the opening is checked again and only then is it determined which way the door will open. The location of future loops is determined in order to drive in the wedges correctly. A couple of wood chips are prepared in advance, as they are placed under the pillars of the door frame. There will be no threshold, and the wood chips will help provide the necessary gap between the floor and the door. The gap is kept minimal, only in this way it will not be noticeable. So, the door frame will be able to breathe on its own.
Required Tools
To install the door block you need the following tools:
- drill, screwdriver or set of screwdrivers, hammer drill;
- hacksaw;
- level, meter, pencil;
- hammer, miter box;
- wooden blocks;
- polyurethane foam, masking adhesive tape.
Masking tape is not the main element. It will only be needed to protect the box when applying polyurethane foam in place of the bars.
If you don’t have a power tool, you can rent one or ask a neighbor or friend to borrow one.
How to install an interior door without a threshold - installation stages
- Collecting the box. Before you begin assembling the standing frame, you should trim it in accordance with the gap between the floor and the door. The gap for residential premises should be 1 cm. The parts are laid out according to the drawing on a clean and flat surface. The previously narrowed corners of the pillar bars are connected to the top bar of the box.
The corners are tightened using self-tapping screws. You can proceed with the subsequent installation of the box. - Installation of the door frame. The box is placed in a pre-prepared opening. The upper part is fixed with wedges. If the bottom threshold is missing, then a lower spacer is inserted and the box is fixed using wedges. Horizontal and vertical bars are leveled using a building level. A spacer bar is fixed in the lock area using wedges. The size will be measured simultaneously at several points, between vertically located bars in the area of the canvas rebate. The data obtained is taken from the width of the canvas + a gap of 0.5 cm.
- Installation of the canvas. The canvas is hung. The gaps are checked for uniformity between the frame and the door leaf. The door should close smoothly. There should be no spontaneous closing or opening in the slightly open position. The gaps are evenly foamed between the door frame and the wall. The wedges are cut only after the mounting foam has completely dried. The spacers are removed and excess foam is removed.
- Installation of additional element. The distance from the edge of the wall to the box is measured. The additional strip is filed, if necessary. A jigsaw or hacksaw is used for this. You should focus on the groove of the platband or additional element. Protruding elements are removed with a chisel. The additional element is placed in the groove, after which it is foamed in several places. The foam must dry. The connecting strip is used if the maximum width of the standard extension does not cover the width of the existing opening.
- Installation of platbands. The diameter of the casing is determined, which is sawed off with a hacksaw. To do this, use a miter saw or miter box (45° angle). The platband is inserted into the groove of the box and secured in several places at the same time using liquid nails. It may be necessary to saw off a 90° corner of the casing, but this depends on the configuration. Such nuances should be clarified with sellers. The upper part of the beak is retractable.
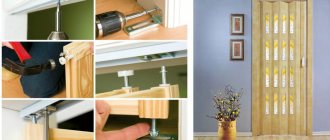
You can also check out the step-by-step photo instructions for installing an interior door:
Adjusting interior doors
In order for the installation of interior doors without a threshold to go smoothly, adjustments should be made. The level is used to adjust the door opening on the side where the hinges are located. One of the ends of the plumb line is pressed against the upper corner, after which it falls down towards the floor.
Similar manipulations are carried out on the other side, in the place where the latch of the bar is located. Spacers and wedges will help adjust the gaps. If the gap is insufficient on the hinge side, you should dismantle them, place a lining under this place and install it in its original place. If the gap is large, then the sockets are slightly deepened with a chisel.
Deepening hinge grooves
By turning the vertical beam of the box, you can adjust the other side. The remaining space is blown out with foam. To avoid deformation of the box, manipulations are performed in several stages.
Final stage
When foaming the gaps, particles of the substance may get onto the door and stain the canvas. You can remove foam using a damp cloth, which should be soaked in a solvent or other liquid that contains alcohol.
It is impossible to remove foam that has already completely dried without damaging the surface. Therefore, try to work carefully. Once foaming has been completed, you need to wait a few hours and remove the spacers. Then all that remains is to cover the gaps treated with foam and part of the box with decorative trim. But before that, trim off the excess foam and saw off the protruding ends of the wedges. Secure the trims with small nails. First, install the upper part of the platband with the ends cut at 45 degrees, and then insert the lower strips.
The installation of an interior door can be seen step by step in this video:
Voted over 167 times, average rating 4.4
Comments
Unfortunately, there are no comments or reviews yet, but you can leave your...
Add a comment Cancel reply
We recommend reading
Miscellaneous Installation of a threshold for the front door in a private house: we select and do it ourselves The threshold under the front door prevents entry into the house...
Miscellaneous What to do if condensation appears on the front door? During the off-season or winter, owners of private houses face...
Miscellaneous How and with what to lubricate a metal entrance door if it creaks? A door that squeaks is a nuisance, especially if it...
Miscellaneous Varieties and manual installation of seals for interior doors No matter how good and expensive an interior door is, its ...