Home » Doors » How to make a door from boards with your own hands
June 28, 2021 No comments
Do-it-yourself board doors: how to choose materials and create such structures.
Modern doors are made from a variety of suitable materials. However, wood products remain traditionally in demand. Moreover, wooden doors are installed:
- and at the entrance;
- and between rooms;
- in for the isolation of outbuildings.
Various types of designs are offered. So it remains to decide which wooden doors are ideal for a particular case. However, first you need to understand what such products are.
Design features of doors made of wood materials
Selected wooden doors can be of the following types:
- massive;
- paneled;
- frame;
- solid panel;
- hollow panels.
Massive doors
Solid wood doors can be installed in a private house or apartment
These structures are made from planed or tongue-and-groove boards of considerable thickness. They are connected into one plane to create a flat surface.
The created shield has inclined or horizontal jumpers, which helps create a more rigid structure.
Paneled doors
Paneled doors are currently popular
Such wooden doors are also produced:
- from boards;
- from timber;
- from laminated veneer lumber.
In the latter case, the material is made using separate elements - lamellas. They are glued together to form beams (thick boards).
Prices for panel doors
Panel doors
This option is often called budget; these doors cost significantly less than the designs described above. Panel doors are made from a material that is inexpensive. It can be low-quality wood or fiberboard. The top of the fiberboard is covered with laminate or veneer.
Panel door made of fiberboard
Panel structures, created with high quality, have a decent appearance. If the surface is refined with natural veneer, then it will be difficult to distinguish them from solid wood in appearance.
When it is necessary
A door from classic flat boards is made during the construction of a bathhouse, sauna, country house, barn. Purchasing finished products for these purposes is not cheap, and it is not always possible to find a suitable model.
In order for the process to bring joy, and the result to be an excellent door device, you need to prepare. It is important to determine the required door type, dimensions, and select the appropriate tool.
It’s easy to make excellent doors from ordinary materials with a small supply of knowledge and tools.
What materials are needed to make doors?
To make wooden doors yourself, you should have the following materials on hand.
- Wood. The material is selected individually, taking into account the specific door being created:
- by size;
- by grade;
- in count.
Wood for the door
Next, the rules for choosing materials will be described in more detail.
- Self-tapping screws. The length is different.
- Wood glue.
- Certain materials required for creating specific types of paintings.
Rules for choosing lumber
You should understand the rules by which blanks for the canvas are selected. Otherwise, the door, which is already ready, may become deformed. Then it will be impossible to correct the defect. Wood is selected based on these criteria.
Firstly, when choosing a type of wood, financial capabilities and personal preference are taken into account.
Secondly, it is best to purchase industrial wood known for its quality, that is, material with a minimum of knots. If knots are present, they are light, inconspicuous, and small in size.
Thirdly, the wood must be easy to process. And then, when the product is ready, the structure should be operated without problems. This means that the material should initially be selected with a residual moisture content from 12% to 15%. It is advisable that the wood be dried in a drying chamber specially designed for this purpose.
Fourthly, purchased boards must be checked for evenness. To check, they are laid on a leveled surface, after which they try to connect them using tongue-and-groove locks. If the board has moved or bent, it will not be possible to connect the individual elements normally.
Fifthly, the boards for the door are selected with a thickness ranging from 2.5 cm to 5 cm. The thickness depends on the location of the structure: thinner between rooms, thicker at the entrance.
How to cover the surface?
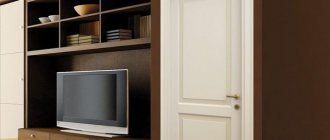
Veneering of interior panel doors.
Many people do not know how to make a door themselves, so they often resort to the help of specialists. They will help you find any information on construction work. It is important to decide what type of door you want to make. However, this is not the only issue that needs to be resolved. Do you know what to cover doors with? There are, as a rule, 4 types of door coverings, which are divided into lamination, veneering, tinting and painting. The simplest are the last two types.
The dyeing process has its own characteristics. As a rule, several layers of paint are applied to the canvas to ensure that the color is rich and durable. The durability and reliability of the structure depends on what materials you are going to make the door from. Painting and the necessary equipment are the main components of the structure. If you are going to tint the door, then use a varnish that will give it a transparent (in some cases translucent) tint. This way you will be able to highlight the natural color of the wood. Experts make doors based on tinting using hardwood, as soft wood may show dents or other imperfections.
Related article: Do-it-yourself heating of water pipes with a cable
What is lamination? This painting process involves pressing a special film onto the surface. No glue is used, but the film must be either plastic or paper. Now about the veneering method. It consists of gluing a thin wood film onto the finished door leaf. Its optimal thickness is 1 mm. The veneer is laid on a substrate and then covered with regular varnish. This coating is considered ideal for solid wood and doors with a typical panel structure.
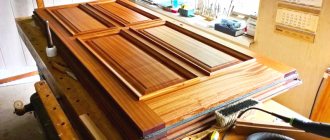
How to make a door from solid wood
Making a solid pine door
These designs install:
- between rooms;
- in the baths;
- at the entrance to the mansion (apartment);
- in outbuildings.
Externally, products intended for installation in different places will vary.
If the door is installed at the entrance to the bathhouse, this is a simple design. The shield is assembled from boards that are fastened with diagonal and transverse elements.
Step one. If the door is installed at the entrance to the house, it should look aesthetically pleasing. The assembled shield undergoes special processing, after which it becomes perfectly even and smooth.
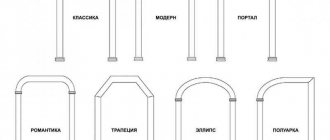
Step two. Next, the canvas is marked to make a vibrating relief pattern. And finally, using a router, a relief is cut out on the canvas.
Door made of tongue and groove boards
Step three. To make a shield, it is advisable to use tongue-and-groove boards with tongue-and-groove fastenings. But you can also use non-grooved ones. The main thing is that the thickness of the selected boards should be at least 2.5 cm. And for the entrance to a living space, it is advisable to choose a board at least 4 cm thick, but not more than 6 cm.
When making doors intended for locking outbuildings (including bathhouses), non-grooved boards are usually chosen. Any of the above strappings can be used.
Step four. When installing a door in a residential area, the board is selected:
- high quality;
- tongue and groove;
- thick enough.
Step five. The prepared material is marked and then sawed. The required segments are obtained. These boards are used to form a shield. They should be laid in such a way that the annual rings on the individual elements are in harmony with each other, that is, they are directed in one direction.
Step six. When you take tongue and groove boards, you need to carefully cut off the tenon from the end panel, after which the end is carefully processed.
A panel made from tongue-and-groove boards can be assembled using a tongue-and-groove joint and wood glue. But the non-grooved parts are simply glued together.
Step seven. After assembly and gluing, the panel of the canvas should be pressed in different areas with clamps. The plane is left in this position until it dries completely.
Glued panel of fabric
Step eight. The shield is dry. Now it is processed with a milling cutter until a perfectly smooth plane is obtained. Then the joints between the boards will be very difficult to notice.
Step nine. It's time to fasten the shield with one of the types of strapping. The simplest is the installation of 3 crossbars in the lower, upper, middle zone of the canvas. You will need parts equal in length to the width of the shield.
Step ten. Markings are made on the door leaf. Places are allocated to cut grooves for the crossbars. Next, pre-prepared transverse elements are applied to these places. They are outlined with a pencil.
Step eleven. Using these marks, transverse grooves can be easily cut using a router. They must match the dimensions of the crossbars and their shape. A milling cutter is used to create a perfectly smooth surface, so that the crossbars should fit into the sockets without problems - easily, but at the same time quite tightly. In addition, the groove is coated with ordinary wood glue.
Step twelve. You can even cut the groove by hand. First, cuts are made, taking into account the desired angle. And then the excess wood is chopped off with a chisel.
Step thirteen. After preparing the grooves, cross members are inserted. This is done on one side, gradually moving the cross member inward. Use a mallet or rubber mallet.
Installation of crossbars
Step fourteen. The prepared canvas is treated with an antiseptic.
Step fifteen. There may be a need:
- in changing the color of the canvas;
- in artificial “aging” of the door;
- in its improvement.
Then staining technology is used. You need to purchase a suitable stain and achieve the desired darkening of the texture, that is, to make the pattern more expressive. You should coat the canvas with stain once or even several times.
Staining a door
Step sixteen. As soon as the stain has dried, the surface will be coated with several layers of varnish.
Step seventeen. Markings are made on the door frame and its leaf to install hinged hinges of the selected model. Then you can install hinges in the marked places.
Making recesses for door hinges
Step eighteen. Now mark the place where the lock will be installed. Marks are made both on the box and on the canvas. You can embed the lock; it is installed manually.
Step nineteen. The canvas is hung in the doorway.
If necessary, finishing preparation is carried out.
How to make a panel door
It is not difficult to make such a design yourself. All necessary materials and suitable tools of good quality must be prepared. It will be necessary to maintain all dimensions, and the edges must remain smooth.
- First, a frame frame, the so-called harness, is assembled. The required size is taken into account. The internal space must be filled (partially, completely). In other words, the inside of the frame becomes solid, but a finely filled shield can also be constructed.
Door frame made of boards
- The frame (binding) determines the size of the canvas, so it is designed first. To create it, a timber is prepared, the approximate cross-sectional size of which is 3x12 cm. It is cut taking into account the size (width, length) of the fabric being prepared.
The timber is ready. Now you need to choose a method for connecting the fabric at the corners. Of all the types of connections, it is better to choose the simplest one - “half a tree”.
- Grooves are marked along the edges of the prepared timber. This work must be done with extreme precision. Next, a hand saw and chisel are used to remove the wood. The depth of the groove is equal to half the thickness of the timber.
- At the corners, the grooves are connected; they are first coated with glue. Accuracy control is carried out using a construction angle.
- The glue on the joints will dry out after a while, and then the joints are fastened with dowels. Through holes are prepared for these elements, their diameter is 0.8-1.0 cm. Dowels treated with glue are driven into the holes. You need to work carefully.
- Now the frame is glued, the glue has dried. Then one side of it is lined with a suitable material - usually fiberboard or plywood. The sheet of material is cut according to the required dimensions. It is laid on a flat table surface. Next, the frame is laid on the sheet. The facing material is marked.
- The frame must be removed to apply wood glue to the highlighted strips. Then the frame is installed in its original place. You will need to press it firmly to connect to the facing material.
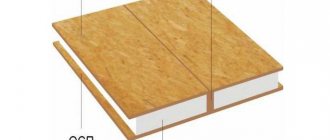
- The resulting internal space of the frame should be filled. Materials for filling can be:
- MDF pieces;
- timber
Filling the panel door with filler
- The filling elements should be glued together. They should also be glued to both the frame bars and the facing material (to the sheet below). Such elements will be required for the rigid installation of the door handle and lock mortise.
- Before covering the structure with cladding, the glue must dry completely. In the meantime, while the glue dries, the material required for cladding is being prepared.
- Measure the perimeter of the frame. Using these dimensions, sheets of finishing material (one, two) are cut out. When it is planned to glue two sheets, first glue the fiberboard and then glue it on top:
- veneered plywood;
- laminated sheet.
Door trim laminated veneer
- If it is possible to put the door leaf under the press, this should be done. You can even create such a device yourself. For example, cover the product with plastic film, and then place gypsum boards or other suitable weights on top.
- If the apartment owner wishes, he can create the cladding not from laminated sheets, but from natural wood slats. However, then each element will need to be screwed to the frame.
To do this, holes are drilled for countersunk holes in order to “sink” the heads of the screws. And so that the holes are visually invisible, they are subsequently filled with a mixture consisting of wood glue and sawdust. After drying, such places are treated with a knife.
Wooden door covered with slats
- All ends, as well as corner areas of the blade, are processed with a router. A high-quality processed surface will be presented in a neat form.
- A lock (latch handle) is cut into the prepared canvas, and the hinges are also secured.
Now the finished door leaf can be hung in the door frame.
Installation of roller blinds on plastic windows without drilling, see here.
Video: How to make a door to a bathhouse from boards with your own hands:
(No Ratings Yet)
Marking and preparing parts for assembly
At the stage of preparing parts, the design of metal doors, a drawing of which is drawn to scale, is drawn in the form of separate drawings - the elaboration concerns how the parts will be attached and what the sequence of work will be.
Detailed drawings make it possible to minimize errors and waste when cutting metal. When transferring drawings to metal, you need to clearly understand how a metal door is structured, which elements require special precision, and for which it is necessary to make a gap of 1-2 mm. For the door frame, it is important that all parts are made with the smallest deviations, especially if the profile pipe will be butt welded along 45 degree cuts.
It is recommended not to cut all the metal into parts at once, as this will make it easier to get confused. But gradually cutting off the required amount of pipe or corner gives you a chance to do everything right.
The first step is to prepare the door frame. Tolerances on the outside should be no more than 1 cm in relation to the doorway. But the inside must be perfect in all planes.
A do-it-yourself metal door, the drawings of which are developed taking into account the installation of safe locks with fixation at several points on the block, must be reinforced with an internal frame made of a profile pipe or corner.
In the process of laying out the door block parts on the assembly table, the installation location is determined:
- anchor bolts for fastening the block to the wall;
- door hinges;
- key holes and fixing the safe mechanism;
Even before welding the hinges to the metal door and connecting the block into a single structure, it is recommended to drill the necessary holes in the profile, and only after that proceed with final assembly.