Calling a professional to lay tiles in the kitchen is not a cheap service. Especially if you use natural materials for cladding. Laying tiles in the kitchen does not require special experience or skill in this type of construction work.
You can tile kitchen walls yourself, but it is important to strictly follow the instructions and basic rules.
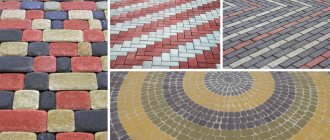
Types and characteristics of tiles
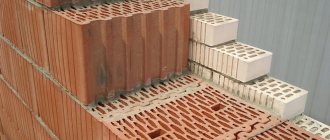
Basically, kitchen walls are covered with ceramic tiles - they are sold at an affordable price, and also do not require special skills for installation.
An improved version of ceramic tiles is porcelain tiles, which are more wear-resistant and durable than conventional ceramics.
But ceramics still does not lose its leading position.
You can compare the pros and cons of each material in the table below.
| Characteristic | Ceramic tile | Porcelain tiles |
| Strength | High strength, however, in this parameter, ceramics are much inferior to porcelain stoneware | The material is much harder and not subject to mechanical stress |
| Appearance | Available in different colors, it allows you to create interesting compositions to diversify your look. | Looks rougher than regular ceramic |
| Waterproof | High level | High level |
| Wear resistance | Resistant to mechanical stress, but if used improperly, cracks may appear | Resistant to heavy objects, acids and chemical elements, cracks and chips are very rare |
You should choose which tile to put in the kitchen based on the principle of its use. It is better to lay porcelain tiles on the floor, and the kitchen apron looks more aesthetically pleasing if the laying is made of ceramic tiles.
Stages of installing tiles on the wall
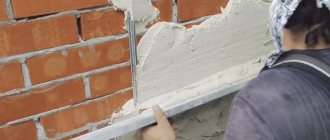
Laying a tile backsplash in the kitchen begins with priming the surface, which improves adhesion to the adhesive and eliminates dust. While the wall dries, the material is sorted and cut.
Installation of the apron includes the following steps:
- preparing glue;
- laying tiles;
- grouting joints.
Mix a portion of glue in the container, which can be used before the pot life of the mixture expires. For cement compositions this is 4 hours. If ready-made mastic is used, its lifespan is calculated from the moment it is applied to the wall. Quick-drying tile compounds harden within 10-30 minutes. When installing the finish, excess mortar that appears must be removed immediately.
Mixing glue
Cement, mastic and polymer adhesives are used in different ways. In the first case, the mixture is applied to the back side of the tile and distributed evenly with a notched trowel. Place the product against the wall and press it.
When using mastics or polymer adhesives, first cover the wall with them, and then install the cladding. Due to the rapid drying of the mass, it is recommended to make a batch to finish a small area.
Cut the wall tiles using a glass cutter with a cutting roller or a diamond tip. On the front side, a furrow is scratched along the fault line, destroying the top layer of glaze. Then lay the product on a flat surface, aligning the cutting line with the edge of the stand or placing a metal rod under it. When pressed sharply, the fragment breaks off. If you need to remove a small piece, use wire cutters.
To secure joints of equal thickness, crosses are laid between the tiles. After the glue sets, they are removed with pliers.
An innovative way to create uniform seams is SVP. These are systems for leveling tiles using devices consisting of clips and wedges. The retainer is inserted between two cladding elements and clamped with a wedge. After the glue has hardened, it is removed along with part of the clip. The advantage of this mounting option is that the coating can be leveled horizontally and vertically at the same time. Disadvantage: consumables remain in the design and are not reused.
Installation of hovercraft
After the glue has hardened - 1-3 days, depending on the type - they begin to grout the joints (for more information about grouting, read the article at the link). Cement, epoxy or polyurethane fugues are used. The color is selected according to the surface design. It is advisable to check the composition for compatibility with the cladding material, otherwise the edges may become stained or unsightly stains may form.
Quick-hardening mixtures are rubbed with a spatula into the joint cavity, first in the transverse, then in the longitudinal direction. The operation is repeated 2-3 times. After 15-30 minutes, clean the surface with a damp sponge or cloth, making sure not to damage the still soft solution. After 24 hours, wipe the coating with a dry cloth.
Preparing to lay tiles in the kitchen
The preparatory stage largely determines how the installation on the kitchen walls will proceed. First you need to clean the base and remove the old coating. The paint can be removed with sandpaper or a sanding machine.
To speed up this process, you can use a chemical solution (the main thing is that it does not harm human health).
To remove old tiles, it is better to use a drill or grinder with a special attachment.
The cleaned walls are treated with a soil solution. Make sure that the solution lies in an even layer. In areas where the primer has not been applied, the glue will adhere less firmly.
Leveling the kitchen walls with your own hands
This work is carried out in several stages. In addition, there are several options for carrying it out:
- if the kitchen walls are cracked or uneven, then they are covered with plasterboard and tiled with ceramic tiles;
- when the walls are covered with paint, you will need to remove it and plaster the walls;
- If the walls are smooth, then initially you need to plaster them a little with your own hands.
The work begins with filling all the unevenness and cracks with putty. All protruding parts are also removed. Deep cracks and potholes must be covered with cement mortar. After this, apply the plaster and wait until it is completely dry.
To level walls that have large unevenness or displacement, the rule is used
A wide spatula is necessary for applying finishing layers of putty to the walls.
Now you need to apply a deep penetration primer with your own hands. You will also need to wait for it to dry completely. After this, you can begin laying the tiles.
Materials, tools and calculation of the number of tiles
In order not to make a mistake with the quantity of tiles, professionals recommend always buying 10-15% of the stock. This is especially true for novice craftsmen, who can make mistakes in calculations or make mistakes when cutting or laying.
The quantity is calculated very simply. First you need to determine the area of the room in which the renovation will be carried out.
The area is calculated using the formula “length times width”.
Add up the obtained values for each of the walls on which the cladding will be carried out. Using the same formula, calculate the area of one tile and divide the area of the entire room by it. This will give you an approximate number of tiles.
Another way to calculate the amount of material is to cut out a tile template from durable cardboard and apply it to the wall on which the ceramics will be applied. Thus, calculate the number of tiles in one row and multiply the resulting value by the number of rows.
However, in this case there is a risk of making a mistake with the size of the kitchen and the tiles themselves.
Required Tools
It is important not only to know how to lay tiles in the kitchen, but also to purchase high-quality tools so that during the installation process they do not damage the tiles and cause problems.
Basic materials for cladding kitchen walls:
- Tiles (10-15% more than the required quantity).
- Ground mortar for leveling walls.
- Glue mass.
- Water for diluting glue and primer.
- Plaster.
- Grouting solution.
- Putty.
Required tools:
- Pencil and ruler for markings.
- Bucket for diluting glue and primer.
- Drill.
- A tile cutter or grinder with a diamond bit for cutting tiles.
- Building level
- Construction mixer.
- Crosses for tiles.
- Rubber spatula.
- Trowel.
- Comb.
It is equally important to correctly calculate the amount of glue and primer. Since they dry quickly, they need to be diluted per 1 square meter, otherwise the compositions will lose their basic properties.
Preparation of glue
There are several types of glue. To place it in the kitchen, a standard cement-based adhesive is sufficient. It is diluted with water and mixed using a construction mixer. If you don’t have one, you can take a drill with a special screw attachment.
The glue must be mixed thoroughly so that there are no lumps. Let it sit for 10-15 minutes, then stir again. It is important to comply with all proportions and dosage indicated on the packaging, otherwise there is a possibility of damaging the material or making it insufficiently durable for fastening.
It is better to apply the glue with a notched trowel. It is recommended to do this in different directions to ensure better grip.
To prevent the glue from sticking to the spatula, the spatula must be regularly moistened with water.
The glue is applied not only to the tiles, but also to the wall itself. After application, let it dry for a few minutes. After this, you can begin installation.
Methods for laying tiles in corners
So, how to lay tiles in corners? There are two options for combining it:
- rectilinear - elements are placed one to another at right angles, so that one end is visible, the other is hidden by the top element. When the tile needs to be adjusted to size, the cut edge is placed on the bottom. The disadvantage of this method is the formation of a seam at the joint. Although it is masked with white or colored grout, the appearance of the surface is not ideal;
- perpendicular at the corners - suitable for decorating protruding borders. The main thing is that the cladding is not visible from below. To do this, the tile is glued in such a way that the horizontal tile “hangs” over the edge. Note that the designed corner will look neat only if the canopy width does not exceed six millimeters and the edge is intact.
Trimming edges
To obtain an even seam at the joint, a bevel for the internal corner is possible - trimming the end of the tile at 45°, which is performed:
- angle grinder;
- roller tile cutter;
- fine sandpaper.
The ideal solution is to use an electric tile cutter with an inclined bed design.
How to make a neat corner of a kitchen apron? To do this, the tiles are cut, laid on the mortar in a corner so that the ends coincide and form a solid coating. It will not be easy for novice craftsmen to complete such work. First, they need to practice.
Important! Laying tiles in the corners must be done on a perfectly flat wall surface, otherwise the width of the adhesive composition will be different, which will negatively affect the position of adjacent elements.
Application of trims
They are decorative PVC profiles that allow you to form a corner of a certain direction. The outer protrusions are covered with L-shaped overlays, and the inner ones are covered with pressed-in arc-shaped overlays. Convex narrow tapes are also widely used.
Let’s answer another question: how to glue a decorative corner to a ceramic tile? Used for this:
- liquid nails;
- silicone sealant;
- glue.
Typically, such overlays have a special design that allows them to be laid on the solution. A special plate goes under the slab and is secured with glue. This method of installation is easy and simple, as a result the surface of the apron acquires a neat, beautiful appearance, while the joints are reliably protected from the ingress of microbes, dirt, and water. To attach trimmers to external corners, silicone or acrylic-based sealant is used.
L-shaped tile
To decorate the kitchen apron in the corners, you can use specially shaped ceramic tiles. Many modern manufacturers produce special corner parts from clay, which are connected to each other at 90°, forming perpendicularly connected parts. Laying such tiles is an extremely simple job. It is attached to a flat surface with a special solution.
Important! When you use L-shaped pieces, they are laid first on the leveled wall, and the rest of the tiles are laid out from them.
Differences between interior and exterior corner design
When doing work, it is important not to forget about the differences between external and internal L-shaped parts. Some are protruding areas, others form a space in which the surfaces of the adjacent kitchen walls intersect.
The greatest difference between external and internal corners is noticeable when installing decorative PVC corners. Trims vary in shape and size, are installed in different areas of the apron, and simultaneously perform decorative and protective functions.
It is worth considering that it is easier to stick the internal trim tiles, because... with a slight deviation from the norm, the situation can be corrected with grout or adhesive.
Note that colored fillers look beautiful only on the inner corners, due to the fact that over time they crumble and fall out, they are additionally covered with profiles that not only protect the surface from external damage, but also wonderfully decorate it.
Preparing the surface of walls and floors
The preparation of the walls largely determines how the tiles will lay and how durable the surface will be. Main stages of wall preparation:
- The old coating is removed.
- The wall must be leveled and all cracks and irregularities removed. The easiest way is to cover the wall with plasterboard. The second option is to fill the uneven areas with putty. The process will take longer, but as a result the wall will become much smoother, which is important when tiling.
- If the wall was initially flat and the old coating was not removed from it, applying regular plaster will be sufficient.
- The next stage of preparation is applying a deep penetration primer. It must dry thoroughly so that the glue does not “move off” upon contact.
Some experts recommend soaking it in water to ensure better adhesion to the adhesive solution.
Marking
Before applying the glue, the wall is marked. Laying tiles should begin from the bottom. Using a level, pencil and tape measure, draw a horizontal line from wall to wall at the bottom of the wall. The height of the line should be measured using the tile itself.
Start laying along the marked line. This will form the first row. Place the remaining materials along the first row. The distance between them is adjusted using tiled crosses, which are installed at the site of future seams.
Installation of an apron for the kitchen
An apron is a vertical part of the wall located between the countertop and kitchen wall cabinets.
Ceramic tile backsplash
This is the most used surface in the kitchen, so the tiles should be easy to clean and resistant to water, aggressive environments and temperature changes. Today, ceramic tiles are the ideal material for aprons.
An apron made from ceramic tiles will cost you a little more than one made from MDF or plastic. But is it worth saving on quality and durability if the apron takes up only a few square meters?
Tip: laying tiles should begin after ordering the furniture, so as not to make a mistake in the size of the apron.
How to calculate the number of tiles for a backsplash
To calculate the amount of material needed, you need to decide on the method of laying it. The diagonal option gives a slightly higher consumption of tiles than the usual basic one.
You should also take into account the percentage of defects, as well as possible chips when drilling and sawing holes for sockets and lamps. Therefore, you need to purchase material with a reserve of 10%.
The height of the kitchen apron can be equal to the distance from the countertop to the wall cabinets, that is, 48-60 cm. The working wall may not occupy the entire space, but it must be lowered behind the countertop by 2-3 cm.
Laying a tile backsplash
If desired, only local areas can be tiled (near the sink, near the stove). It should be noted that the hood above the hob is located slightly higher than the cabinets: from electric stoves to the hood the distance is at least 65 cm, for gas stoves - at least 75 cm. The standard height of floor cabinets is 88-92 cm.
Preparing the base
Laying tiles in the kitchen with your own hands, whether tiling walls or floors, begins only after work has been carried out to prepare the base.
Preparing the base of the walls for laying tiles
For this:
- the old coating must be completely removed (wallpaper, paint, tiles);
- weak plaster is cleaned down to stone or brickwork;
- walls are checked for convexity and concavity and for mutual perpendicularity and are leveled;
- old wooden floors and linoleum floors must be removed and the floor leveled with a cement-sand screed.
How to remove old tiles in the kitchen
Prepare your work area: cover the floor with plastic sheeting and cover items that cannot be removed with old blankets.
Take precautions: wear gloves, safety glasses and a respirator.
Start knocking out the tiles from the top row using a chisel and chisel.
If the material holds firmly, it must be broken, but not with a hammer. Use a tile cutter to cut diagonally into the material. Using a carbide drill, drill a hole at their intersection, insert a chisel into it and, moving towards the edges, break it into small pieces. You can use a hammer drill with a spatula.
After removing all the tiles, you need to thoroughly clean the wall with a chisel from any remaining mortar to rough plaster. Then use a hammer drill with a metal brush to rough grind the surface.
If fungus is found under a layer of old tiles, you need to treat the wall with a special antifungal liquid.
Video instructions for removing old tiles in the kitchen:
Methods for proper installation of tiles and sequence of actions
There are several features on how to properly lay tiles in the kitchen. Laying should begin from the middle and the most visible areas that are not hidden under furniture and decorative elements. Trims should be placed closer to the corners and the floor and ceiling.
Seal the corners with plastic corners so that the edges of the tiles are not visible and the style is not spoiled.
Apron laying
The apron is the main part of the kitchen that marks the work area. The bottom line of the apron should go under the tabletop by at least 1-2 cm, and the top line should reach the hood. The side boundaries can be marked by cabinets or a stove or sink. The tiles for the apron should be resistant to moisture, dirt and grease, and easy to clean.
To make the side border smooth, you should make a marking: attach a cord with a weight to the ceiling. Under the influence of gravity, the cord will fall down and form a perfectly straight line.
We also recommend watching - How to lay a kitchen apron from ceramic tiles with your own hands
Laying tiles on the floor
The floor is more often exposed to mechanical stress, so it must be durable to cover it. It is better to use porcelain stoneware for this purpose, or, in extreme cases, standard ceramic tiles.
You should choose a moisture-resistant and heat-resistant adhesive, since heated floors are becoming increasingly common.
It should not crack from high temperature.
Laying tiles on kitchen walls
The main task is to correctly lay the first row of tiles. Constantly monitor it using a building level. In order for it to lie flat, its boundaries should be marked in advance. The horizontal boundary is marked with a level, the vertical boundary with a cord with a weight attached to it.
At the bottom you need to place a metal profile that will keep it from sliding.
How to put on drywall?
Drywall is a fairly fragile material, so before laying it should be properly processed and coated with a special primer. You can prepare drywall as follows:
- Seal all seams and joints with putty.
- Go over the surface with a roller twice to coat the drywall with an even layer of primer.
- Finish the holes for the pipes with silicone sealant.
Design of corners and slopes near windows
Particular attention should be paid to the design of corners and slopes so that they look aesthetically pleasing. To do this, you need to prepare plastic corners in advance that will hide the ends of the tiles.
The corner should be 2 mm larger than the thickness of the tile so that the tiles fit inside without any problems.
How to properly glue it to concrete without leveling?
Concrete is a smooth material itself, so it can be laid on it without prior leveling. Apply a few drops of glue to each piece, placing them in the corners and in the center.
You should not glue more than 2-3 rows in one approach, since the tiles are quite difficult to attach to concrete. The glue also needs to be selected appropriately, which will ensure reliable fixation on the concrete base.
Material gluing technology
To prevent the tiles from falling off in the near future, you need to strictly follow the procedure and buy high-quality glue.
Tools and materials
To work, you will need a number of tools - rubber and iron spatulas, a tape measure, a metal ruler and a level. A grinder, an aluminum rule, a metal profile, a tile cutting machine, a hammer, pliers, a roller with a tray and a rubber mallet will also come in handy. In addition to the tile itself, you will need to buy:
- plaster,
- nails,
- good primer
- grout for seams,
- glue,
- liquid Nails,
- crosses, plastic corners,
- dowels,
- gypsum board sheets (plasterboard).
We will consider below which tile adhesive is best suited for a kitchen backsplash or floor. Firstly, the packaging must be marked “for internal use”. In new houses that are subject to shrinkage, they use elastic glue; for others, they purchase standard glue. Transparent (glass) tiles, marble, and mosaics should be glued with white glue, ceramics and porcelain tiles with gray glue. Among the brands that are worth paying attention to are Ceresit, Knauf, Mapei, Litokol.
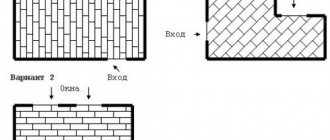
Layout options
If there are small uneven walls, it is better to purchase a mosaic; it will help hide unsightly protrusions. To visually increase the height of the walls and expand the room, tile panels, paintings, and material with vertical stripes are used. There are several ways to stack products. They can be like this:
- Parallel. The tiles on the wall must be laid parallel to the floor.
- Diagonal. The material is laid diagonally, which visually expands the room.
- Deck. Imitating brickwork, move each subsequent row. This is only possible if the tile is rectangular.
- Carpet. The composition is a complex panel where the pattern is formed by the tile itself. The method is available mainly to professionals.
- Modular. It is a combination of different tiles.
Beginners can choose one of the following methods:
- Seam to seam. This is the simplest technique for working with tiles. It must be glued in rows, one element strictly under the other. It’s easy to calculate material consumption, and the result is usually decent.
- At a run. The seam of the upper element should be in the middle of the bottom tile. The method is widely used by beginners.
- Diagonally. For a beginning tiler, the method is more complicated than the ones mentioned above. The rows of tiles will have to be directed strictly at an angle of 45 degrees. The material consumption will be greater, it will often have to be cut, which also requires skill.
- Combined method. Some of the tiles need to be glued in the usual way, the rest - diagonally, like chess squares, which will allow you to achieve an interesting design.
Preparing the base
To prevent the tiles from falling off, you need to prepare the walls well. The tile may fall off from an uneven surface. It must be cleaned of the old coating and leveled. For this purpose, two options are used:
- Plaster. Usually sand-cement mortars are used, but lime, gypsum and clay are not suitable. The walls are cleaned of dust, dirt and the surface is roughened. To do this, notches are made in the concrete, and shingles are nailed into the wood. Then the walls are primed with a deep penetration agent, beacons are installed, and corner profiles are attached. The solution is mixed and applied to the surface.
- Drywall. If the differences in the wall are more than 5 cm, it is better to use gypsum board. First you need to eliminate the areas that are falling off and prime the walls. Then they measure and cut the plasterboard, make holes for sockets, and install the wiring. The sheets are fixed to the wall by applying mounting adhesive to them. Before the composition completely hardens, level the drywall by tapping it with a hammer in different areas. After drying, the plasterboard is primed.
If the wall is covered with paint, it is washed off with a special liquid, then the residue is removed with a metal spatula. Otherwise, the tile may peel off quickly.
Applying primer
To work, you need to choose a high-quality primer of a reputable brand, which is capable of penetrating deeply and reliably adhering to cement or plaster. Apply it only to a dry surface. The liquid is poured into the tray, the roller is dipped and squeezed out a little. Strokes are made arbitrarily, as convenient. The soil should saturate the wall well so that there are no dry areas left. In the corners the solution is applied with a brush. Then allow the soil to dry completely.
Preparation of the fixing composition
The adhesive solution is diluted immediately before laying the tiles. Pour water into a bucket (as indicated in the instructions), add glue and knead well. To avoid lumps, it is better to use a drill with an attachment or a construction mixer. There is no need to dilute a lot of glue at once; a solution for 1-1.5 square meters is enough. m of tiles.
Progress
The first row of tiles should be 2-3 cm below the working surface. The last row is extended to a similar distance under the upper cabinets. Depending on this, lines are drawn for the beginning of the row at the bottom and at the top. An iron profile is drilled under the bottom (it can be replaced with a wooden block). It will serve as a support that will prevent the tile from slipping until the glue dries completely.
The first elements are glued from the center of the bottom row, moving to the edges. The adhesive mass is scooped onto a spatula and applied to the tiles or the wall - whichever is more convenient. The lower edge of the tile is pressed against the profile and pressed well. The glued material is tapped with a mallet to expel air. Seam crosses are placed at the upper and lower corners of the tile.
Making tile joints is very important. They prevent the tiles from cracking when they expand at elevated temperatures. They also add beauty to the masonry and hide errors. After the first tile, glue the second one, then lay out the entire row, placing crosses. Every 10 elements they are interrupted to remove the exposed glue with a damp cloth.
The following is the operating procedure:
- The next row is glued a day later, when the first one dries,
- finish work on the second day,
- allow the masonry to dry,
- tap the walls with a mallet to find voids by the dull sound, remove tiles from such areas and re-glue them,
- remove the crosses,
- thoroughly wipe the entire tile, removing dirt and glue residues,
- unscrew the support profile.
Grouting joints
The joints are rubbed down only after the glue has completely dried. This is the last stage of laying tiles. The grout is of high quality and selected according to color. Dilute the mass as indicated in the instructions (or buy ready-made). Take a little mixture onto a rubber spatula or a special grater and apply it to the seam. Excess is immediately wiped off with a damp cloth. As the grout dries, you can go over it again with liquid glass, liquid silicone or waterproof varnish.
Covering another surface
In the kitchen, tiles are often laid on the floor. To level it, a screed is made, and the surface must be absolutely flat. Otherwise, the tile will quickly peel off. The kitchen is visually divided into 4 parts, the surface is outlined. Installation begins from the center of the room. In the middle, lay 4 tiles on the glue and press them tightly. Seams are left between them, for which crosses are used. After drying, grout is applied.
Good tools and quality materials will make laying tiles in the kitchen much faster and easier. If necessary, beginners can use the clamping system; they will level the tiles in one plane without a level.
The result will be an updated room that is pleasing to the eye, especially taking into account the savings on hiring tilers.
Grouting joints
The final stage is grouting the joints. Before starting, you need to remove all the crosses and then apply a special solution to the tiles. It is worth choosing a transparent grout or one close in color to ceramics.
The consistency should not be too thick, otherwise it will be difficult to apply. For convenience, use a rubber spatula or sponge.
Read more about grouting here - How to grout tiles on a wall
Surface preparation for installation, tools and materials
In order to lay tiles in the kitchen with your own hands according to all the rules, you will need:
- tile;
- plaster;
- nails;
- rubber spatula;
- construction level;
- metal spatulas;
- deep fill primer;
- plastic crosses and corners;
- tile powder;
- special machine for cutting tiles;
- roulette;
- aluminum rules;
- Bulgarian;
- drywall profile;
- metal ruler;
- special glue.
When choosing crosses for seams, you need to focus on the structure of the tiles
Let's start choosing a variety of materials. There are many types of primer, but each of them is practically the same from each other. It must be remembered that you cannot pour the primer back into the canister if you have poured it out of it. In addition to its unsuitability, it will emit a disgusting smell.
Glue on the market is also available in huge varieties. Some recommend using only foreign compounds, others – domestic ones. Experts, for the most part, are of the opinion that domestic ones are no worse than foreign ones. The main advantage is the lower price, since there is no overpayment of extra money for the brand.
Useful tips
You can see how to lay tiles on the wall in the kitchen with your own hands in the video. Some practical tips:
- It should not only be durable, but also beautiful, suitable for the interior of the kitchen.
- It is better to avoid bright colors and massive patterns in the kitchen.
- To make it fit more tightly to the concrete, you can attach a reinforced mesh underneath it.
- To ensure better adhesion to the wall, the adhesive should be applied in different directions.
These helpful tips will help you lay tiles yourself and make your kitchen beautiful.
Covering window slopes in the kitchen
Some people like to tile not only the floor and walls in the kitchen, but also the slopes, as we wrote earlier about how to make slopes. This process is not complicated, we prepare the slope, then prime it, then for installation we will need an outer corner into which we will drive the end of the tile. It is important that the thickness of the corner itself be greater than the tile, otherwise the tile will stick out unsightly; if the tile is 8 mm, then the corner is 10 mm.