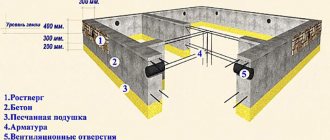
The lifespan of a building is directly related to the start of its construction. Properly installed ventilation in the foundation of a house will prevent the destruction of floor and wall materials. The durability of residential and non-residential premises and the health of the people in them depend on this stage of work.
You will learn everything about the rules and regulations for constructing a ventilation system to protect the foundation of a house from the article we presented. We will tell you about the reasons why moisture removal from the foundation is mandatory. We will introduce you to proven methods, calculation schemes and installation stages.
Options for ventilation systems and schemes
The construction of a ventilation system is regulated by domestic SNiPs (Building Norms and Rules) and international construction standards.
Reasons for regular ventilation
Some consequences of a missing or improper foundation ventilation system:
- The appearance of condensation, a gradual increase to 100% humidity;
- Rotting of wooden beams, ceilings, rough materials of the floor structure;
- The accumulation of natural radon gas released from the soil, the inhalation of which leads to oncology;
- Reproduction of mold, fungi, and other microorganisms that cause allergic diseases and bronchial asthma.
To maintain the humidity regime, it is necessary to evaporate the accumulated moisture and remove it from under the floor of the house to the street. Neglecting building regulations can cause irreparable harm to the health of the residents of the house.
Organization of natural ventilation
The choice of ventilation option is determined by economic feasibility.
There are two main ways to arrange natural ventilation:
First method. Installation of special holes in the foundation, called vents or vents.
Openings located in opposite walls cause a draft, which removes moisture from the space limited by the foundation
Second method. Installation of supply and exhaust air ducts. They take moisture and harmful gases from the basement and discharge them outside through exhaust ventilation risers.
It is possible to install one exhaust pipe for small basements. Holes for fresh air circulation can be made in the floor.
The first method is cheaper to construct, but will require additional costs for heating the house during operation. The second method is effective only with an integrated approach to energy saving.
It requires large expenses for insulating the foundation, creating a waterproofing barrier, constructing a blind area, air ducts or pipes. Investments will not pay off without insulation work and high-quality insulation of the entire house from the inside.
Forced system device
Natural ventilation depends on the temperature and density of the air mass outdoors and indoors. It does not work when the air temperature outside and in the basement are equal. When humidity is high and the efficiency of the natural air exchange system is low, it is supplemented with electrical appliances and fans.
Forced ventilation is usually used:
- in basements with an area of 40 m2 or more or with isolated compartments;
- in the architectural design of a house without ventilation ducts and pipes above the roof;
- in rooms equipped with sources of odors and humidity in the basement - workshop, garage, sauna.
The power of supply and exhaust ventilation devices is calculated based on the volume of the basement.
Supply fans intensively pump in fresh air from the street, and exhaust fans remove exhaust air outside. Typically, the supply and exhaust system is used either for exhaust or for supply
In mechanical ventilation systems, either a supply fan or an exhaust fan are activated. If the mechanism operates on the inflow, then the air it pumps spontaneously displaces the exhaust air mass from the basement. If the hood is in operation, then air is drawn into the rarefied space by itself, naturally.
Ventilation in the foundation of a house - how it works
Any ventilation, as an air exchange process carried out in a certain volume, is based on the mechanical or natural impulse of the influx and exhaust of air masses.
- Mechanical stimulation involves the use of injection equipment in the air exchange channels - fans, compressors, and so on. This is an extremely effective, but very energy-intensive method of ventilation.
- Natural impulse uses an almost inexhaustible and free source of energy to activate the air exchange process - the forces of nature itself. Air exchange occurs due to the pressure difference between the supply and exhaust or the temperature difference between the ventilated and ambient environment.
Ventilation under the foundation works only due to the natural impulse of flow . Moreover, it’s not even a matter of temperature or pressure differences - everything is complicated with foundations. The principle of operation itself is based on the elementary “blowing” of the basement space with ordinary winds, the gusts of which rage in the atmosphere all year round.
And this is, perhaps, the most reliable ventilation option: after all, with proper selection of the dimensions and location of the vents, drafts provoked by the wind will “stretch” the entire basement space of the house, providing multiple air exchanges in the foundation area.
Foundation ventilation device
Calculation of vents based on the area of the base
Effective ventilation of the foundation in a wooden house or brick building is possible only if there is an influx of a sufficient portion of air masses. In turn, the volume of inflow depends on the dimensions of the ventilation holes - vents. Thus, the efficiency of the entire ventilation system serving the foundation of the building depends on the size of the vents.
Therefore, in building regulations there is a special section devoted to calculating the dimensions of vents. Moreover, the easiest way to determine these dimensions is to compare the area of the ventilation hole and the area of the basement of the building. The construction rules SP 54.13330.2011 even indicate the proportion of such a comparison - 1:400.
Example: if the area of your floor (basement) is 100 square meters, then the area of the vents sufficient to service such a base cannot be less than 0.25 m2 (1/400 x 100).
At the same time, it is necessary to understand that vents are arranged exclusively in pairs, located along one axis - this enhances the energy of the draft. Because of this, the total number of vents cannot be less than 4 pieces (one hole in each “wall” of the base tape). Therefore, the area of one vent is determined by dividing 1/400 of the floor area by the recommended paired number of channels for ventilating the base.
Example: if the area of the vents is 0.25 square meters, and the number of channels cannot be less than 4, then the area of one vent is 625 square centimeters (0.0625 m2).
However, both the number of vents and the location of these ventilation holes are determined solely by the type of foundation.
Placement of foundation vents
Ventilation of pile foundation
Foundations on piles or short pillars involve the construction of a strip plinth that blocks access to the supporting elements of the foundation structure. Moreover, vents can be installed both in a finished base and in a belt under construction.
Ventilation arrangement during the construction of the basement is carried out as follows:
- First, the dimensions of the vents are determined.
- Next, when the base tape reaches ½ of its height, “bookmarks” are made in opposite walls for the vents, placing them at a distance of a quarter of the length of the façade from each corner. In most cases, “fills” are bricks or channels made of a profile pipe that are not reinforced with cement mortar and are placed in the formwork when the tape is poured.
- After completion of the construction of the tape, the bookmarks are removed from the body of the enclosing structure, opening the vents.
From the point of view of ease of arrangement, the installation of vents during the construction of the plinth strip looks preferable to the operation of “cutting through” ventilation ducts. After all, when cutting out the vent, it is necessary to use a special tool - hammer drills, grinders, drills with special attachments - with the help of which they pierce a fairly strong wall of the tape. Let's say right away - this is very hard work.
Foundation ventilation on screw piles
Ventilation of strip foundations
From the point of view of the process of arranging vents, the strip foundation is arranged in a more complex way than the pile version of the foundation. Indeed, in addition to the external tape that holds the walls of the house, inside such a foundation there are special partitions on which the internal interior partitions are based.
Therefore, the process of forming ventilation channels in the strip base is as follows:
- First, the number and dimensions of the vents are calculated.
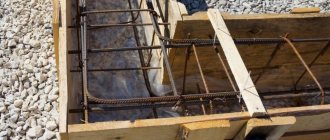
- Next, the formwork is assembled for pouring the foundation strip.
- Upon completion of assembly, the formwork is filled with reinforcement and mortar to ½ of the height of the foundation.
- After this, wooden blocks wrapped in roofing material are placed in the required places - at a distance of ¼ of the total length of the front or side section of the tape from each external corner.
- The same bars are laid in the internal sections of the foundation strip, placing them along the axis of the future ventilation duct.
- Next, you need to fill the formwork with mortar to the calculated height of the foundation.
After a week, you will remove the formwork and push out the wooden block from the tape, which will slide out of the roofing felt wrapper, opening the air channel.
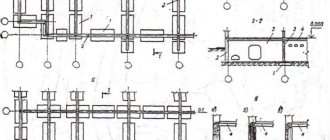
Design for pouring a strip foundation
When is it possible without ventilation?
There is no need to install vents or air ducts in any foundation without a subfloor. No basement - no problem.
But not always, but only when at least one of the following two conditions is met:
- A concrete slab is installed on the grillage of a columnar foundation, and the space inside is completely filled from the ground to the floor with a material that filters water well - sand, expanded clay, granulated foam glass. Excess moisture in them evaporates simply and quickly.
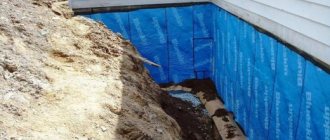
- A drainage system has been installed to remove water from the foundation. Excess water is collected by drains - perforated drainage pipes, and discharged into a collector well or waste pit outside the site.
- A durable waterproofing is installed, wrapping all base elements with a water-impervious layer of adhesive or welded material, as well as a complex of materials.
You can omit ventilation vents when using a crawl space or basement for storage. You just need an open passage to the living area of the house and ventilation windows with bars or opening transoms.
It is permissible not to install ventilation vents if ventilation will be carried out through windows and doorways in an equipped, operational basement or basement
It is up to the homeowner to decide whether special vents or ducts are needed in the foundation of a home with an exposed subfloor. Refusal of products in the above cases is permitted by IRS-2006R408.3. In other foundation structures, a ventilation system is required.
conclusions
The installation of vents in the foundation of a private house is a mandatory requirement if there is a strip base and an unheated underground space. Effective ventilation of the subfloor is necessary to ensure the durability of the building in both warm and cold seasons. In winter, partial closing of some vents is allowed in order to reduce heat loss from the building. For this purpose, ventilation grilles with dampers and various available materials are used, for example, insulation in the form of polystyrene foam, expanded polystyrene or mineral wool. However, a ventilation system using vents must also work in winter, since the lack of effective ventilation will lead to extremely unpleasant consequences, more serious than an increase in heating costs for the building.
Return to list
Specifics of ventilation with vents
Holes in the foundation to circulate fresh air provide simple and inexpensive ventilation. Vents remove condensation well, keeping the basement dry.
Parameter calculation steps
For effective ventilation, the number of openings and dimensions are carefully determined. Regulates the location, size, number of vents SNiP 01/31/2003.
During construction the following requirements must be met:
- The diameter of the circular section must be at least 25 cm.
- The minimum area of one hole without reinforcement is 0.05-0.85 m2;
- The sum of the cross-sectional area of all vents must be more than 1/400 of the base of the house;
- With increased radon content in the soil, the total area of the openings is increased to 1/100 of the basement area.
Most owners of private houses prefer to install ventilation holes with a minimum permissible cross-sectional diameter, increasing the number of vents if necessary.
The geometric shape of the vents can be any. The most commonly used are round, square, rectangular sections
Naturally, if the foundation or basement level is laid with brick or foam concrete blocks, then the square configuration of the ventilation vents is a priority.
But when pouring a foundation concrete “ribbon”, preference is given to a round section. It is also obtained when drilling structures for ventilation after construction.
Vent location options
The design of exhaust and supply openings has the following features:
- It is recommended to make the first blows from each corner no further than 0.9 m;
- The distance between the holes is set to no more than 3 m;
- The distance from ground level is from 3/4 to 2/3 of the height of the foundation;
- There must be at least 30 cm from the opening to the bottom of the base plane;
- Place the vents symmetrically on opposite sides;
- If the foundation is low, you will have to dig pits under the vents.
Openings are also made in basement partitions.
Hole installation process
The sinuses are filled while the foundation “ribbon” is being poured with concrete. Typically plastic pipes are used for installation. They need to be filled with sand to prevent deformation and breakage, which is removed after the concrete has dried.
PHOTO 5 If for some reason the builders did not make vents during the construction of the foundation, they need to form ventilation holes in the finished structure.
Step-by-step instructions for performing the work:
- Draw the future foundation by placing on paper the calculated number of vents indicating the dimensions;
- Prepare cut pieces of pipes with sand equal to the width of the foundation “ribbon”, compact the ends tightly with a rag;
- Place pieces of pipes, sleeves, in the formwork for pouring concrete, attaching each end of the future vent tightly to the walls of the formwork;
- Fill the formwork with the pipes with concrete, after hardening, clean the pipes and install protective grilles.
Do not limit the holes with wooden blocks when pouring the foundation. Their dismantling will require additional effort, loss of time, and damage the concrete walls.
During the construction of a foundation or plinth made of bricks with rectangular cross-section holes for ventilation, the roof is reinforced. The upper part of the masonry is strengthened using a reinforcement cage. Metal rods are laid above the hole in a horizontal plane
Square holes in brickwork are obtained by laying elements staggered and using cut bricks.
Methods for protecting openings
All through vents should be closed with special plugs or valves that allow air to pass through. They protect the base from the penetration of birds, cats, rats, mice and other small animals.
Different types are used based on personal preference:
- Plastic products have a modern aesthetic design, a variety of shapes, including in the form of bends at right angles. They are often installed on small openings.
- Strong, reliable fastenings ensure durability of metal doors. Grids made of reinforcement, stainless steel mesh welded to the corners, are usually used on wide openings.
- For individual orders, beautiful and strong gratings can be made in workshops. They will become not only protective elements, but also decorative decorations of the facade.
Blinds and grilles made of polymers are used mainly in the arrangement of ventilation openings of small cross-section.
Devices that regulate the width of the opening, called dampers, will help regulate air exchange. Install them on indoor air ducts
If the ventilation hole in the foundation or plinth is blocked by a stationary grille, you can partially or completely open/close the opening using a damper mounted in the air duct.
Air ducts for the exhaust device
This form of supply and exhaust ventilation is suitable for all types of foundations. The floor on a monolithic, columnar, pile foundation will be as dry and warm as possible.
Insulation of a pile foundation: step-by-step instructions
Any owner of a site, when planning to build his own house, tries to minimize the total cost estimate as much as possible. Fortunately, the abundance of modern technological developments makes it possible to choose the least expensive approaches to construction, naturally, without losing the performance qualities of the future building.
Insulation of a pile foundation
One of the most material-intensive, expensive, and time-consuming stages of construction was usually considered to be the construction of the foundation of a house. However, for many types of residential and ancillary buildings, pouring a strip or monolithic slab base is not required at all. It is enough to confine yourself to installing piles, which are tied on top with a grillage - this will become a reliable basis for raising the walls. This approach is good for everyone, but very often the house, especially with very uneven terrain, turns out to be “floating in the air,” that is, below the floors of the first floor there is a space blown by all the winds. It’s okay - you need to properly insulate the pile foundation, and the building, even externally, will not differ at all from those buildings that are installed on a “classical” concrete base.
A few words about the pile-screw foundation
The pile-screw foundation has a number of significant advantages.
- First of all, it becomes the most profitable solution if the house is being built on unstable, waterlogged soils that tend to swell in winter. The lower screw part of the pile reaches depths below the freezing level, stable layers of soil, and seasonal fluctuations in the surface do not have any negative impact on the constructed house.
- Such a foundation is the most economical and easiest to construct when building houses on sites with rugged terrain - achieving horizontal bottom trim with this approach is the easiest way.
- The construction of a pile-screw foundation is less dependent than others on the season and weather - construction can be carried out at any time of the year.
- In terms of construction time, such a foundation also has no equal.
- The technology for its arrangement is quite simple and, subject to certain conditions, can be implemented on its own.
- From a cost point of view, the construction of a pile foundation is the most economical.
The entire technology for creating a pile-screw foundation for building a house can be briefly presented as follows:
| Illustration | Brief description of the operation performed |
| Piles are pipes with a diameter of 100 mm or more made of high-quality steel, with a wall thickness of at least 4 mm. Specific parameters of piles, including their length, are calculated by designers depending on the level of planned loads, the general picture of soils and topography at the construction site. The lower end of the pile has a sharp point with one or more spiral-shaped cutting blades welded on. | |
| A set of piles usually consists of pile heads to which mounting platforms are welded. The diameter of the heads is such that they fit tightly onto the pile pipe. | |
| After marking the pile field, pits with a depth of about 300 ÷ 500 mm are usually dug in the places where the supports are installed. They are often shed with plenty of water to facilitate the initial screwing of the pile into the ground. | |
| The pile is placed vertically in the pit, and a pin is inserted into the hole in its upper part. pipe-levers are put on it for screwing. | |
| With the efforts of two people (sometimes more are required), the pile rotates, gradually plunging deeper into the thickness of the soil. At this stage of work, the most important thing is strict control of the vertical screwing of the support. Screwing continues until the pre-set depth mark is reached. Many construction organizations have specialized equipment to mechanize this most labor-intensive operation. | |
| After all the piles are installed, using a laser or water level, an accurate mark of the common protruding part of the supports is made on each pipe. It must be below the hole where the pin was inserted. | |
| Next, all piles are trimmed to a single horizontal level. | |
| The concrete solution is mixed, and through the funnel the pile is completely filled to the top with it. | |
| The consistency of the solution should be sufficiently liquid and fluid so that the pipe cavity is filled completely, without air bubbles. It is typical that there is no need to wait for the concrete to set. They immediately move on to the next operation. | |
| The standard caps are placed on the piles until they stop, so that the installation sites are oriented correctly. The heads are tightly welded with a continuous seam | |
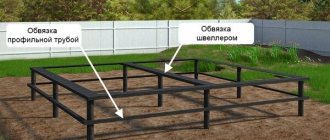
| To completely eliminate any vibrations of the supports, it is recommended to provide an auxiliary strapping made of a metal profile, which is welded into the piles below the head. If the piles protrude to a considerable height, sometimes several rows of strapping are welded. This operation is especially important if the crown beam will be directly attached to the mounting sites of the piles. | |
| There is another approach - installing a common belt (grillage), for example, from a channel of the appropriate size. The grillage will become the basis for the further construction of the walls of the house. | |
| The installation of a pile-screw foundation must be completed by cleaning the weld seams from slag and high-quality treatment of all metal parts with anti-corrosion compounds. |
The table focuses on creating a grillage from rolled steel. However, the options may vary.
Several options for piping (grillage) of a pile-screw foundation
- Figures “A” and “B” show a welded grillage made from an I-beam and a channel, respectively.
- Fragment “B” - the grillage is not used at all, and the lower crown beam is attached to the mounting sites of the piles.
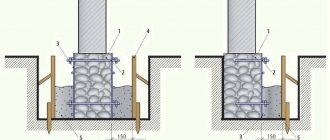
- And finally, option “G” is pouring a reinforced concrete grillage. In this case, a kind of “symbiosis” is created between the pile and strip foundations.
This option is the most labor-intensive, and is most often resorted to if it is necessary to create a reliable foundation for building a house made of brick or gas silicate blocks.
In this case, at the stage of pouring concrete into the piles, a reinforcement structure is installed in the pipes - it should protrude from above. After the piles are installed, the formwork for the grillage is installed, and a reinforcing belt is laid, which must be connected to the internal reinforcement of the piles. The solution is poured, and the created structure will be ready for further construction operations only after the concrete has fully matured (no earlier than a month).
Structurally, such a grillage can be raised above the ground, located on the surface, or be an analogue of a traditional shallow foundation strip. But in any case, it rests not on the ground, but on piles.
Various options for the location of a reinforced concrete grillage
1 – screw pile;
2 – internal reinforcement in the pile;
3 – grillage reinforcement belt;
4 – reinforced concrete grillage.
Such close attention was paid to the types of pile binding because the technological approach to the insulation of a pile foundation directly depends on this.
Why is it necessary to insulate a pile foundation?
It would seem, what is the point of insulating a pile foundation? It rests deep in layers of non-freezing soil, that is, it is not in danger of swelling. If high-quality anti-corrosion preparation of the structure has been carried out, then there is no particular fear of the destructive effects of soil and atmospheric moisture.
However, very vulnerable areas remain, as well as a number of other unresolved issues:
- If a reinforced concrete grillage is poured, then regardless of its position relative to the ground level, this structure becomes a very powerful cold accumulator. Naturally, a massive grillage will “pull” heat from the walls and ceilings resting on it, which will lead to significant heat losses and increased costs for replenishing them with the heating system.
A reinforced concrete grillage is always a powerful “cold accumulator.”
In fact, the goals of insulation in this case largely coincide with the task of thermal insulation work on a conventional monolithic strip foundation - reducing heat loss, and protecting the reinforced concrete structure itself from the effects of temperature changes.
- If the walls are installed on a wooden or metal grillage, then there is space under the house that is blown by the wind. During the cold season, this will also lead to cooling of the ground floor floor and the lower part of the walls. Of course, it is possible to provide very reliable multi-layer thermal insulation of the ceiling, but it is still better to eliminate heat loss completely by covering the gap with an insulating structure.
- If the house is equipped with at least minimal “conveniences” - running water and even the simplest sewerage system, then engineering communications will pass through this underground space. Insulation of the pile foundation will increase the level of protection of communications from freezing and from mechanical damage.
Insulation and protection are required by utility lines running in the underground room.
- Just from an aesthetic point of view, the house will look much more advantageous if the basement part of the pile foundation is insulated and beautifully finished externally. In addition, garbage and dirt will inevitably be blown into the open space by the wind, which in itself is unpleasant and will require additional efforts to put things in order.
- The house will receive maximum protection if a blind area is installed around the perimeter of its walls. An integrated approach to the insulation of any foundation also implies the creation of a high-quality blind area that is not subject to swelling, that is, thermally insulated from below.
Now that the reader is apparently convinced of the need to insulate a pile foundation, we can proceed to consider some typical cases of work.
Insulation of a pile foundation with a reinforced concrete grillage
This is one of the most difficult cases, since the goal is not only to block access to cold air into the underground space, but also to provide thermal insulation protection for the grillage itself so that it is not subject to destructive influences and does not become a powerful bridge of cold.
There may also be several options, and they will depend on the height of the basement part of the pile foundation, the position of the reinforced concrete grillage, the features of the first floor ceiling, etc.
Let's look at one commonly used scheme:
The first option for insulating a pile foundation with a reinforced concrete grillage
1 – soil at the construction site.
2 – installed foundation pile, which ends at the top with a massive reinforced concrete grillage (item 3). The grillage itself is the basis for the construction of an aerated concrete (brick) wall (item 4).
On the outside (this is a prerequisite) there is a layer of insulation of the required thickness (item 5). As a thermal insulator, the best solution would be to use extruded polystyrene foam, for example, Penoplex-Foundation boards. This material is resistant to high static and dynamic loads, is not afraid of exposure to atmospheric and ground moisture, and has excellent thermal resistance.
Penoplex slabs - comprehensive home insulation
The Penoplex range of thermal insulation boards covers literally all areas of private construction. Read more about the advantages of Penoplex insulation and the technologies for its use in a special publication on our portal.
A layer of horizontal insulation (item 6) is tightly joined to the grillage insulation, without gaps, which will prevent freezing and swelling of the soil around the walls and thereby ensure the integrity of the concrete blind area poured along the perimeter (item 7). Often the blind area is not poured, but laid out, for example, from paving stones.
On top, also without a gap, the façade insulation (item 8) is joined together as in the diagram, or, better yet, overlapped, so as not to create a “cold bridge” at the border of the base and the wall.
Prices for Penoplex insulation
Penoplex insulation
With this approach, floor insulation is solved in the following way:
Sand filling is made inside, about 500 mm thick (item 9). Instead of sand, the pillow can be made of loose insulation - expanded clay, or a complex, layer-by-layer option can be used. From above, this backfill must be covered with a waterproofing layer (item 10) - this role is usually played by a couple of layers of roofing material laid with overlapping overlaps.
A rough screed with reinforcement is poured on top (item 11). A layer of insulation (item 12), for example, the same Penoplex, is laid on top of it. Well, above that there will be a finishing screed with a thickness of 60÷70 mm, in the thickness of which a water or electric “warm floor” can be provided.
This scheme almost completely blocks access to the cold to the grillage and walls, and there is simply no underground space as such.
Another option is when it is impossible to do without an underground, for example, when the first floor floor slab is laid on the grillage.
And in this version, the grillage is also insulated from below, from the ground
At the beginning, everything is the same - soil (item 1) with a screwed-in pile (item 2) and a reinforced concrete grillage (item 3). Differences - from the grillage comes the base brickwork (item 4), which already becomes the basis for the construction of walls made of bricks or blocks (item 5)
Vertical insulation of the base is carried out with the same extruded polystyrene foam (item 6). But in this case, horizontal insulation of the grillage itself is also provided from below. To do this, first lay out a gravel layer (item 7), then a compacted sand cushion (item 8), and then a layer of the same insulating material (item 9). The best solution is to carry out such a design even before pouring the grillage, that is, the horizontal layer of insulation in this case will act as the lower surface of the formwork. Thus, the foundation tape received reliable insulation from the outside and from the bottom.
Decorative cladding is provided on the outside of the plinth and facade wall (item 11) - these can be panels, siding with a ventilated gap, or a plaster layer using “wet facade” technology.
The diagram shows a blind area (item 10) without its own insulation, but such thermal insulation should not be ignored. This will significantly increase the viability of this structure, since the freezing of the soil under the blind area has not been canceled.
The floor slab (item 12) is laid on the grillage, and an underground (item 13) inevitably remains below it. Next, thermal insulation of the floor is carried out in the usual way. First, a layer of roll or coating waterproofing (item 14), then a layer of insulation (item 15), and then a finishing screed or “warm floor” system.
The entire grillage (tape) must open to the base. There will be no problem if the lower part of the insulation is below ground level - as already noted, Penoplex is not at all afraid of such an impact.
Before attaching the insulation to the grillage, all surfaces, concrete and metal, are first carefully waterproofed - for this, special bitumen-based mastics are usually used, and to obtain a guaranteed result, it is also recommended to use high-quality roofing felt.
It is recommended to fix the insulation on a concrete waterproofed surface using a special glue designed specifically for thermal insulation work. It can be in the form of a dry construction mixture, a ready-made paste composition, or in tubes like polyurethane foam.
One of the types of glue for insulation work
Penoplex panels have lamellas for easy joining without leaving gaps. But if the gaps still remain, then they are filled with polyurethane foam. If foam is used, it is recommended to coat all seams with bitumen mastic on top, after trimming off the excess.
There is no provision for fastening the panels to the concrete strip below the ground level, but in the basement part, if necessary, you can use “fungi” dowels.
As already mentioned, in the case under consideration, it is imperative to provide horizontal thermal insulation along the perimeter of the building, under the blind area. To do this, a trench is dug in advance, about 400 mm deep. A sand and gravel cushion is poured into the bottom and compacted, and then the insulation boards are pricked so that they fit tightly with the vertical insulation.
Joining vertical and horizontal insulating belts and installing reinforcing mesh
Reinforcing mesh is laid on top of the insulation. Formwork is installed along the outer perimeter of the future blind area. Then you can pour concrete so that a small difference in height is ensured - about 30÷50 mm with a slope from the wall.
Pouring the blind area with concrete
In fact, at this point the insulation of the pile foundation with a reinforced concrete grillage can be considered complete. It remains only after the blind area has completely hardened to provide external cladding of the base - panels, tiles, plaster, etc.
The question of the thickness of the insulating layer, vertical and horizontal, remained unresolved, and this is also of great importance in this case.
It is easy to calculate this parameter, guided by the normalized values of heat transfer resistance for building structures calculated for a specific construction region. These indicators can be determined, for example, on the attached map diagram - in this case we are interested in purple numbers - for the walls.
Map diagram with normalized heat transfer resistance values
Knowing the thermal conductivity coefficients of building and insulating materials and the thickness of the foundation tape (grillage), it is easy to calculate the required thickness of thermal insulation. We will not give calculation formulas, but rather suggest using a convenient calculator:
Calculator for calculating the thickness of vertical insulation of a pile foundation with a concrete grillage
Other materials that can be used as a layer of thermal insulation include ordinary polystyrene foam (foam), polyurethane foam in the form of panels, or applied by spraying. All this is also taken into account in the calculator.
The resulting value is rounded and reduced to standard thicknesses of insulating materials.
Go to calculations
Without much error, you can use another tabular method for determining the thickness of insulation.
By the way, it allows you to determine the recommended dimensions of the horizontal layer of thermal insulation in terms of thickness and width from the wall. In addition, it is recommended to thicken the insulation in the most vulnerable areas - namely in the corners of the house.
Thickened areas of horizontal insulation at the corners of the building
The parameters of such reinforcement - the total thickness of the layer and the length of the section from the corner of the house, will also be obtained from the table.
First, you need to determine approximately (rounded to 500) the so-called “frost index” for your region. To do this, you can use the following map diagram:
Schematic map with frost index isotherms
Now all that remains is to enter the table and determine the necessary parameters for the vertical and horizontal thermal insulation of the foundation:
| “Frost index”, MI (degree-hours) | up to 35000 | 35000 | 40000 | 50000 | 60000 | 70000 | 80000 | 90000 |
| Vertical foundation insulation: | ||||||||
| — thickness of the vertical insulation layer (mm) | 84 | 91 | 98 | 112 | 126 | 140 | 154 | 168 |
| Horizontal insulation along the perimeter of the foundation: | ||||||||
| — thickness of the horizontal insulation belt (mm) | not necessary | 18 | 32 | 49 | 63 | 81 | 102 | 133 |
| — S — width of the horizontal insulation belt (m) | not necessary | 0.3 | 0.6 | 0.9 | 1.2 | 1.5 | 1.8 | 1.8 |
| — thickness of the thickened section (mm) | not necessary | 25 | 44 | 69 | 95 | 121 | 152 | 200 |
| — L — length of thickened sections from the corners of the building (m) | not necessary | 1.2 | 1.2 | 1.5 | 2 | 2.5 | 3 | 3.5 |
The obtained values, if necessary, can be rounded in one direction or another (depending on the more accurate value of the “frost index”), and brought to the standard thicknesses of manufactured insulation materials.
Insulation of a pile-screw foundation with a metal grillage or timber frame
The main difference between this option is the absence of a massive cold accumulator that would “pull” heat from the walls. And therefore, the main efforts should be directed not so much at external thermal insulation, but at ensuring the most efficient basement floor of the first floor.
As usual, a pile-screw foundation with a similar piping implies a fairly high location of the “zero level” above the ground surface, which can also be aggravated by uneven terrain. Filling the entire internal space with soil, and then creating a sand-expanded clay insulation cushion is possible in principle, but in most cases it is absolutely not justified from the point of view of uneconomicality and too much labor. Therefore, the basement floor is usually raised above the ground, leaving a ventilated space below. This satisfies certain requirements for high-quality thermal insulation of the floor.
Insulation of the basement floor
Most often, in such construction, floors are used on floor beams. The insulation diagram for such a floor is shown in the figure:
Scheme of the insulated basement and floor of the first floor
1 – floor beams made of wooden beams of calculated cross-section. Usually – at least 100×200 mm.
Skull bars (item 2) with a cross-section of approximately 50×50 mm are attached to the bottom of the beams. They become the basis for laying subfloor boards (item 3) about 25 mm thick. For the subfloor, you can use not the highest quality material. Often, for the sake of economy, it is not even made continuous, with gaps between the boards, but in such a way that the insulation material is guaranteed to be retained.
Waterproofing (item 4) is laid on the subfloor boards, extending onto the floor beams. This may be a special high-density waterproofing film, but it is quite possible to use inexpensive roofing felt. Overlaps of adjacent waterproofing strips must be taped.
Insulation boards are laid on top of the waterproofing (item 5). In this case, the best option would be mineral basalt wool with a density of 35÷40 kg/m³. The thickness of the insulation is determined by calculations or is taken equal to 200 mm.
Please note that the diagram shows logs for laying the finished floor (item 6). This is a high-quality timber of the required cross-section (for example, 75×75 mm). But they are usually mounted perpendicular to the floor beams. And at the same time, insulation is performed in two layers. The first row of thermal insulation mats is laid between the tanks, and the second - already between the joists, perpendicularly. This ensures an almost complete absence of cold bridges through the wooden parts of the ceiling.
How to install floor beams and joists
The quality of the floor and the duration of its operation directly depend on the correct selection and installation of load-bearing elements. How to choose the required section and how to install floor beams and joists - read in a special publication on our portal.
A layer of vapor barrier film (item 7) with a vapor permeability of no more than 1 g/m²/24 hours is laid on top of the insulation. It is fixed with counter-lattice boards (pos. thickness from 30 to 50 mm - this will create the necessary ventilation gap.
Prices for thermal insulation adhesive Ceresit
thermal insulation adhesive Ceresit
And finally, the finishing floor covering (item 9) from high-quality boards with a thickness of 35÷40 mm is installed along the counter-lattice boards.
Before installing such a floor structure, all wooden parts (with the exception of only the top “finishing” board) must undergo thorough treatment with special compounds that will prevent biological decomposition of the wood, its infection with fungus, and give the material the necessary fire resistance.
All wooden parts must undergo careful preparation
You should not skimp on impregnation - it is better to carry out the treatment in several layers. Under the conditions under consideration, this will be extremely important; attention will be focused on this below.
If a slab was used as the basement floor of the first floor, it is recommended that in addition to the internal insulation of the floor of the first floor, it is also recommended to provide an external layer of thermal insulation. The fact is that with such a scheme without external insulation, the dew point will inevitably be shifted into the thickness of the internal insulation, which will lead to its gradual saturation with moisture. The outer layer of thermal insulation will bring the dew point outside.
Insulation of the basement around the perimeter of the building
The next question is what to do with the gap between the soil surface and the frame, that is, with the uncovered base part of the pile foundation.
Opinions on this matter vary quite a lot.
- Many builders argue that high-quality insulation of the floor is quite enough, and the lower space should remain ventilated, and it is enough to simply decorate it with decorative cladding.
- Opponents of this approach are of the opinion that insulation is still necessary, since unnecessary heat loss, especially on extremely cold winter days, will be very significant, and it is better to avoid it completely.
Probably the truth lies somewhere in the middle. Insulation in any case will not hurt, but it must be done in such a way as not to harm the entire structure of the floor.
How can you perform vertical insulation of the basement part?
Brickwork
One option is to build a brick basement wall. With careful laying, this will achieve a certain insulation of the underground space and at the same time create a decorative cladding.
To lay a brick wall (usually half a brick), it is necessary to prepare the base. This can be a shallow foundation strip, approximately 200 mm wide, poured around the perimeter of the house. True, there is a certain danger in this option.
The fact is that, as already mentioned, a pile foundation is usually installed on unstable soils, that is, the immobility of the building itself is ensured. But a shallow strip foundation for brick cladding will not have such stability, and winter swelling of the soil will inevitably lead to its deformation. How long will such brick cladding of the basement last?
This means that it is advisable to connect the base for the brickwork with stationary piles. This can be achieved, for example, by welding a channel to the piles along the perimeter, aligning it exactly horizontally.
For brickwork, a base has been prepared from a channel welded to the piles
The size of the channel is selected so that the brick fits into it. The metal profile, after anti-corrosion treatment and creation of a waterproofing layer, becomes a kind of “strip foundation” for the brickwork. A clear example of this approach is shown in the video:
Video: How to cover the basement of a pile foundation with bricks
Closing the basement opening with a fence
Another solution to the problem is to install a wall (fence) made of sheet material or special panels. This involves installing the partition on a frame structure.
In principle, there should be no issues with the frame - reliable vertical posts are already there - these are the piles themselves. If, even during the construction of the pile foundation, additional piping with a metal profile was immediately carried out (as was shown in the table above), then we can say that the frame is already completely ready.
Approximate diagram of fastening the pick-up to the metal frame of the piles
1 – soil surface.
2 – screw pile.
3 – strapping beam.
4 – Two rows of welded additional pile piping – profile pipes.
5 – Pickup. It can be, for example, sheets of flat slate, cement-bonded particle boards (CSP), and often even simply insulating boards of extruded polystyrene foam.
6 – External decorative cladding.
The metal frame is not a dogma at all. It is quite possible to limit yourself to a wooden structure, having thought through its fastening to vertical piles, for example, by welding small gussets-brackets into the pipes for screwing boards or beams. Of course, all wooden elements of such a structure must first undergo appropriate processing.
You can also use a wooden frame
Insulation of the fence can be carried out both from the outside and from the inside. The photographs below show that DSP sheets can be mounted on top of the insulation layer for further finishing, or the insulation itself (extruded polystyrene foam) itself is the basis for finishing work.
Various options for the location of insulation boards
An option is possible in which the thin, strong wall of the intake is insulated from the inside, from the underground space. For example, you can use sprayed polyurethane foam for this.
Thermal insulation is made from the inside by spraying polyurethane foam
Often, special panels are used as a material to create such a false base, which combine the properties of both insulation and decorative finishing. They are made of polystyrene foam or polyurethane foam, and on the outer surface they have imitation stone or brickwork, or even clinker tile cladding. As a rule, such thermal panels have a well-thought-out system of fastening and joining to each other, which allows the work to be completed in the shortest possible time - issues of insulation and finishing are resolved simultaneously.
Base thermal panels - both insulation and finishing at the same time
If a regular insulated fence is installed, then its finishing can include a very large number of options - all at the discretion of the homeowner. At the same time, during finishing, the issue of basement flashings is immediately taken into account.
Finishing the base and flashings
A well-designed basement always affects the “solidity” of the entire house. What options exist for finishing the plinth - read in a special publication on our portal.
What should be the thickness of the insulation? In principle, you can use the same calculation system as given above - just enter a zero value in the “grillage thickness” field in the calculator. You can also use the data from the table given there, including to create an insulated blind area.
The blind area can also be joined to a false base, as shown above. True, sometimes they prefer another option - the lower edge of the fence is not covered with soil and does not meet the blind area, but a ventilation gap is left there. True, the thermal insulation qualities of such a false base are significantly reduced. But for regions with mild winters it is a very good option.
Options for the relative position of the basement fence and blind area
On the left is a diagram with complete closure of the basement clearance, on the right - with leaving a ventilated gap.
1 – soil.
2 – pile.
3 – frame for fastening the pick-up.
4 – pick up.
5 – a layer of waterproofing that ensures the outflow of atmospheric moisture into the drainage. Please note that it is located differently.
6 – external decorative finishing of the false base.
7 – sand cushion.
8 – blind area (paving slabs can be used).
9 – basement ebb.
10 – drainage pipe.
The blue arrow in the right figure shows the remaining ventilation gap (about 30 ÷ 50 mm).
If it is planned to completely close the space between the soil and the piping, then one extremely important point must be taken into account. In the insulated underground space there will be increased humidity and dampness will certainly begin to accumulate. This can have the most negative impact on the condition of all wooden parts of the basement floor and frame structure - another important argument in favor of their conscientious preliminary preparation.
Prices for popular insulation
To avoid the destructive effects of dampness, it is necessary to provide ventilation vents - one on each side of the house. They are equipped with closing windows, and in winter, when heat conservation comes to the fore, the vents can be kept closed. With the onset of the warm season, the vents open and the underground space receives the necessary ventilation.
The total area of the vents must be at least 1/400 of the area of the resulting basement room. For example, for a house 7 × 10 m, that is, with a basement of 70 m², the total area of the vents should be at least 0.175 m². If you make, say, 6 vents, then the area of each will be about 0.03 m², and you can choose a size of 20 × 15 cm. However, only the area is important, and the specific dimensions and shape of the vents can be arbitrary.
Video: What are the consequences of mistakes in insulating a pile foundation?
In order to always maintain dry soil around a house on a pile foundation, it is recommended to install a drainage system - one of the diagrams shows its pipe. But this is already a topic for detailed consideration in a separate article.
Preparing for system construction
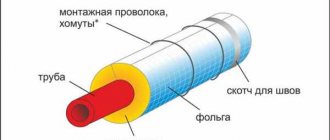
For the installation of exhaust ducts, pipes or ducts are usually used. They can be plastic, metal, brick, wood. Each type of material has its pros and cons.
Selection of material for assembly
Main design differences:
- Metal ones have a long service life, get dirty slowly, but are expensive and difficult to install;
- PVC pipes are easy to assemble, thanks to the presence of a variety of fasteners, and are affordable;
- Wooden boxes are the most inexpensive option, they are environmentally friendly, but less durable.
What material to choose and how to make reliable ventilation in the foundation is decided by each owner based on his financial capabilities. In large cottages, exhaust pipes are often made of brick. They are connected to a common air duct system and provide good ventilation throughout the house.
Rules for calculating sizes
Precise parameters of the ventilation system guarantee the required air circulation.
- The length of the exhaust pipes is equal to the height of the house plus 1.5 m;
- The cross-section of the air duct must be at least 26 cm2 per meter of basement area;
- The total cross-sectional area of the exhaust pipes should be 15% larger than that of the supply pipes.
After all measurements and calculations have been completed, preparations for installation can begin. Check the serviceability of tools and devices, stock up on materials.
Stages of channel installation
Before starting all work, you should draw up a diagram of the location of the elements of the ventilation system.
Installation of air ducts is carried out in the following sequence:
- The supply channel is mounted through a hole in the base or in another place, its lower end is located at a distance of 0.5 m from the floor.
- The pipe joints in the foundation openings are hermetically sealed;
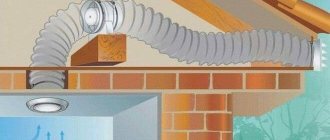
- Exhaust structures are mounted under the ceiling, connected into a common channel with the outer part of the pipe;
Adjustable dampers on the exhaust and supply air ducts will help prevent the basement from freezing in winter.
Above the roof, the exhaust riser is mounted vertically, protected from moisture on top by a deflector - a metal or plastic “umbrella”, the diameter of which is slightly larger than the diameter of the pipe
The height of ventilation risers rising above the roof is usually assumed to be equal to the height of the chimney pipes. In order to ensure stable draft in the hood, the top of the pipe should be 0.5 - 1.0 m higher than the ridge.
Determining the location for construction
A house built in a well-ventilated area may have a ventilation system with a minimum number of vents. It is enough to make only two openings in the foundation. For a building located in a low area, the number of vents is increased to the maximum.
The location of the holes should be planned taking into account the wind rose. For example, if calculations showed the need to equip 6 vents, then 2 of them should be located on the leeward side, 2 on the opposite windward side and 1 on the remaining sides of the foundation.
If the basement space is completely immersed in the ground, then it must be equipped with a mechanical ventilation system. In this case, it is constructively connected to the general network that provides air exchange at home
Supply and exhaust ventilation, which provides fresh air to the rooms being used in the basement, is usually connected to the general ventilation network. This way, one recuperator can process the entire building. In addition, exhaust ventilation risers can be located in one shaft.
Weighted assessment of the issue
Natural air exchange using vents in the foundation can be made from scrap materials and construction waste. All other options will require costs.
Will affect the cost of ventilation:
- The area of the basement and the height of the entire building when installing air ducts;
- Availability of equipment for forced ventilation. All simple fans and switches can be purchased for 3-5 thousand rubles;
- Additional devices. The cost of complex recuperators, split systems, hygrometers, sensors with turnkey installation starts from 20 thousand rubles, often exceeding the amount of 100 thousand.
For the well-being of residents and the strength of the house, it is worth choosing an effective foundation ventilation scheme. It can be completely free or very expensive, the main thing is that the air in the basement is renewed and the walls are dry.
The constructed ventilation system requires periodic measures to effectively maintain the microclimate in the basement.
Should I close the vents in the foundation for the winter?
The durability and long-term trouble-free operation of buildings and structures largely depends on properly organized and efficiently operating ventilation of the building. Its important element is the vents in the strip foundations. However, homeowners often wonder whether to close foundation vents during the winter and how this will affect the efficiency of crawl space ventilation. To answer the question correctly, you need to understand why the installation of vents is required and what consequences will likely occur in the absence of them.
Subtleties of proper operation
It should be remembered that the movement of dry air eliminates condensation. High-quality ventilation is possible with proper operation of the ventilation system.
It is necessary to constantly monitor the weather conditions and carry out simple measures:
- Close the air dampers during long rains and melting snow in the spring.
- Regularly treat the inner surface of the foundation with lime or special antifungal impregnations;
- To combat excess moisture, you can use boxes with sawdust, sand, and salt, periodically replacing the filler with dry ones.
The basement should be ventilated in the dry summer heat, and in winter leave small gaps in closed sinuses for draft.
In winter, it is imperative to clear the snow from the walls around the entire perimeter of the house so that when the spring melts, water does not flood the foundation.
Even if the foundation of the house is protected by an effective wall drainage system, regular snow removal is required. During frosty periods and heavy rainfall, ventilation vents should not be covered with snowdrifts.
How to properly organize ventilation of the foundation of a house?
Foundation ventilation will protect your basement from premature destruction caused by the decomposition of building materials impregnated with condensation of water vapor.
After all, it is in the condensate that those colonies of aggressive microflora (mold, fungus, etc.) “live”, which, sooner or later, will destroy the entire basement structure. Therefore, it is customary to install ventilation openings - vents - in the body of each foundation, except, perhaps, for the slab version of the foundation.
Ventilation of the foundation of the house
In this article we will look at the nuances of ventilation of pile and strip foundations, starting from calculations of the dimensions of the vents and ending with the practice of arranging and operating ventilation ducts.
Signs of poor ventilation
Ventilation does not always ensure a high level of preservation of a comfortable microclimate inside the foundation. Sometimes in winter, cold air causes condensation to form when it comes into contact with a heated floor, causing frost to form on the walls.
The causes of dangerous processes can be:
- Incorrectly calculated number of vents and foundation air ducts;
- Close location of underground groundwater, swampy area;
- A large amount of moisture comes in during the rainy season and snow melts.
An imbalance in the relationship between temperature and humidity indicates insufficient ventilation. To establish equilibrium, additional measures are required to drain the basement and adjust the ventilation system.
The result of poor ventilation is black mold on the foundation and walls. If the structure is not dried, the entire house will be destroyed.
It is not for nothing that the foundation is called the foundation of a house. Its destruction due to fungus will inevitably lead to the unsuitability of the building. Walls damaged by mold can still be saved by partially replacing building materials; these methods are not applicable to the foundation.
The feasibility of closing vents
When deciding whether it is necessary to close the foundation ventilation for the winter, the owner of the building must understand whether the influence of negative factors, which an effectively working vent system is designed to eliminate, ceases during the cold season. It is obvious that the soil continues to release moisture and radon even in the cold season, although in somewhat smaller quantities. Therefore, protecting wooden or concrete structures from moisture and increased concentrations of harmful substances in underground air is still necessary.
In addition, an important task of the vents at the base of the house is to maintain the temperature at the level prescribed by the Code of Practice - that is, at most, 2 degrees higher than outside. This also cannot be achieved without constant ventilation, which is carried out using vents.
Ways to correct the situation
If increased humidity appears under the floor and fungus begins to multiply, this means that the ventilation is not coping with its task. The problem has several solutions.
Option 1. Refinement and modernization of the design
It is necessary to inspect, make calculations and plan measures to optimize the existing system or install a new one.
To increase basement ventilation you can:
- Increase the diameter of existing vents and drill new ones. It is better to use the services of a construction company that has equipment for diamond drilling.
- Install additional air ducts from the basement to the roof of the house. Increased draft will ensure effective reduction of humidity.
- Install a forced ventilation device with an automatic timer. It is convenient to set up a differentiated thermometer that turns on the fan at the moment when the temperature in the basement begins to exceed the outside temperature.
The appearance of condensation in small quantities can be removed using a regular household fan. Or periodically connect a heat source, for example, a heater.
Option #2. Reduce moisture penetration
The cause of high humidity is usually a high groundwater level. If the ventilation is done as competently as possible, then it is necessary to make or strengthen waterproofing protection. Suitable materials are polyethylene film with a thickness of 150 microns, roofing felt or its new versions - rolled weld-on materials.
Foundation waterproofing is carried out using bitumen-containing materials. Pasted or surface-surfaced roll options such as TechnoNIKOL brand products, bitumen and bitumen-polymer mastics
The process of laying polyethylene on the foundation of a small dacha or utility block:
- Place it on the foundation walls at a distance of at least 30 cm from the ground surface, secure it with planks;
- Lay the film so that one sheet overlaps the other by 15-20 cm;
- Carefully seal the joints with double-sided tape on each side of the canvas;
Spread sand in a layer of at least 3 cm or make a small screed to protect the film.
A good effect will be obtained with an insulated base with a blind area and the presence of a ventilation pipe. If there is no insulation, then condensation will collect on the film. In this case, you can make a slope in one direction so that the accumulated moisture flows beyond the foundation.
Option #2. Exchange or purchase of new home
In multi-storey buildings, residents of the first floors sometimes experience unpleasant situations related to the operation of the basement ventilation system. Management companies must solve such problems. But they are sometimes in no hurry to do this, even in the presence of litigation.
The specific culprit of the accident is determined by the cause of the flood. This could be due to improper construction, breakdown of communications, seasonal rise in groundwater levels, floods, etc.
Desperate people are even trying to exchange such apartments or live longer in the country. Sometimes they start building a private residential building on their own and fall into the same trap. Therefore, it is very important at the initial stage of laying the foundation to think through and correctly implement the ventilation system.
When building a private house, basement ventilation can be arranged either with your own hands or with the involvement of professional builders.
Brick finishing
The cladding can be made of more serious materials. Brick will allow you to build strong and durable protection. You can also choose this type for aesthetic reasons.
Finishing a building with brick begins with laying the foundation for the masonry. Just as in the case of siding, it is necessary to provide a layer that compensates for soil deformations in winter. There are two base options:
- Monolithic non-buried tape. This option is not recommended for construction on heaving soils. It can only be used on coarse and sandy soils (medium or coarse sand).
- At a distance of 50-70 mm from the ground, a corner is welded to the metal heads of the piles. The shelf of this profile will become the base for a brick wall. It is recommended to take an equal angle corner with a shelf width of 120 mm. The thickness of the rolled products is determined depending on the height of the masonry and the distance between the piles. If in doubt, it is better to take a thicker product.
The length of rolled metal can be 6 or 12 m. They are chosen depending on what is available and on the length of the walls of the building. Brick laying must be carried out with bandaging. To connect the elements together, a masonry mortar made of sand and cement is used. The average thickness of the seams is 10-12 mm.
Brick finishing has the following advantages:
- good thermal insulation properties of the material (it is worth choosing hollow ceramic bricks with increased performance);
- no need for additional finishing;
- maintainability;
- durability.
The finish is also characterized by a number of shortcomings. These include large mass and cost, labor intensity, limited color solutions.
Quantity
Ventilation of the foundation in a private house without a basement or with a room in the basement is carried out taking into account the total area and space inside such a room. In this case, the holes in the foundation can be of any configuration. Most often they are made rectangular or round. If desired, you can choose any shape.
If the house is multi-story, the vents are made quite large. In this case, their number can be reduced. However, for a private cottage this option is unacceptable. It significantly spoils the aesthetics of the facade. Therefore, small but frequent holes are made. They are placed at a distance of 2-3 meters. For example, for a house with an area of 100 m² and a hole size of 5 cm², you will need to make 5 holes. Their total dimensions will be 25 cm² required by SNiP. If there is a large emission of radon in the area where the house is built, the number of ventilation holes will need to be increased by 4 times.
Location
Ventilation of a strip foundation requires the correct placement of vents around the perimeter. All holes must be made at a distance of 15 cm from the top edge of the base. For a low base you will need to make a pit. Ventilation must be positioned exactly as recommended.
The holes should be spaced evenly. They should be on opposite sides of the building opposite each other. This will allow air to circulate properly in the crawl space. Depending on the direction of the wind, the air flow will fly into one vent and fly out through another.
If there are partitions in the basement, at least one vent must be provided for each separate compartment. The distance between the holes should be a maximum of 3 m. In climate zones with high rainfall, it is recommended to increase the size of the holes.