How to make a brick foundation with your own hands?
- How to choose a brick for a foundation of this type?
- Brick foundation construction technology
- How to reinforce a brick foundation with your own hands?
Quite often, when choosing a foundation for a private house, a brick foundation is not considered because of its unreliability. It is worth understanding that this is a misconception.
DIY brick columnar foundation.
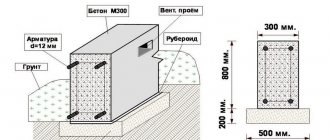
Brick foundation diagram.
A brick foundation has the following strength indicators:
- average strength indicators;
- high rigidity;
- poor resistance to low temperatures and moisture.
Due to these parameters, it is recommended to use this type of foundation in dry, hard soil that is not prone to heaving and has low groundwater levels.
The service life of this type of foundation, subject to installation rules and regulations, is about 40 years.
Advantages of a brick foundation:
DIY broken brick foundation.
Brick foundation diagram.
- A partially destroyed base can be easily repaired by restoring the brickwork elements in the necessary places.
- The absence of large heavy structural elements allows you to independently build the foundation without the use of special equipment and hired workers.
- There is no global destruction when the ground moves (this foundation is more flexible than a monolithic one).
- This design can be given any shape to the tape without the use of formwork.
Disadvantages of a brick foundation:
- The hygroscopicity of this building material allows moisture to easily penetrate its structure, which negatively affects the stability of the base. The number of defrost/freeze cycles for a red brick foundation is limited, so reliable waterproofing is required.
- Shorter service life compared to a concrete foundation.
- Limited area of use. When laying a foundation on unstable soil, it will be necessary to increase the strength of the brickwork from mechanical loads by performing reinforcement.
Materials that will be needed to build a red brick foundation:
- insulation;
- brick;
- waterproofing materials;
- cement mortar;
- materials for reinforcement (masonry mesh, reinforcement).
Brick foundation: basic requirements
Based on design features, all foundations can be divided into the following types:
- monolithic;
- tape;
- columnar.
A monolithic foundation is a single structure and is poured with concrete, so in this case it is not made of brick.
Strip and columnar foundations can be created from bricks, but a number of requirements must be met:
- The material must be of high quality and very durable. Experienced experts recommend using burnt red brick - it is sold as defective, which means that the material can be purchased at a low cost. Red brick foundations are chosen by people who intend to save money, but are also interested in quality. Brick defects consist of metallized areas and convexities, however, this does not in any way affect the strength.
- It is also necessary to take into account the standards for the preparation of cement mortar. In order to do everything correctly, you need to use a 3:1 ratio (sand/cement). It is advisable to select the grade of dry cement as high as possible - experts note that its minimum value should be M400. Since the masonry will almost always be in conditions of high humidity, in order to give it strength, it is advisable to add waterproofing additives to the mixture.
- A columnar brick foundation implies the presence of a layer of waterproofing under each support. If you plan to create a strip, then it is necessary to waterproof the entire area under the foundation.
- If you plan to lay a strip foundation, then the base must be poured from concrete, with a sand cushion - and the work must be carried out strictly in accordance with all technologies. This is necessary to ensure that the masonry does not crack over time.
- Before laying a brick foundation with your own hands, it is still recommended to invite specialists in geodetic work. Thanks to them, it will be possible to accurately calculate the required foundation depth based on the planned load. However, we should not forget that such a foundation is used for the construction of light and small buildings, so usually no special requirements are placed on it.
If you are interested in finding out how much the work of specialists will cost, an online calculator can help with this. This way you can immediately understand whether it’s worth contacting the experts, or whether it’s better to do all the work yourself.
How to choose a brick for a foundation of this type?
Brick is the main material for this type of foundation. The reliability and durability of both the foundation and the private house as a whole depends on the correctness of its choice.
DIY brick foundation step by step.
You should know which bricks are not allowed to be used for the construction of such a structure. The construction of a foundation made of any hollow or sand-lime brick is unacceptable. It does not matter at all how well the waterproofing is done.
For laying the underground part of the base, you must choose a solid red ceramic brick that is well-fired. It is characterized by high compression resistance and is less exposed to moisture than others.
The above-ground part of the base, the upper floors and the base can be laid out of white silicate brick. The use of this building material for an above-ground foundation is allowed only on a dry layer of soil with low groundwater levels.
It is important to choose the right brand of material. In this case, you will need to take into account 2 main parameters: F (frost resistance) and M (load per 1 sq.cm). To build the foundation, bricks of the M300, M250, M200, M175, M150 brands with frost resistance F 35-100 should be used. For underground masonry, the water absorption value should be in the range of 7-15%.
Prices for brands of ceramic solid bricks vary between 8-20 rubles per 1 piece. The final figure will depend on the characteristics of the building material and the size of the purchased batch.
In 1 cubic meter There will be approximately 400 bricks laid. To calculate the total amount of material required, you will need to multiply the resulting volume by the number of bricks in 1 cubic meter of masonry.
How to lay a brick on a foundation
Working tools should be prepared in advance :
- trowel (or trowel) for laying out the mortar, removing excess mortar, leveling;
- a mason's hammer for splitting bricks into pieces of the required size;
- a plumb line checks the verticality of the masonry;
- the cord helps to lay out rows in straight lines and maintain one height indicator;
- the ordering marks the rows according to the thickness of the seam and brick;
- the wood rule checks the quality of the external surface;
- shovel;
- container for stirring the solution (or concrete mixer).
First, we lay roofing felt to isolate the cleaned foundation from moisture. There are two ways to go.
The first way is to completely lay out the first row, and then the corners. In this case, the corner should always be several bricks higher than the walls. We check the straightness of the corners, the verticality of the masonry with a level, a square, and a plumb line.
The second method is to initially draw out all the corners, after which the walls are laid. Checking the corners occurs using the same tools. Unevenness should be corrected by tapping the incorrectly placed bricks with a hammer. The stage ends with tying a cord for guidance in the corners. Now you can begin the main part of the work.
Some recommendations for the accuracy of laying bricks on the foundation
The masonry technology is simple:
- lay out and level the width of the mortar to one and a half centimeters with a trowel;
- lay the brick, lightly pressing it down to evenly distribute the binder mixture;
- Gently tapping with a hammer, level the stone, following the line marked with the cord;
- collect excess mortar with a trowel and fill the vertical seam between two bricks.
Some experienced builders pre-apply a small amount of binder mixture to the side edge of the brick to bond it to the adjacent one.
It is necessary to constantly remember to control verticality, straightness of lines and thickness of seams.
You will learn how to calculate a shallow strip foundation from our next article.
And here is an article about a columnar grillage foundation.
Technology for constructing a brick foundation.
Do-it-yourself brick foundation for a house.
Diagram of a brick columnar foundation.
First of all, on the site you will need to develop the configuration of the foundation and calculate its volume, taking into account the possible load (weight of floors, walls, roof) and the existing soil properties. The width of the base should be calculated so that the tape is half a brick larger than the walls of a private house. This will make it possible to conveniently lay the logs on the internal ledge when installing floors.
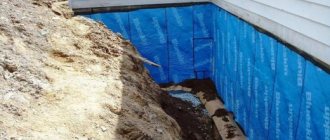
Excavation. The trench under the brick foundation is dug so that a layer of waterproofing material can be laid on both sides. On heaving and clayey soils, backfilling will need to be done, so the width of the trench should be increased by at least 1 m.
Construction of a sand cushion 0.1-0.15 m high. The sand will need to be moistened and compacted until a flat surface is obtained.
Laying a layer of waterproofing. For a simpler option, it makes sense to use ordinary roofing felt, which is folded in several layers.
It is recommended to use polymer materials for the waterproofing layer.
How to make a brick foundation with your own hands.
Waterproofing scheme for a brick foundation.
Installation of formwork and pouring a concrete pad 100 mm high. With the help of a concrete pad it is possible to increase the bearing capacity of the base. Concrete can be reinforced with metal rods or steel wire.
Laying process. This work should begin after the concrete mixture has completely hardened. The laying should begin with the removal of the corners and continue by bandaging the seams of minimum thickness.
If you do not plan to plaster the foundation in the future, the seam should be made flush. Otherwise, you can use regular internal seams. The seams between the foundation bricks will need to be filled with mortar. External basement seams are facing, so they do not need to be filled with mortar.
Next, you will need to wait approximately 2-3 weeks for the foundation to fully cure and the solution to completely set.
As mentioned earlier, in areas with high groundwater levels, backfilling will be necessary. A sand cushion must also be placed around the perimeter of the base. The space between the foundation walls and the trench walls should be filled with gravel, crushed stone, construction waste or coarse sand. Such a layer will facilitate the rapid drainage of water during snow melting and prolonged rains.
To effectively protect the foundation of a house from atmospheric moisture, a beating is installed; for this purpose, the soil surface is concreted along the perimeter of the foundation with a slope to the outside, which allows water to flow freely.
Before erecting walls, it is necessary to make hydro- and thermal insulation of the horizontal upper part of the foundation.
Brick foundation
The reliability of the foundation depends on three factors:
- accurate calculation;
- quality of materials used;
- competent performance of work.
To build a high-quality structure, it is important to pay special attention to each of the components.
Strip brick base
To make a brick foundation you will need to prepare the following elements:
- brick;
- insulation material;
- reinforcing bars;
- cement;
- sand;
- crushed stone
The required amount of material will depend on the volume of the foundation. The volume should be calculated based on the size of the tape, the depth of placement and the weight of the structure being manufactured.
As an example, we will use solid red brick M150 with dimensions 250x120x65 mm. In this case, 513 bricks will be needed per 1 m3 of masonry. However, it is worth remembering about the building mixture, which takes up approximately 25% of the entire masonry. Accordingly, for 1 m3 of masonry you need approximately 400 bricks. To calculate the material, you need to multiply the volume of the foundation by the number of bricks in 1 m3 of masonry.
The masonry will be exposed to moisture, so it needs to be protected. For this purpose, you can use thermal insulation based on:
- polystyrene foam (tile version);
- geotextiles (materials in rolls);
- cement;
- bitumen
During the laying process, the structure will need to be strengthened. This is done by installing reinforcing bars.
It is recommended to reinforce the masonry with reinforcing bars
In the transverse direction, the masonry is reinforced with corrugated metal reinforcement rods with a diameter of 7-8 mm. For longitudinal reinforcement, a metal mesh made of wire 5-6 mm thick is used.
To lay the underground part of the strip base, you will need a mixture of cement and high-strength lime. In the above-ground part, you can use a cement-lime mixture in a 3:1 ratio. If construction work is carried out in areas where groundwater is located close to the surface, the mixture must contain additives for waterproofing. The mixture recipe will depend on the type of soil.
Before carrying out work on the territory, you will need to prepare a foundation design and calculate its volume, taking into account the likely loads (weight of walls, lintels, roof) and soil parameters. The width of the brick base must be calculated so that the strip is half a brick wider than the walls of the main building. This will allow you to comfortably install the logs on the internal ledge during the installation of floors.
To build a brick strip base, you will need to perform the following steps:
- The first step is excavation work.
The pit for the strip base is dug with the expectation that waterproofing material will be located along the masonry. On clayey and heaving soil, backfilling is required, so the width of the pit should be increased by at least 1 m. The trench under the strip foundation is dug using two cords stretched along the width of the strip - Next, a cushion of sand 10-15 cm high is arranged. The sand must be moistened and compacted until a smooth surface is obtained.
In this case, a level should be used to control the horizontal position of the base. The sand needs to be moistened and compacted, and then the bottom of the trench is leveled using a level - Waterproofing material is laid.
The use of roofing material is allowed. The material must be folded in several layers in the form of a pocket with vertical walls. Waterproofing material is laid at the bottom of the trench. You can use roofing felt or modern water-repellent membranes - The frame is installed and a concrete mixture 10 cm high is poured. By using concrete, the load-bearing characteristics of the base can be increased. The solution can be reinforced with wire or rods.
- Brickwork is being done.
Work can begin only after the concrete has completely dried. Laying should begin with removing the corners and carry out bandaging the seams. Laying the foundation begins from the corner of the building and is carried out with bandaging
If you do not plan to plaster the base in the future, then the seam should be made flush. Otherwise, standard internal seams are acceptable. The seams between the bricks should be filled with building mixture. The external seams of the base part will be facing, so they must be left with cavities to a depth of 12–14 mm for better fixation of the mortar during the plastering process. This type of masonry is called empty masonry.
After laying, you need to wait 14–20 days for the mixture to completely set.
In areas with high groundwater levels, backfilling should be performed.
In areas with high groundwater levels, backfilling is done around the perimeter of the foundation to quickly drain moisture
In addition to the sand cushion at the bottom of the pit, it should also be made around the perimeter of the base. The space between the walls of the structure and the pit must be filled with crushed stone, coarse sand, soil or debris. This layer will facilitate the rapid removal of liquid during rain or melting snow.
To more effectively protect the base from precipitation, you should make a beating. The procedure consists of concreting the soil surface around the perimeter of the base with a slope to the outside. This will allow the liquid to flow freely over the concrete slab.
Before erecting the walls, you will need to re-lay the hydro- and thermal insulation material. Laying is done horizontally on the top surface.
Horizontal waterproofing is carried out by applying bitumen mastic or laying roofing material on top
Video: how to lay bricks correctly
Masonry reinforcement
If the soil on the site is unstable, the strip base must be reinforced. The design will allow you to cope with significant mechanical loads.
You will need to install 2 belts of 2 rods each. It is important to ensure that the reinforcing bars are hidden to a depth of 2 mm or more under the cement layer. This will increase the thickness of the seams. To strengthen the base, metal rods with a diameter of 7-8 mm are used. They should be laid at a distance of half a brick from the side base of the tape along the perimeter.
To perform transverse reinforcement, you need to use a mesh of 3-6 mm metal wire. If you plan to use wire with a thickness of more than 5 mm, then you need to weave in a zigzag.
Video: reinforcing brickwork with mesh
Columnar brick base
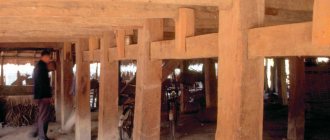
Brick supports are capable of supporting the weight of frame buildings of 2-3 floors.
To make a columnar base, you will need to perform the following steps:
- Preparing the pit for supports.
The soil should be selected taking into account the dimensions of the supports. It should be taken into account that the laying will be carried out at a depth of up to 70 cm. The hole can be dug manually or using large-sized equipment. It is important to ensure that each hole is placed exactly along the marking axes. The construction of the foundation begins with digging holes for the pillars - Bedding device. Sand and crushed stone should be poured into the bottom of the recesses in a layer 12-14 cm high. After filling, tamping must be done.
- Laying waterproofing. To do this, you need to put roofing felt on top of the sand and crushed stone.
Sand and crushed stone are poured into a layer of 12-14 cm at the bottom of each hole. Next, the bedding is compacted and roofing material is laid on top of it
- Pouring the concrete base. To strengthen the base and improve the conditions for its use, it is recommended to build a small concrete slab under the brickwork. To do this, the first thing you need to do is install a reinforcing mesh with rods with a diameter of at least 3 mm and fill it with concrete. The base should be 16-20 cm thick.
- Laying brick pillars.
It can be started 24-48 hours after pouring the concrete. In one row of the support you need to place 4 bricks. Cement grade M400 is used to prepare the solution. Brick laying should be done only after the concrete has completely dried. - Reinforcement.
During the laying process, it is necessary to reupholster. To increase the strength of the pillars, it is recommended to reinforce them horizontally with a thin masonry mesh. Reinforcement is done every few rows. To make the pillars more durable, they must be reinforced with reinforcing mesh every 2–3 rows - Installation of supports under partitions. At the intersection of the walls, you need to place pillars 510x510 mm in 2 bricks.
- Arrangement of additional pillars. In places with a small load, supports of one and a half bricks 380x380 mm are mounted at a distance of 150-200 cm from each other.
- Each row must be checked for level. Permissible deviation is 2°.
Brickwork must be carried out until each support rises 20 cm above the upper edge of the pit.
Next, you should waterproof the pillars. To do this, they need to be coated with bitumen-based mastic. The unoccupied space between the pillars and the walls of the pit must be filled with crushed stone.
The free space between the supports and the walls of the pit should be filled with crushed stone
Video: columnar brick foundation
How to lay out a zero on a brick foundation
You will need to prepare the following tools:
- jointing;
- hammer;
- plumb line;
- Master OK;
- cord;
- level;
- order.
Bringing the base to zero involves performing work that can ensure that the upper surface of the base is strictly horizontal. Its level in all places should be in the same plane. The whole point is that the foundation will take on the load of the main structure. Accordingly, in order for the weight to be distributed evenly, you will need to bring the upper part of the base to zero. This is necessary to prevent premature damage to the base.
It is not always possible to ensure a horizontal level for the base by pouring the building mixture. Therefore, the zero level method should be used using brickwork.
Before starting laying, the surface must be checked for correct horizontal position using a level. Step-by-step instruction:
- Checking starts from the corners.
- Gradually you need to move on to other parts of the base.
- After the differences in horizon levels are determined, you need to mark the corners with a marker.
- Next, you should stretch the marking cord.
Checking the horizontalness of the base is done using a level and starts from the corners
The brick row must be laid out dry - without using masonry mortar. This is necessary for better control of the location of the row in which whole bricks are used for masonry. Next, work should be done to mark the sections of vertical joints. Laying the plinth begins with the corners, which set guidelines for the further formation of the walls. To do this, you need to stretch a marking cord along the adjacent rows that form the corner.
The first row must be laid out perpendicular to the walls of the base.
To form a zero mark in relation to the horizon line, you should be guided by the level of the stretched rope. During laying it is necessary to use a thin cement mixture. This is necessary to facilitate adjustment to the orientation of the bricks.
When laying bricks in each row, you need to focus on the level of the tensioned rope
Each row of masonry that forms the base must be checked with a level. This will allow you to accurately maintain the horizontal surfaces and help eliminate distortions in the foundation. According to construction standards, the last row of plinth masonry must be covered with a layer of waterproofing material. This will prevent moisture from entering the outer walls of the building.
At the final stage, you need to sprinkle earth on the area of the base that can be seen from under the stonework. After this, the walls can be erected.
It is possible to remove the correct surface of the base after the masonry mixture has dried, but it is recommended to do this during laying. In this case, less effort and time will be required, and there will be no need to doubt the reliability of the product in the future.
Waterproofing brick base
The first step is to do the preparatory work:
- The surface should not be dirty, so first of all, the brickwork is cleaned of dust and dirt.
- Next, you need to apply water or a layer of primer to the prepared base.
- For better penetration of the primer, the surface must be heated. The high temperature allows the primer to penetrate deeper into the brick.
- If the surface is uneven, it needs to be leveled. There should not be any protrusions. If there are any, they need to be cleaned and sealed with mixture. Otherwise, the waterproofing may swell and tear.
After priming, they begin to cover the foundation with waterproofing material. One of the most effective means for waterproofing is liquid rubber. It has a high degree of elasticity and tensile strength. Therefore, even cracks in the base cannot damage it. Liquid rubber is applied in several layers by spraying.
To apply liquid rubber you will need special equipment and protective clothing.
You can also use waterproofing in rolls. It is strong and durable. However, its installation is more difficult. Of the rolled materials, roofing felt is most often used.
Waterproofing can be done using rolled materials. Roofing felt is most often used
The material has certain advantages and disadvantages. Main advantages:
- low cost;
- availability;
- durability and reliability;
- the ability to give the required shape during heat treatment.
Flaws:
- installation work cannot be completed alone;
- you will need to carefully handle the joints during installation;
- It is recommended to protect roofing felt from mechanical influences.
Using roofing felt to protect against moisture is advisable for small buildings. Nowadays you can find more modern materials on sale that are manufactured using innovative methods. They have a longer service life.
The base and base should be completely protected from interaction with moisture, so waterproofing should be laid in several layers.
Waterproofing material must be laid both at the bottom of the masonry and at the top, preferably in several layers
If you plan to use roofing felt, then the layers need to be coated with bitumen mastic. The first layer of material should be laid at a height of approximately 20 cm from the level of the blind area, and the second - along the top of the base.
It is recommended to apply bitumen mastic not only to the facing material, but also to the brickwork. The coating material will sit on the surface and may begin to peel off over time. The hydrophobe will penetrate into the thickness of the brick and create a protective layer of several centimeters. This layer will prevent capillary pumping from the soil if the waterproofing is broken or from snow, which can lie near the wall for a long time in winter or spring. Accordingly, the finishing of facing stones or ceramic tiles will not peel off from the foundation.
Quite often, builders make the mistake of laying waterproofing above the basement of the building. Because of this, the basement is constantly flooded, and the base becomes wet and after a while begins to quickly collapse.
How to reinforce a brick foundation with your own hands?
Diagram of the foundation and brick pillars.
Diagram of the foundation and brick pillars.
If the existing soils on the site where it is planned to build a private house are not stable enough, a foundation of this type will need to be reinforced. This base design allows it to withstand severe mechanical loads even on problematic soils.
It is necessary to ensure that the reinforcement is hidden under a layer of cement mortar by at least 2 mm. This may lead to an increase in seam thickness. For reinforcement, metal rods are used, which have a diameter of approximately 6-7 mm. They will need to be laid at a distance of half a brick from the side surface of the tape along the entire perimeter.
For transverse reinforcement, it is necessary to use a steel wire mesh, which has a diameter of approximately 3-5 mm. If you use wire with a thickness of more than 5 mm, you will need to perform a zigzag weave.
A brick foundation is more expensive and less durable than a monolithic foundation, but this brick structure also has a fairly large number of advantages.
Construction of houses
75 votes
+
Vote for!
—
Vote against!
There are many types of foundations. If during the construction of residential buildings it is necessary to strictly follow the design documentation, which already contains the type of foundation, then during the private construction of outbuildings, bathhouses or any other small buildings, you can try to save money. The most budget-friendly is a shallow brick foundation. It does not require a large amount of expensive materials, extensive earthworks and the need to use construction equipment. You can do all the work yourself and quite quickly. The article will discuss various features and methods of laying a brick foundation.
- Columnar foundation. Technology
In what cases can the foundation be laid out of brick?
According to their design features, all foundations are divided into strip, columnar and monolithic. The latter are poured with concrete and are a solid reinforced concrete structure, so this type of foundation is not laid with bricks.
Regarding strip and columnar ones, in certain cases they can be made entirely of bricks. But it is important to comply with a number of requirements:
- the brick should be the most durable; experienced builders recommend choosing burnt red brick, which is sold as defective at a significantly lower price. Its defects include possible bulges and metallized areas. This does not affect the strength characteristics in any way;
- There are also a number of requirements for cement mortar. It should be prepared in the proportion of 3 parts sand and 1 part cement. The grade of dry cement should be as high as possible, the minimum acceptable value is M400. Since the masonry will often be in an environment with high humidity, it is advisable to add waterproofing additives to the mixture;
- When building a columnar brick foundation, a layer of waterproofing should be placed under each support. If a tape is made, then the entire area under the foundation is waterproofed. This stage is desirable, but if the groundwater level is only 1.5 meters or higher, then it must be done;
- When laying a strip foundation, the base should still be poured from concrete with a sand cushion made using all technologies. This will not only increase the possible load on the base, but also protect the cracking of the masonry from soil heaving;
- Before starting laying the foundation, it is recommended to carry out geodetic work. This will allow you to accurately calculate the required depth of the foundation in accordance with the load that will presumably be placed on it. But brick foundations are most often made for light houses or outbuildings, so there are no special requirements for them.
Choosing bricks for laying the foundation
One of the most important characteristics of a brick that you should pay attention to is its brand. It encrypts 2 of its main parameters: M (load per cm2) and F (frost resistance).
- The following types are suitable for the foundation:
- M-150;
- M-175;
- M-200;
- M-250;
- M-300.
- Frost resistance indicators should be F 35-100. The water absorption rate is also taken into account; it is recommended to choose its value in the range of 6-20%. This is especially important for foundations that will be located underground.
- White sand-lime bricks cannot be used. It has very low moisture resistance, and when it gets wet in the fall and winter, it begins to crack. When laying a foundation made of sand-lime brick, it will quickly become damp and crumble, which will lead to deformation of the base and the entire structure. It will no longer be possible to correct this on your own, and ordering builders to correct the error will be tantamount to the price of a new foundation.
- Only red brick is suitable for laying the foundation, but not all of it. Often, manufacturers, in pursuit of a lower price, skimp on the quality of firing. It is impossible to distinguish this from the outside, but within a few years after construction, quite noticeable cracks will appear. And after 6-10 years it completely crumbles.
- Clinker bricks are best suited . This type of ceramic brick, but for its firing, a higher temperature is used, which exceeds 1200 °C. This makes it very durable and resistant to getting wet and freezing. Therefore, sidewalks and paths are often laid out for them. But only solid bricks are suitable; products with cavities are unsuitable for laying foundations. Although they are not inferior in strength to solid analogues, the water that accumulates in the cavities will freeze in winter and destroy the entire structure. But it has a drawback, because of which this brick is practically not used in Russia - its high price. Almost all the goods presented on the construction market are imported.
Important: fire-resistant bricks that cannot tolerate high humidity are also not suitable for laying a brick foundation.
Adviсe:
- in some cases, masons recommend additional protection of the brick foundation from moisture by applying a strong solution of cement plaster to it. But this will only be an additional measure in addition to the main waterproofing. Since concrete itself is unable to fully protect against water and deteriorates over time;
- When laying a brick foundation with your own hands, it is important to follow all the rules that apply to walls. This is the thickness of the seam, reinforcement, horizontal and vertical level, etc.
Laying a brick foundation photo
Brick foundation calculations
- Before you begin laying a brick foundation, you need to accurately calculate the size of the foundation and the amount of materials needed for it. The first parameter is based on the load that will be exerted on the foundation (material of walls and ceilings, number of floors and type of soil). These dimensions, as a rule, are already included in the project. But in any case, the width of the foundation should be at least 5-7 cm greater than the thickness of the walls; in the future, this will make it possible to conveniently position the floor logs of the first floor.
- First you need to calculate the required number of bricks. The dimensions of red bricks are standard (25x12x6.5). Approximate prices for products from Russian factories range from 10-15 rubles/piece. The imported analogue costs 70-100 rubles/piece.
- Next, calculate the required volume of river sand and river sand for the cushion and concrete mortar. Their average cost today is 400 rubles/t and 700 rubles/t, respectively.
- For bricklaying, cement mortar is made in small portions yourself. This means you need to buy the required number of bags of cement, 50 kg of which costs 250 rubles. If there is no suitable dry room for storing it, then it is better to buy in small quantities. If you are outside, even under a canopy, it will quickly deteriorate from humidity.
- It is more convenient to use bitumen, primer or any other coating material as waterproofing. For a 6x10m foundation, on average, one bucket costs 1000 - 1500 rubles.
- Reinforcement is used to strengthen the brick structure. During work, reinforcing masonry mesh made of wire with a diameter of 4-6 mm is laid across some rows, and corrugated reinforcing rods with a diameter of 6-8 mm are fixed in the longitudinal direction.
Thus, you can calculate the cost of laying a brick foundation if you do the work yourself. But you can order the services of masons, since no special aesthetics are required, and their work will cost less than when building walls.
Brick strip foundation
Preparatory stage
- When building a house, it is recommended to make a strip foundation that runs along the perimeter of the building and under all load-bearing walls. This will require a lot of excavation, a lot of bricks and mortar, all of which comes at a significant expense. When building a barn, bathhouse or small country house using frame technology or timber, it is allowed to make a cheaper columnar foundation from bricks.
- In any case, before ordering a house project, you should carry out a geodetic assessment, which will become a recommendation for the required foundation. Sometimes it is necessary to make a concrete base with piles extending below the freezing level of the soil. In other cases, a shallow brick foundation on a sand bed is sufficient.
- Next, they begin marking and digging a trench for a brick foundation. Its width is calculated from the width of the base itself and the distance required to lay the waterproofing layer on both sides. If the soil is heaving (most often clayey), backfilling will be required, because of this the width of the trench increases significantly.
Stages of work
- The first layer is a sand cushion; its height should be at least 15cm. The sand is leveled and compacted using a vibrating plate. If it is not there, then you can simply spill sand from a hose with a sprayer. The result should be a smooth, compacted horizontal surface.
- Next comes waterproofing. It is recommended to use modern polymer materials, but if you want to save money, roofing felt is also suitable. It is folded in several layers with allowances on the walls.
Laying a brick foundation diagram
- The next step is recommended, but not required. Formwork is laid and a concrete base 10 cm high is poured. This will significantly increase the bearing capacity of the foundation, especially when reinforcing the concrete layer with fiberglass reinforcement.
- After a few days, when the mortar has reached its maximum strength characteristics, they begin laying. Start from the corners. The seams are made as usual internal ones, but if there is no further plastering, then it is better to make them flush.
- But cement plaster is an important protective layer of brick from moisture. Therefore, the method of applying the mortar in the lower part of the foundation and in the basement is different. So, if the lower seams are completely filled with mortar, then in the above-ground part the mortar should not reach the edge of the brick by 1 cm. This will increase the adhesion of the plaster.
Advice: on problematic soils, such as heaving soils, with a close groundwater level, reinforcement is done.
- When all the bricklaying is finished, you need to leave it for a couple of weeks until the cement mortar has completely set.
- It was mentioned above about the need to leave a wide trench around the entire perimeter. Now that the masonry has fully matured, it’s time to fill in these voids. Its purpose is drainage functions that facilitate the rapid removal of melt water from the foundation. Therefore, sand, sand, crushed stone or fine construction waste are suitable for backfilling. A blind area is built on top of such a trench, pouring concrete at an angle away from the house.
- Before the construction of the walls of the house begins, the upper part of the brick foundation is waterproofed.
Tub of bricks on the foundation video
How to properly reinforce a brick foundation
Having chosen this type of foundation on unstable soil, you must additionally take care of the reliability of the foundation and strengthen the structure as much as possible.
- The reinforcement is placed in 2 belts in 2 rows. It is important that it is completely immersed in the cement mortar and covered with it by a couple of millimeters. This seam will be immediately visible - it is thicker than the others.
- Twisted steel or fiberglass rods are used as reinforcing material. They are placed at a distance of 5-6 cm from the edge of the strip foundation along its entire perimeter.
- For transverse reinforcement, a mesh with a thin wire diameter is cut and laid.
Columnar brick base
It is columnar foundations that are most often laid out of brick. But, like all designs, they have their advantages and disadvantages.
- The advantages include low cost, no need to build a blind area, the ability to do it yourself, ideal for building an extension or veranda.
- But there are also significant drawbacks: high-quality waterproofing is required, they are more susceptible to soil heaving forces in cold weather, lack of a basement and low resistance to mechanical pressure.
It is not recommended to install a columnar brick foundation if:
- the site has a strong slope and the height difference under the foundation exceeds 2 m;
- weak mobile soil, over time the pillars will sag;
- clay or peat soils;
- it is planned to build a house from heavy materials, such as brick, foam blocks or reinforced concrete slabs;
- It is planned to equip a basement or ground floor.
The shape of the support pillars is always square or rectangular. The size of their cross-section directly depends on the calculated parameters of the foundation area, which are specified in the project.
For a light one-story building, it is enough to choose the size of a square support with a side of 38 cm. Or you can strengthen the structure by making the supports rectangular with sides of 38x51 cm. The pillars located inside the foundation under the load-bearing walls are usually made smaller; it is enough to make a section of 25x38 cm. When building a two-story house, even from light materials, the size of the external and internal brick pillars must be no less than 51x51cm.
Brick columnar foundations are divided into two main types, depending on the level of occurrence:
- recessed is suitable for an area with low groundwater, located at a depth of 1.5-2 m, that is, below the freezing level of the soil;
- shallow-buried is optimal for sandy types of soil, when it is enough to go deep only 40-80 cm.
Columnar foundation. Technology
- When you have a project or at least a foundation plan in hand, you can start working. The place under it should be fairly level, but you cannot fill in the holes immediately before starting work. The soil will not be dense enough and after the first winter the pole will sag.
- Then marking is carried out using twine. First, the corners are determined, their diagonal is checked, and when there is precise confidence in the correct location, the pegs are driven in. A rope is pulled tightly between them, which will be the boundary of the outer sides of the remaining pillars along the perimeter.
- Next, even rectangular or square holes are dug to a depth of approximately 60-70 cm and with a margin on the sides for subsequent filling.
- A sand cushion is made at the bottom of each hole. To do this, a geofabric is laid at the bottom, which, by allowing water to pass through, will protect the sand from seeping into the ground. Sand or fine crushed stone is poured on top in a layer of 10-15 cm. Afterwards it is leveled and thoroughly compacted.
- A layer of rolled waterproofing, for example roofing felt, is placed on top of the resulting cushion of sand or crushed stone. It will protect the bottom row of bricks from water that will rise from below.
- As with strip foundations, brick pillars can also be reinforced with a concrete base. This is especially true when, at the initial stage of construction, changes were made to the house design, which lead to heavier construction. First, a reinforcing mesh made of thin wire (3-5 mm in diameter) is laid, and a layer of concrete 20-25 cm thick is poured on top of it. Depending on the brand and quality of the mortar, it will take 2-3 days for complete hardening and the ability to proceed directly to bricklaying.
- For laying a brick foundation, the mortar is prepared using cement grade M-500 or M-400, but not lower. When constructing a square support, 4 bricks are placed in one row.
- For high-quality work, it is important to do constriction and reinforcement, which allows strengthening the foundation supports horizontally. Every 4 rows (30cm) a reinforcing mesh of 5-6mm wire is placed in the solution.
- In those places where the walls will intersect, install the strongest supports. They are made in two bricks with a cross-sectional size of 51x51 cm. In places where the load will be significantly less, a size of 38x38 cm with a distance of 1.5-2 meters between them is sufficient.
- As with the construction of any foundation, it is important that all brick pillars are strictly in the same horizontal plane. Therefore, each new row of masonry is checked with a level. The pillars themselves are also carefully aligned using plumb lines so that the angle of inclination does not exceed two degrees. Otherwise, a poor-quality foundation will quickly deteriorate and lead to the destruction of the entire building.
- Thus, the masonry continues to be brought up until the foundation is at a level of 20 from the surface of the earth. If there is a slope on the site, the height of all brick pillars is adjusted to the one located at the highest point.
- Since the masonry is done in half a brick, the result is a support of a rectangular or square cross-section with an empty cavity in the center. Sometimes concrete blocks are placed inside, but it is more expedient to lower reinforcing bars there and fill everything with concrete.
- After completing the laying of the brick foundation, the moment of its waterproofing comes. The most convenient way is to use a ready-made primer and coat all the walls of the supports. Or use heated bitumen. To waterproof a horizontal surface, roofing felt or modern solpimer-bitumen roll membranes are used. In this form they are left to gain strength and dry for a week.
- Now it’s time to fill up the free space around the supports. It is filled with pgs, crushed stone or slag.
Recessed brick foundations are made less frequently. It turns out to be too labor-intensive, since you have to dig a 2-meter hole for each support, of which a lot is required. In addition, it will not be possible to lay the entire height of the pillar at once, which means that its construction will take not only a lot of effort, but also a lot of time. But if, nevertheless, there is a desire to make exactly this type (for example, there are bricks in stock), then the technology will fully correspond to the shallow-recessed analogue.
Tips for building a brick foundation
- If the groundwater is deep and the soil is sandy and not subject to heaving.
- Suitable as an inexpensive base for light utility buildings, bathhouses, garages.
- Only red solid clinker brick is suitable. The frost-resistant and strength characteristics of which should be among the maximum in the line.
- Due to the hydrophobic properties of brick, high-quality waterproofing will be required.
- Foundation reinforcement is required.
- If the foundation is designed for a residential building, then you should not save on a concrete base. This is not necessary for secondary structures.
Columnar foundation made of brick.
The most affordable option for a columnar foundation can be made of brick. This foundation construction technology is easy to master on your own, and it is ideal for houses and other buildings that have a lightweight structure. Brick supports are reliable enough to support the weight of a frame house of two residential floors or even more. It is also important that a columnar brick foundation is a very economical option. And finally, about durability: this type of foundation can have a service life of 30 to 50 years. The specific figure depends on three factors:
- the nature of the soil at the site where the house is being built;
- quality of materials;
- quality of brickwork.
For what buildings can or cannot be used?
It is recommended to lay it out under light buildings on one floor. Among them:
- frame, wooden structures made of timber;
- gas silicate house or foam block;
- alcove;
Photo: brick gazebo
- closed veranda;
- garage;
- bath;
- barn;
- fence;
- large greenhouse;
- outdoor oven.
Depending on the complexity of the design, a columnar or strip type is used.
You cannot lay such a foundation under two-story or three-story houses, where the walls will be made of brick or monolithic concrete.
There are no restrictions in the choice of material for cladding the facade of a building.
Which brick to choose?
For the construction of the foundation, you should choose only solid burnt red ceramic bricks. It is characterized by high strength and low moisture permeability. Provided proper waterproofing is installed, a foundation made of such bricks can be used for many decades without losing its original characteristics.
The most important parameter of solid ceramic bricks chosen for the construction of a foundation is frost resistance (F). It shows how many freezing and thawing cycles the material can withstand. For example, if the frost resistance index is F35, then the manufacturer guarantees that a brick of this brand is guaranteed to last 35 years without visible signs of destruction of the foundation. Don't forget about this indicator when purchasing material. The higher the parameter F, the higher the service life of the foundation.
The bricks that are supposed to be used to build the foundation are selected especially carefully. For this purpose, only burnt bricks that do not have cracks are suitable; they produce a ringing sound when struck. Preference is given to red solid brick of grades M-150, M-200 and higher. Material grades M-100 and M-125 are not recommended.
Once again, we draw your attention to the fact that the use of silicate or lightweight hollow bricks for a brick columnar foundation is not allowed.
Advantages of a brick foundation.
- Possibility of self-construction of the foundation (Absence of heavy elements and large structures. No need to involve heavy construction equipment).
- Ease of restoration of brickwork by replacing its individual fragments in case of partial destruction of the base.
- General advantages of columnar foundations.
Choosing a brick for the foundation
For a brick foundation the following is used:
- Solid burnt red brick. It has good strength and water resistance. The following brands of brick are used: M-150, 175, 200, 250, 300. The number after the letter “M” shows the permissible load per square centimeter. It is also necessary that the frost resistance of the material (F) be in the range of 35–100, and the water absorption rate be from 6 to 20%. It is best to make the foundation from clinker bricks. It is fired at a temperature of more than 1200 °C, which makes it durable, frost-resistant and moisture-resistant. However, it costs significantly more.
Solid red brick is used for foundation work.
- Old, but intact brick. Broken brick reduces the strength of the foundation, as it cannot withstand the necessary loads, so it cannot be used for masonry. To construct a load-bearing frame, it is necessary to select whole bricks that have an even shape without cracks. The remainder can be placed in concrete as a compacting mass.
White silicate, fire-resistant and red slotted bricks cannot be used. Silicate and fireproof are not resistant to moisture, and slotted ones are not strong enough.
The material consumption is affected by the size, type, volume of the foundation and its depth. To calculate the number of bricks, it is necessary to multiply the volume of the base by the number of bricks in one m3 of masonry. This is an average of 460 pcs.
Rules for self-construction of a brick foundation.
- Basic rule: strict selection of bricks for foundation masonry. You should choose only solid red clay bricks, which must be burnt, since the main reason for the destruction of bricks is high humidity, and burnt ceramic bricks are characterized by low moisture permeability.
- The brick foundation is laid using high-strength cement-sand mortar (1:3) with waterproofing additives.
- It is mandatory to install thorough waterproofing when constructing brick foundations in areas where groundwater lies close to the surface of the earth.
- Making the base of the base with concrete casting and its special filling are necessary to improve operating conditions and strengthen the brick foundation.
- Calculation of the depth of a brick foundation is carried out according to general rules, but a prerequisite is its construction on a layer of stable, hard soil.*
* Columnar brick foundation is not recommended:
- on weak horizontally moving soils (possibility of foundation overturning);
- in areas with differences in ground heights of 2 meters or more.
Brick plinth laying technology
Laying bricks on the surface of the foundation must be carried out taking into account certain rules, which will ensure the high quality of the created structure.
Preparing the necessary materials
Brick laying on the plinth
The solution must be prepared immediately before performing the main work. It must be used within 3 hours as it quickly hardens and loses its properties. The preparation of cement-sand mortar can be done in a concrete mixer or done manually.
Take a basin of a suitable size and fill it with sand and cement (4:1), using a special mortar shovel. After mixing the dry ingredients, add water and 2-3 drops of liquid soap (this will give the solution additional plasticity). All ingredients are thoroughly mixed to obtain a mixture with a homogeneous consistency.
Experts recommend pre-soaking the brick in plain water for 15 minutes. Laying such material will be much easier and will allow you to easily eliminate minor defects that appear during work. After pre-soaking the material, seams are obtained that will be much stronger than usual. This is achieved by the absence of penetration of capillary moisture from the solution into the masonry.
Brick laying technology
For high-quality bricklaying, use the following instructions:
Types of bricklaying
- First, the corners are set, which should be at the same level. A cord is stretched between them for laying the next bricks.
- The solution for the bottom row is applied directly to the roofing material, spread with a trowel so that it does not reach the edges by 2-3 cm.
- The thickness of the seam is usually 12 mm, and with reinforcement it reaches 16 mm (metal mesh is used).
- The corner is formed from two bricks laid at right angles. For reliable fixation, use a construction hammer.
- Excess solution is removed with a trowel. It is applied to the side faces of red brick to form vertical seams.
- The position of each brick is checked using a level and plumb line.
- All masonry elements are carefully pressed to the surface, which ensures the reliability of the created structure.
- The bricks at the corners are laid several rows higher, which allows a cord to be pulled between them to form the entire masonry.
- During work, the quality of masonry corners is checked with a square, level and plumb line.
Acceptable errors:
- in the vertical plane up to 10 mm;
- in horizontal – 5 mm.
If small defects are detected, they can be eliminated by varying the thickness of the seam. But if the differences in level are large, it is impossible to get rid of them in this way. Therefore, in the process of laying each row, it is necessary to pay due attention to each brick. Particular care must be taken to form the corners, which affect the quality of the entire structure.
Construction of a brick columnar foundation.
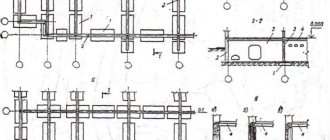
The pillars must be erected in all corners, at the intersections of walls, under heavily loaded purlins and piers, at other points with heavy loads, and also at a distance of 1.5-2 meters from each other (the heavier the walls, the smaller the distance between the pillars) according to the entire perimeter. The specific foundation layout depends on the layout of the building and design documentation data. On top of the pillars, to evenly distribute the load, they are tied with beams, which should be stronger the greater the distance between the pillars.
When determining the cross-sectional size of brick supports, they are guided by the calculated values of the sole area required according to the project. Most often, pillars are erected with a square or rectangular cross-section. For one-story buildings, in the first case, the rib size is usually chosen to be 380 mm, and in the second case, the dimensions of the sides of the rectangle are 380 and 510 mm; The cross-section of the intermediate pillars is 380×250mm. The pillars of a brick foundation for a two-story building must have a cross-section of at least 510x510mm.
There are two types of brick columnar foundations based on their depth:
- Shallow-recessed. It is used for sandy, rocky, coarse soils and is buried into the soil to a depth of 0.4-0.7 meters.
- Recessed. It is installed in an area with a low groundwater level. It is buried to a depth of up to two meters (0.3-0.5 meters below the freezing depth).
Construction of a shallow foundation.
The construction of a brick columnar foundation involves the sequential implementation of the following work:
- Excavation
.
The first stage in the construction of a brick columnar foundation is the construction of pits for the pillars. The soil is selected taking into account the size of the pillars and in order to ensure the possibility of masonry at a depth of up to 70 cm. Holes can be dug by hand or using machinery. One way or another, the main requirement is the exact location of each hole along the axes, according to the drawing. To calculate the depth of soil freezing in your city, you can use our calculator: Calculation of the depth of soil freezing. - Preparing the base
.
Crushed stone and sand are poured into the bottom of each pit (layer thickness 10-15 cm), followed by compaction and waterproofing (roofing felt is laid on top of the sand base, protecting the brick from moisture that will penetrate from below, from under the sand and crushed stone). To strengthen the foundation and improve its operating conditions, a concrete base can be built for laying bricks. To do this, first install a mesh of reinforcement with a rod diameter of at least 3 mm (you can use a masonry mesh made of wire of the same thickness). The mesh is filled with a layer of concrete. The recommended base thickness is at least 15-20cm. After 1-2 days, the concrete will set and you can proceed to laying bricks. The specific setting time of concrete depends on the quality of the solution. To calculate the composition of concrete, we suggest using our service: Calculator for calculating the composition of concrete. - Bricklaying
.
Usually 4 bricks are laid in one row of a pillar. The masonry is carried out using a cement-based mortar of grades M-400 or M-500.
In the process of laying supports, it is necessary to observe the tension. To make the pillars stronger, they can be strengthened horizontally using a reinforcing mesh made of wire with a diameter of 6 mm every 3-4 rows of brickwork (every 25-30 cm).
At the intersections of the walls, pillars of 510x510mm in two bricks are installed. In places with less load, it is enough to install pillars of one and a half bricks 380x380mm at a distance of 1500-2000mm from each other.
To ensure that the foundation is level, each laid row of bricks is leveled. The pillars are checked with a vertical level, making sure that the deviation does not exceed 2 degrees. The exact placement of bricks and pillars in general is very important for the reliability of the foundation and the further operation of the house.
The brickwork is continued until each pillar rises above the upper edge of its hole by at least 20 cm. On a site that has a slope, all pillars are raised along the upper edge to the same height, and the minimum height of the pillar above the edge of the pit should be no less than 20 cm.
The masonry is carried out in half a brick, constructing a square-section column with a void in the center. To strengthen the foundation structure, the empty core of the pillar is filled with concrete and pre-reinforced with a reinforcement bar.
- Waterproofing of pillars
. Upon completion of the masonry, the brick foundation supports are waterproofed to protect them from external moisture. To do this, the pillars can be coated with bitumen mastic, and polymer-bitumen membranes can be used for horizontal waterproofing. - Filling up free space
.
It will take about 5-7 days for pillars made of brick to dry, stand and gain strength. After this, the free space between the supports and the walls of the pits is filled with crushed stone, slag or gravel. This makes it possible to reduce the impact of active seasonal soil movements on the foundation. - Waterproofing the top of the supports
.
Each brick pillar is covered with roofing felt on top, on top of which the walls of the house will be built in the future. - Pickup
.
To prevent cold air from the street from penetrating under the floor of the building, a fence is installed between the pillars located along the perimeter of the building.
Why are bricks placed on the foundation?
Brick laying on the foundation is done to form a base enclosing the underground space. The stability of the building is significantly increased by the construction of the plinth.
Brick base
The best material for building a basement is red brick . Above the ground level (at a height of 15 cm), special ventilation openings must be provided, which are placed at least one for every 3 meters and covered with a special metal mesh or dampers. The construction of a plinth is a complex and responsible task. The base and foundation are the basis of the strength, strength, and reliability of the house.
Correct laying of the base
The technology for correctly laying bricks on the foundation begins with setting the correct angles . The first row is installed without mortar along the width of the base. It is necessary to constantly monitor the level. You have to measure the sides, making sure that the structure is absolutely even.
The maximum permissible discrepancy is 2 cm, since such an error can still be corrected with subsequent actions.
Having measured the sides, you can mount the base itself using a brick with a mortar of sand and cement. the solution like this: one part cement, three parts sand, water in an amount sufficient to give the solution a thick, plastic consistency.
The minimum width of the basement wall should be 380 mm - with foam insulation, or 500 mm - without insulation. The height of the foundation required for the construction of the basement is 30-40 cm. This height of the base of the house allows you to build a high, beautiful basement, where you can subsequently place a utility room or boiler room.
For the construction of the basement, a whole brick or its halves are used. It is worth paying special attention to the brick lining of the corners, since they bear the entire load.
Here is an article that talks about the types of foundations for wooden houses. And in this article you will learn how to repair the foundation of an old wooden house.
We build a red brick foundation on our own.
Brick is the main material used in construction, without which no construction project can take place. In addition to the construction of walls, it is also used in the construction of foundations.
DIY brick foundation base.
Advantages and disadvantages of brick masonry.
Brick foundations are used in the construction of terraces, cottages, dachas, and houses made of reinforced concrete slabs. It has a number of important advantages:
- not susceptible to natural factors and does not harm human health;
- A brick foundation can be laid quickly with your own hands. A person can cope with this work on his own (if he has certain skills, of course).
- the cost of brickwork is much less than a reinforced concrete base;
- better thermal insulation than reinforced concrete slabs;
- masonry is much easier to repair. It is easier to remove damaged foundation elements and insert new ones.
- there are no volumetric monolithic slabs in the brick foundation, and in a situation where the soil begins to move, it will not collapse, but will only lose its rigidity;
- durability.
With many advantages, a brick foundation also has several disadvantages:
- porous structure, therefore, due to moisture ingress, the brick can freeze very much;
- the masonry will have to be insulated;
- The work of building a foundation is labor-intensive and requires a lot of time and effort.
Selection of materials
Brick is one of the oldest building materials, whose age can be safely calculated in thousands of years. Of course, there are also modern types of bricks that builders use, so we’ll talk about them. More precisely, about only one of the types, since the rest can hardly be called ideal materials for building a foundation - they do not have the proper strength and resistance to external influences.
To lay the foundation of any, even the lightest building, only solid baked bricks made of high-quality clay are suitable. You can recognize it by its characteristic reddish or ocher tint. It is able to withstand heavy loads, does not absorb moisture as much as its brothers in the workshop, and is durable and durable. There is, however, another worthy alternative - solid clinker brick, but its cost is much higher than clay brick, and therefore it is almost never used for foundations.
To make the masonry more durable, it is strengthened with a reinforcing screed. Longitudinal or transverse reinforcement is laid during the laying process, using corrugated steel rods with a diameter of 6-8 mm (longitudinal) or wire mesh with a diameter of 4-6 mm (transverse).
Helpful advice: When you go to buy a red solid brick, take one copy from the lot and drop it onto the asphalt from a height of 1 m. If it crumbles, it is better to refrain from buying this lot. If not, specially split the brick and look at the cut - a well-baked product should have a uniform color with a slightly dark core, without stains or foreign inclusions.
The grade of material also plays an important role. When choosing, be guided by two main parameters - load per 1 cm² (indicated by the letter “M”) and frost resistance (indicated by the letter “F”, and the number means the number of freezing-thawing sessions that the brick can withstand). Products with the following markings are suitable for laying foundations: M from 150 to 300, F – from 35 to 100. In addition, you should pay attention to the ability to absorb moisture. Information about this must also be present in the product certificate. The permissible water absorption range for foundation bricks is 6-16%.
To fix the bricks, use a classic cement-sand mortar, mixed in a ratio of 1:3 (1 part cement not lower than M300 to 3 parts fine river sand). You will find more information in the article “Mortar for bricklaying: composition, proportions, production.” Sand, by the way, will be needed in different fractions and not only for the solution. So, for the drainage cushion, which must be present under each foundation, you should choose coarse sand. They take it for dumping. Also for drainage you will need gravel or crushed stone with a fraction of 50 mm.
However, no drainage pad can completely protect the foundation from getting wet. To do this, it should be additionally insulated with waterproof materials. Typically, inexpensive roll waterproofing (roofing felt and its modifications), coating (bitumen mastics) or sprayed (liquid rubber) waterproofing is used for brick foundations. Additional protection against moisture can be achieved using penetrating waterproofing. You will find more information on this topic in the article “Penetrating waterproofing: characteristics and technology for protecting basements.” Before this, it is recommended to insulate the brickwork so that it does not freeze and lasts longer. For insulation, the most hydrophobic materials (usually polystyrene foam derivatives) are used.
Dimensions and calculation of bricks for the foundation
What size bricks should I use to build the foundation? Smaller ones promise high strength and solidity, while larger ones are faster to work with. There is no point in guessing on this topic, since many years of construction experience have already prepared the answer.
The following brick sizes are suitable for laying foundations:
- single 250x120x65 mm;
- modular 288x138x65 mm;
- thickened 250x120x88 mm;
- thickened modular 288x138x88 mm.
To understand how many bricks will be needed to build the foundation, you should calculate the total volume of the foundation. It is calculated by taking into account the configuration and width of the strip (for a strip foundation), the depth of the foundation, the height of the pillars (for a columnar foundation) and the approximate weight of the future building. We must not forget about the mortar, which accounts for about 0.25 m³ of the total volume of the masonry.
Technology for laying a brick foundation
Foundations made from piece materials, such as brick, are mainly suitable for the construction of small, lightweight one-story buildings: barns, verandas, gazebos, bathhouses, etc. With proper installation and the use of high-quality consumables, such a base can last at least 20 years.
You can build strip or column foundations from bricks, and the choice of type mainly depends on the characteristics of the soil and the operational purpose of the future building. A columnar foundation is the easiest and cheapest to make, but in this case it will not be possible to build a cellar or basement. The belt type is more expensive, but leaves space for underground activities. It is more durable than columnar and can withstand greater loads. So, on a columnar brick foundation you can build a bathhouse or a guest house, and on a strip foundation - a small log house or timber house.
The depth of the foundation should be determined depending on the weight of the future structure and the characteristics of the soil. It is best to lay the pillars just below the freezing level, but in some cases it is permissible to make a shallow foundation. It is necessary to lay bricks below the freezing level only in heaving areas, strengthening it with backfill on the sides and drainage at the base.
Strip foundation
Many people imagine a brick strip foundation as not a very reliable option, but this is pure misconception. The reason for this is the apparent simplicity of the design and insufficient insulation of the masonry. Very often, developers simply dig a trench and lay bricks there, without even bothering to coat them with mastic and make a blind area. It is not surprising that such a foundation begins to shake and fall apart after a few years. We will tell you how simple, and most importantly inexpensive, it is to build a durable foundation for brickwork.
Important: Strip brick foundations are optimal for stable (non-heaving) soils and light one-story buildings.
Advantages of a strip brick foundation:
- you can work manually (even alone) without the involvement of large construction equipment;
- minor ground movements (heaving in the spring) will not lead to global destruction (a brick foundation is much more flexible than a monolithic one);
- if the foundation is partially destroyed due to soil movements or due to natural aging, restoration will not take much time and effort (in the right places you can simply strengthen or replace the masonry);
- there is no need to build formwork to give the foundation any geometry.
The disadvantages of a brick foundation (both strip and columnar) include the hygroscopicity of the material. However, this problem can be solved at least to some extent by using waterproofing. It is also worth considering the rather short service life of a brick foundation compared to a concrete one and the limited scope of application - such a foundation can only be laid on relatively stationary and dry soils. If you still have to work on an area with heaving soil, the masonry needs to be reinforced with reinforcement.
How to make a strip-type brick foundation:
- Prepare the area for the foundation - remove excess vegetation, remove the fertile layer of soil (the thickness of the turf is usually 20-30 cm), level the surface.
- Mark the foundation in accordance with the prepared drawing. Place pegs at the corners of the future base and stretch a cord between them. You will find a lot of useful information on this issue in the article “How to lay out a foundation.”
- Dig a trench to lay the tapes. Its depth should take into account the estimated depth of the foundation plus space for the drainage cushion (approximately 30-50 cm). The width of the trench depends on the soil moisture - the higher the humidity, the wider. If the groundwater in the area passes close to the surface, the width of the trench must be extended 1 m beyond the design limits of the foundation, in order to then make a drainage fill.
- If possible, the bottom of the trench should be leveled and compacted thoroughly. After this, you can start working on the drainage pad. First, cover the bottom with a 15-20 cm layer of coarse sand, pour water over it and compact it. Then add the same amount of gravel or crushed stone, pour water again and compact it.
- Place waterproofing material on top of the leveled layer of the drainage pad. To do this, you can use cheap roofing felt or thick construction polyethylene film. Lay the materials so that it covers the bottom and walls of the trench and sticks out 20 cm.
- As you can see, such preparatory work already allows us to hope that the brick foundation will be reliably protected, but it is still too early to start laying. First you need to make a concrete base - a screed, which will create a flat, hard surface for the bricks. Install the formwork from old boards or plywood so that after pouring the concrete you get a 10 cm thick strip. Do not neglect the construction of the formwork! Some people mistakenly believe that concrete can be poured directly into the waterproofing “pocket,” but this is a direct violation of the technology, which leads to cracking of the base. The concrete strip must have the same thickness and width along its entire length so as not to come into disastrous conflict with rolling forces due to soil movements. The absence of formwork creates all the conditions for the appearance of vertical faults in the foundation and walls in the very near future.
- After pouring and leveling the concrete base, it must be left to dry for 2-3 days, after which you can finally begin laying bricks. The first rows should start from the corners, using a standard dressing of half a brick. The seams in this case will be external, located flush with the plane of the brick. After finishing, the masonry should be left to dry for 3 weeks in dry weather. Video about bricklaying a 1-brick foundation with a single-row ligation:
- Since, as you remember, there is already pre-laid hydraulic material (roofing felt or film) on the sides, you can coat the dried masonry with penetrating waterproofing or bitumen mastic to enhance the effect, not forgetting to treat the upper end part.
- Do not forget to insulate the foundation walls so that the brick does not freeze, and after that you can “wrap” it in a waterproofing material.
We said above that if the groundwater in the area lies close to the surface, backfilling must be done. To do this, the trench is expanded and the masonry is made in such a way that there is 10-15 cm between it and the wall of the trench. In the usual case, the finished masonry is covered with soil, and for backfilling, instead of soil, sand mixed with gravel or crushed stone is used to build side drainage cushions. Alternatively, you can use broken brick, slate, glass or other construction debris.
Columnar foundation
Columnar foundations made of brick are usually made finely roughened, installing pillars at the intersection points of walls and in places of increased load. The distance between them should not exceed 2 m. Bricks should be laid with reinforcement tied, but otherwise the principle of the device is the same as that of a strip foundation: drainage pad, waterproofing, concrete base, insulation, etc.
How to make a columnar foundation from brick:
- Mark the foundation in accordance with the drawing, indicating the locations of the pillars.
- Dig holes for the posts, taking into account the depth plus the drainage pad.
- Build a drainage pad by first pouring and compacting coarse sand, then crushed stone or gravel.
- Lay the waterproofing material, wrapping it onto the walls of the pit.
- Build wooden formwork and pour a concrete base 10-15 cm thick.
- After drying, place the bricks in the hole, forming pillars with a square or rectangular cross-section. Most often they are made square with a side of 42 cm, that is, the laying takes place in one and a half bricks. The drainage pad should be 15-20 cm wider on all sides than the brick pillar. Thus, with a square pillar of 42 cm, the width of the drainage embankment will be about 60 cm.
- Constantly check the evenness of the masonry. In the case of bricks, you need to constantly work with a level and a tape measure so that all the pillars come out at the same height.
- After the masonry mortar has dried, lay a waterproofing material (roofing felt, film) on top of each pillar, after which you can begin constructing the frame (grillage).
The price of a brick foundation on pillars will be lower than a strip foundation, but its scope of application is much narrower. It is best to use it for small extensions to a residential building, for building a gazebo or shed.
Results
Finally, we suggest summarizing all the above information and identifying the most important points of the work. Firstly, take the choice of brick seriously - this is the first key to a successful outcome. Secondly, remember that a brick foundation is only suitable for small and light structures, so if you plan to add upper floors and balconies, it is better to take care of pouring a more durable concrete foundation.
It is also important to take into account the width of the masonry and the thickness of the future walls of the house. The protrusion of the brickwork above the foundation is acceptable, but very insignificant. According to the building codes described in the relevant SNiP, the thickness of the wall standing on the foundation should not protrude beyond its limits by more than 20 cm, and the overhang on one side can be no more than 15 cm.
In no case do not forget about waterproofing the brick. Insulation is also important, but with the maximum frost resistance class, an uninsulated brick will last longer than one unprotected with roofing felt or mastic. It is recommended to immediately strengthen the masonry with reinforcement in case of changes in soil characteristics (over time, stable soil can become heaving) and an increase in the mass of the building due to extensions.
Preparing the foundation before masonry work
Laying should be done on a prepared foundation; waterproofing is required to prevent moisture transfer. To do this, it is best to use rolled roofing felt in two layers. But you can also use a bitumen composition with a thickness of 1.5-2 cm.
Laying the first row
As a rule, laying out a brick plinth begins from the corners, which makes further work easier. To simplify the layout, the layout is carried out along a cord stretched in advance along the perimeter of the building. This allows for precise vertical and horizontal levels.
First of all, the corners are drawn, strictly observing the vertical and horizontal lines and the right angle. After that, orders are established and a rope is pulled between them to simplify the laying and control the horizontal and vertical levels. After removing one wall, the rope is moved to the opposite level and masonry continues.
We start laying out from the corners
Dressing
The dressing algorithm depends on the thickness of the base. When laying two bricks, a single-row (or chain) ligation is usually used. With it, the first row is laid out with a poke outward, and the second - according to the “spoon-poke-spoon” pattern. Multi-row dressing is performed, thus, the first 2 rows are laid in the same way, while the subsequent ones are laid exclusively using the spoon method.