In our previous article we talked about the method of insulating the base. Today we will talk more specifically about the use of polystyrene foam and extruded polystyrene foam.
Let's figure out together what are the advantages of insulating the base with extruded polystyrene foam? Looking ahead, let's say about the disadvantage of this material - its high price. But do not make hasty conclusions and remember the proverb that the miser pays twice.
What to choose: foam plastic or penoplex?
Penoplex can lie in the ground for a long time without losing its characteristics.
There are two most common methods - insulating the base with extruded polystyrene foam and regular polystyrene foam. Each of the materials can be used for thermal insulation work, but there are still differences. Also read: “Wall insulation with foam plastic from the inside: technology for performing the work.”
As is known, both insulation materials belong to the same group of polymers, only different techniques are used for their manufacture.
As a result, these polymers have different characteristics. Insulating the base with penoplex has an advantage due to its high performance qualities. Let's make a small comparison:
- thermal conductivity - for penoplex the coefficient is 0.029-0.034 W/m*C versus 0.037-0.043 W/m*C for polystyrene foam; vapor permeability - practically absent in each of the materials being compared; fear of moisture - penoplex is not afraid of water and can lie in the ground almost forever , foam plastic is destroyed by moisture; density - penoplex has a maximum density of 45 kg/m. cube versus 35 kg/m. foam cube.
At the same time, insulating the base with penoplex will cost much more. But, knowing how important it is to make a high-quality thermal insulation layer on the base, it’s better not to think about saving, since it will most likely come out sideways. Extruded polystyrene foam is superior to conventional polystyrene in everything, so experts unanimously say that it is the one that should be used.
Modern paint for heating pipes can be applied even to hot pipes, but the thickness of the layer must be controlled.
It does not smell and dries very quickly. In each individual case, the optimal diameter of the heating pipe is slightly different. The type of heating system, the length of the circuit, the speed of the coolant, etc. are taken into account. Read more here.
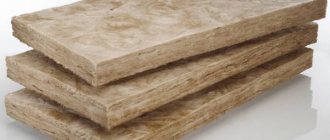
What is expanded polystyrene?
This is a snow-white foam material in the form of polystyrene balls, consisting of styrene, which forms its cellular structure, and a foaming agent - pentane. Both constituent components are hydrocarbon compounds obtained as by-products in oil and gas production cycles.
Characteristics of expanded polystyrene:
High heat-protective qualities, since the insulation has low thermal conductivity in the range of 0.029 - 0.037 W/(m•K).- Mechanical strength is ensured by the flexibility of the technological process, when it is possible to set a given strength for specific applications.
- It has special abilities to maintain stable dimensions at air temperatures up to + 80 C.
- Low water absorption - the insulation is not hygroscopic.
- High chemical resistance to salts and alkalis, but can easily be destroyed when treated with solvents.
- High resistance to atmospheric influences and aging processes.
- Low fire resistance - insulation is highly flammable. Modification of this material with fire retardants significantly reduces its flammability.
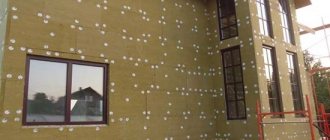
Installation of polystyrene foam on monolithic surfaces
Scheme of insulating the base with extruded polystyrene foam.
When insulating the base with penoplex, the technology does not differ from the same procedure using ordinary polystyrene foam. We have already talked about this in the article about insulating walls outside and inside with penoplex.
Therefore, we will consider the issue comprehensively.
A specific feature of working with monolithic surfaces made of concrete or blocks is the need to install waterproofing. Only after this can the base be insulated with penoplex. The technology of work is as follows:
- applying waterproofing to the surface - carried out in four stages with bitumen roll materials and in one stage with liquid rubber; gluing thermal insulation - the use of fasteners is prohibited, since holes cannot be made in the waterproofing layer; if necessary, external finishing is carried out - if the insulation rises above earth.
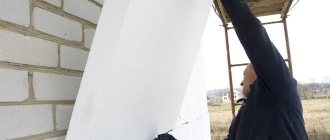
Insulation of the basement floor with polystyrene foam should be accompanied by finishing of the above-ground part of the thermal insulation, since the material is susceptible to the destructive effects of sunlight.
Once again we emphasize that the insulation of the base with polystyrene foam and extruded polystyrene foam is carried out only by gluing sheets of thermal insulation. To do this, use sealants (only special ones), adhesive foam or bitumen mastic.
Even if there are locks around the perimeter of the sheets, the joints still need to be sealed. To do this, you can use ordinary polyurethane foam or the glue that was used for installation. The main thing is that the end result is a monolithic layer that will not let in either heat or moisture.
Finishing when insulating the base with polystyrene foam is not always necessary; if the thermal insulation is covered with loam, then no additional manipulations are necessary. If part of the polymer rises above the ground, then it must be protected from ultraviolet rays.
Fiberglass-reinforced propylene pipes for heating are most often used for assembling circuits. They only compete with PEX pipes, but they are much more expensive. You can read about how to install heating pipes in an apartment or private house here.
Choosing polystyrene foam for foundation insulation
Since the technological process for the production of extruded polystyrene foam is carried out under pressure, this makes it possible to produce insulation whose structure includes high-strength molecular bonds. EPPS is of higher quality than polystyrene foam (PSB). Often, extruded polystyrene foam becomes a material that is almost irreplaceable in cases where ordinary foam plastic simply cannot withstand the load.
Before choosing EPS, you need to understand what technical characteristics it has. Expanded polystyrene is manufactured in several modifications, since different types of EPS are required for different areas of the house (roof, walls, foundation). Each modification of PPS has different characteristics, so it can be used to insulate only a certain area of the house.
Building materials markets sell polystyrene foam of 3 main brands:
- PSB-S-15.
- PSB-S-25.
- PSB-S-35.
For insulating the foundation, the last option is considered the most suitable, because this brand of heat insulator has protective sealed layers, so it does not absorb water. When purchasing expanded polystyrene, you should make sure that the material is marked with o. This will allow you to choose a material that is suitable for all technical characteristics.
The thickness of the EPS is selected depending on the climatic conditions in the region of construction. The width of this material can vary from 1 to 10 cm. For middle latitudes, a heat insulator 5 cm wide is suitable. Each manufacturer produces similar heat insulation boards of various sizes, so you must first determine how many of them will be required.
Polystyrene can be strengthened to the foundation using either special glue or bitumen. It is worth considering: after gluing, polystyrene foam slabs remain movable for more than 20 minutes. Therefore, they need to be strengthened not only with glue, but also with plastic dowels, selected with a margin of length.
Installation of penoplex on a pile foundation
The insulation of the pile foundation is carried out using the sheathing.
For a pile foundation, do-it-yourself insulation of the base with penoplex begins with the construction of a sheathing, which can be wooden or metal. A finishing layer is attached to this sheathing from the outside:
- DSP boards; decorative panels; plastic siding.
Do-it-yourself insulation of the base with polystyrene foam can be done both from the outside and from the inside onto the sheathing. In addition, you can place sheets of thermal insulation between the guides of the wooden sheathing on the inside.
The latter method is simpler to implement, but it should be taken into account that there will be wooden blocks between the foam. Their thermal conductivity is 0.12 W/m*C, which is significantly lower than that of polymers. And if the sheathing is bolted to ears welded to the piles, cold will pass through the fasteners.
Therefore, it is better to carry out insulation along the sheathing.
If polystyrene foam is installed outside, the trim is placed directly on top of it. It is attached to the sheathing through the insulation, and the thermal insulation will be securely fastened. Taking this into account, it is enough to glue the sheets of polystyrene foam with foam adhesive.
All joints and cracks are also foamed. If thermal insulation is laid from the inside, then in addition to fastening it with adhesive foam, you can additionally secure the sheets with slats. In this case, the longer the rail, the better.
Properties of extruded polystyrene foam
Many home owners use foam plastic to insulate the foundation, which is considered a good thermal insulation material. Professionals believe that polystyrene foam is more suitable for thermal insulation of external walls than for insulating the foundation.
Foam plastic can be damaged by rodents, and its shelf life is not very long, since this heat insulator absorbs water, while having low strength and a very high deformation coefficient. Pressless expanded polystyrene (foam) begins to crumble into individual balls after just a few seasons. This occurs due to the hygroscopicity of the material.
Extruded polystyrene foam (EPS) is more durable than polystyrene foam. The duration of its operation significantly exceeds the shelf life of polystyrene foam. Builders often call EPPS Polpan. The technology for its production differs from the production process of polystyrene foam, since EPS is produced under pressure, initially representing a semi-liquid viscous foam mixture fed through a nozzle with a certain cross-section.
As a result, slabs of various sizes are produced. Modern developers often have to insulate the outside of houses with penoplex slabs, that is, extruded polystyrene foam. The material is orange in color.
Is there an alternative to insulating the base with polystyrene foam?
Is there an alternative to polystyrene foam and extruded polystyrene foam? Yes, there is and it is liquid thermal insulation.
Insulating the base with polyurethane foam from the inside is much simpler to perform and does not require any additional manipulations. Polyurethane foam is in no way inferior to the above-mentioned materials in thermal conductivity, but has a slight advantage - it allows steam to pass through. For concrete structures this is not so important, but for houses made of wood this characteristic is decisive, since the floors are also insulated with liquid thermal insulation.
Polyurethane foam also has its weaknesses.
This is a soft material and is deformed even under minimal mechanical loads. Based on this, we can conclude that liquid thermal insulation cannot be an alternative to insulating the base from the outside with penoplex. Let's summarize our article today:
- extruded polystyrene foam for insulating the basement has an undeniable superiority over simple polystyrene; waterproofing is the basis of high-quality thermal insulation; internal insulation is inferior to external insulation; an alternative for internal thermal insulation is liquid insulation, such as polyurethane foam or penoizol.
To see the process with your own eyes, we present to your attention a video:
A correctly executed scheme for insulating the base and blind area with penoplex or extruded polystyrene foam will ensure not only the integrity of the base, but also the structure as a whole. In what cases is insulation necessary, and when can you do without it, how to do everything correctly and without extra costs - our article will answer these questions.
Materials and tools used when insulating the base with foam plastic
In order to conveniently and efficiently insulate the base, before starting installation work you should prepare the following tools and materials:
Insulation diagram for the basement floor.
- Polystyrene foam (another name is penoplex), the density of which must be at least 25 kg/m³.
- Plaster (putty).
- Adhesive cement (installation adhesive).
- Soil (deep penetration).
- Facade paint.
- Reinforced mesh (mesh – 2.5 x 2.5 mm).
- Corner for the production of slopes.
- Plank (rule).
- Marker for marking.
- Knife (for working with foam plastic).
- Level (alcohol or laser).
- Hammer.
- Spatulas.
- Hammer drill (impact drill).
- Primer brushes, roller.
Why and when do you need to insulate?
The blind area performs 4 functions:
- Removal of atmospheric precipitation from the base of the house; Acts as thermal insulation in case of insulation, protecting the soil from freezing; Serves as a decorative element; Provides more comfortable movement around the site.
If it is carried out according to all the rules, then it will drain water from the foundation even without insulation, but it will not protect against soil heaving, which is observed during seasonal temperature changes. When, during severe frosts, soil water becomes ice, the volume of soil increases and begins to put pressure on the blind area and foundation.
These structural elements are subject to destruction, manifested in the form of cracks.
This happens especially quickly with the blind area due to its small thickness. When it is insulated, the soil under it and near the foundation does not freeze. It is important to provide high-quality drainage in parallel with insulation.
Advantages of an insulated blind area
Each owner must decide for himself the issue of insulating the basement and blind area, but experts strongly recommend doing this in cases where the house where they live permanently stands on heaving soil on one of the following types of foundation:
- Shallow; Pile; Columnar; Slab.
It is better to insulate the blind area even when there is a basement floor, and if the foundation, located below the zero level, was not insulated during construction.
The feasibility of performing work on insulating the blind area is determined by the purpose of the structure. If people live in the house permanently, then thermal insulation is necessary, but if it is a dacha where people come only in warm weather, then there is little point in investing a lot of money in it. It is enough to simply make a good drainage system from the foundation.
Many developers carry out the blind area after the construction of the house is completed, and this is their main mistake. Ideally, everything should be done in 2 stages. The first is the installation of a rough blind area after vertical insulation of the foundation and before the final finishing of the base.
It includes excavation, preparatory work, concreting, and digging a trench to drain water from the house. All this does not exclude the possibility of installing an insulated structure around the building in use.
The second stage - the installation of a finishing blind area - begins after finishing the finishing work of the facade and basement. Advantages of this approach:
- The appearance of the base does not suffer; Such a phenomenon as winter heaving of the soil is excluded; Reliable support for scaffolding is provided.
There are many recommendations regarding the width of the blind area. Many consider it an axiom that it should protrude at least 20 cm in relation to the roof overhang. But one can argue with this, because the drainage system removes water from the roof, and it practically does not fall onto the blind area, so the minimum width of the blind area should be 80 cm.
Insulation scheme for the blind area
The width of the structure plays a huge role on subsidence soils. The value recommended by the standards is from 1.5 to 2 m.
Such a wide blind area can cost the owner more than the building itself, but one cannot ignore the subsidence of the soil, because
because the integrity of the structure depends on this. But there is a way out - a combination of the open part of the structure with a hidden blind area.
Insulation of the blind area
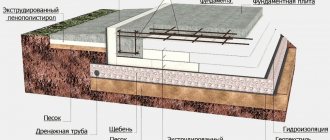
Insulation of the blind area is carried out according to the following scheme:
Penoplex is the best option for insulation
- The soil around the foundation is selected to a width of about a meter to a depth of 0.45 m with a slight slope - from 3 to 5%; Lay a leveling sand layer and thoroughly compact it, after which the thickness of the layer should be at least 150 mm; Lay polystyrene foam or extruded polystyrene foam as tightly as possible ;Spread geotextiles in the trench with a minimum density of 150 mm and a width of 2 m; Take a drainage pipe, lay it on geotextiles along the edge of the trench with an outlet into the drainage ditch; Fill crushed stone over the pipe and into the space between it and the edge of the insulation; Wrap the drainage pipe in geotextiles together with crushed stone, first placing the edge lying on the insulation, and then covering it with the second edge; Fill the slabs and pipe with coarse sand to a height of 300 mm and level, and then compact the surface using a tamper. Make markings for curbs, for which a thread is pulled level at a distance of 70 cm from the foundation; Install storm drains by installing a receiving plastic tray under the drainpipe and connecting to it a sewer pipe for external use with access to the gutter; Install and concrete curbs on both sides ;Fill the internal space with the required amount of sand and compact it again;Paving is done with paving slabs, concrete stone or other material. The height of this layer is 600 mm; Add soil along the outer perimeter of the curb.
Creating thermal insulation for the blind area
Base insulation
It is best to insulate the base with penoplex or extruded polystyrene foam when laying the foundation, but if this moment is missed, then you can do this during the operation of the house.
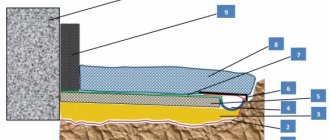
Base insulation scheme
Let's consider the option when the base and walls of the house are in the same plane. Warming is carried out in 10 consecutive steps:
- Make horizontal markings along the entire perimeter, taking into account that the insulation should protrude a few centimeters beyond the waterproofing layer; Cut the heat-insulating material, focusing on the markings; Clean the walls from dirt and dust, prime them; Apply a layer of special glue to the base using a notched trowel , choosing a corner as the starting point; Apply glue to the slabs and attach them to the surface of the base, seal the joints; Drill holes for dowels using a hammer drill, hammer in the fasteners; Attach a metal corner around the perimeter of the wall, using the same glue as for the slabs; Apply layer of soil on the slabs; Cut the reinforcing mesh according to the dimensions of the slabs, coat it with glue and glue it to the heat insulator; Putty or veneer the base, install flashings.
Advantages and disadvantages of insulation
For external insulation of the base, you can use several types of insulation , which differ in cost and characteristics. These include:
- Polystyrene foam is the cheapest material, but it is strictly not recommended for insulation of wooden houses, since it is not only flammable, but also actively supports combustion. For fire safety purposes, it is worth using other materials.
- Expanded polystyrene. The cost of this material is higher than polystyrene foam, but this is compensated by its high thermal insulation properties. In addition, it is not flammable, does not allow moisture to pass through, is durable and has a porous structure with microcells.
- Polyurethane foam. The material has a minimal coefficient of thermal conductivity; it easily sticks when sprayed to any surface, forming an even monolithic layer. Polyurethane foam is applied using a special sprayer, in several layers, the thickness of each of which must be at least 15 mm. The only drawback of this insulation is its high cost.
When choosing the most suitable insulation, focus on its thermal insulation and waterproofing properties, flammability and price.
Insulation under paving slabs
If paving slabs are used as the final finishing of the blind area, then it is enough to ensure a slope of 3%. Place it on a layer of cement-sand mixture, spread in a layer of 2 to 3 cm.
Final finishing with paving slabs
During the laying process, the tiles are knocked down with a rubber hammer to level the surface in a plane. Upon completion of the work, the tiles are scattered over the surface, then passed over with a broom, sweeping away the excess. Next, pour water so that the mixture located below and caught in the seams between the tiles sets.
As you can see, only work done correctly will give a positive result.
Insulating the foundation base allows you to save on the foundation construction process. After all, the wall thickness, determined by the bearing capacity of the foundation, will be much less than the same parameter determined by the heat resistance of the building material.
For example, a sufficiently high load-bearing capacity of reinforced concrete makes it possible to reduce the thickness of the foundation wall to 40-60 centimeters.
But the high heat resistance of the same material requires increasing this parameter to 90-120 centimeters. So is it necessary to insulate the base of the foundation? The answer is obvious: of course yes! After all, pouring a 40-centimeter base will cost three times less than a foundation 120 centimeters wide.
Moreover, replacing the material will give almost the same result. So, an uninsulated brick foundation will cost 2-3 times more than an insulated version of the foundation. And pile foundations will have to be insulated without fail: after all, such a structure simply does not have its own base.
↑
Well, now that the need for insulation is obvious, it’s time to talk about technologies that can increase the heat resistance of the foundation.
In modern construction, there are only three ways to insulate foundations: external, internal and combined. Let's look at their advantages and disadvantages.
External insulation
The first option - external insulation - is based on the installation of a hinged insulation panel fixed on top of the base wall. Moreover, in this case a material with high strength and moisture resistance is used as insulation. After all, a panel soaked in water demonstrates insufficient heat resistance, and a fragile material that has lost its integrity will not be able to protect the foundation from frost.
The only drawback of this option is the insufficient mechanical strength of any external insulation. As a result, a special protector is laid on top of the heat-insulating layer, protecting the soft insulation from unwanted mechanical contacts.
Internal insulation
The second option - internal insulation - is based on filling granular or finely dispersed insulation into the sinuses of the foundation. The moisture resistance and strength of the insulating material in this case are unimportant. Since this material is protected from unwanted contacts (including moisture) by the foundation walls.
Therefore, “internal” insulation is the cheapest option for increasing the heat resistance of foundation walls. But the foundation wall, in this case, will definitely freeze. After all, using this option, we, in fact, protect from the cold not the base itself, but the internal space and the basement floor.
Combined insulation
The third option - combined insulation - involves installing heat-resistant panels on both the inside and outside of the foundation wall. Moreover, as a rule, moisture-resistant and durable insulation is installed on the outside, and ordinary material with moderate hydrophobicity is installed on the inside.
As a result, the base wall turns into a kind of sandwich consisting of three layers: insulation-foundation-insulation.
This design demonstrates maximum efficiency. Moreover, with the help of such a sandwich, both waterproofing and thermal insulation of the base are realized. After all, moisture-resistant external insulation will cut off both cold and moisture from the foundation wall.
But enough theory - let's move on to practice, and consider the processes of external, internal and combined insulation using specific examples.
↑
This operation can be performed in two ways, namely:
- Solid polystyrene foam (panels) can be strengthened on the surface of the foundation with heat-resistant dowels (umbrellas). Liquid polystyrene foam (aerosol) can be applied to the base using a spray gun.
Moreover, both methods guarantee the same efficiency because the thermal conductivity of polystyrene foam is a constant value. It does not depend on the state of the material itself.
True, the option with panels will be cheaper, because to spray the polymer on the walls of the foundation you will have to purchase (rent) a set of expensive equipment.
Well, the process itself looks like this:
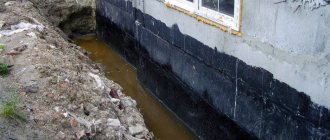
- Before insulating the base, the foundation wall is covered with a layer of waterproofing mastic. Moreover, it will not only save the foundation from contact with unwanted moisture, but will also help fix the positions of the insulation boards. After fixing, a hole is drilled in the panels - one in the center and four at the edges (possibly between the joints of adjacent elements). Next, an umbrella is inserted into the drilled holes, which fixed with a plastic wedge driven into the center of the T-shaped fastening. The tip of the wedge expands the diameter of the umbrella tube and the fastener gets stuck in the wall forever.
After this, you can start processing the seams between the panels. For these purposes, ordinary polyurethane foam is used to seal the gap between the thermal insulation boards. Finally, a layer of external plaster is laid on top of the insulation boards or panels made of natural or artificial stone are mounted.
↑
This operation is performed only in one way: before installing the basement floor, the internal cavities of the foundation (up to the grillage) are filled with expanded clay - a granular material with high heat resistance.
The step-by-step insulation process is as follows:
- The inner walls of the base are primed with moisture-resistant material. Ideally, it would be a good idea to apply a layer of liquid rubber to the foundation walls. After the waterproofing layer has dried, expanded clay is poured into the sinuses, distributed from the center to the foundation walls.
If desired, a ventilated layer can be left between the basement floor and the expanded clay layer, which is used to remove water vapor from the internal space of the foundation. However, for this it is necessary to build a supply and exhaust circulation system, which increases the price of this method of insulating foundations.
↑
The construction of insulation-foundation-insulation sandwiches will cost more than standard methods of increasing heat resistance.
Therefore, this technology is used in only two cases, namely:
- When a home (or commercial real estate) is built in an area with severe climatic conditions. When the building has a usable basement (ground floor or residential basement).
In other cases, a combined insulation system is simply unjustified from an economic point of view.
The construction process itself takes place in two stages: first, the outer layer of insulation is laid, after which they begin installing the inner layer. Moreover, the already discussed technology of wall insulation with expanded polystyrene panels is used as the outer layer. But the inner layer can be formed from mineral wool.
And it's done like this:
- The wall is covered with a layer of vapor barrier - an ordinary membrane film is spread over it. Guides are mounted on the film - U-shaped profiles made of galvanized steel, placed in increments equal to the width of the insulation roll. The insulation is rolled out between the guides, separating the excess part from the roll with an ordinary knife. On top of the insulation, sheets of plasterboard are mounted directly onto the guides, which are plastered with the starting mixture.
Thus, upon completion of the work, you can get not only a warm, but also an already finished (roughly) wall of the living space in the basement of the house.
To preserve the foundation of the house, as well as save on heating the entire building, the owners insulate the basement with various materials. After all, the ground floor is also above ground. Therefore, it is susceptible not only to soil heaving, but also to external climate influences.
Many owners think that after insulating the basement of the house above the ground, all problems with cold floors will be solved. This is a common misconception among novice builders.
After all, the base is not just a separate element of the structure.
It is part of the foundation. Therefore, every owner of his home should know how to insulate the basement of a building from the very bottom. This action will save heat in the house.
Insulation of window openings
Windows and loggias, as well as the basement, have a strong influence on retaining heat in the room. Despite their relatively small area, glazed areas freeze very quickly due to the small thickness of the glass and are a source of cold. The insulation of the loggia and window openings is carried out in two stages - the creation of sealed air chambers and the elimination of gaps between moving elements.
Air chambers are created by replacing conventional glass with multilayer double-glazed windows, inside of which there are air layers that prevent freezing. The price of such products is slightly higher than conventional analogues, however, with their help the window opening is reliably protected from freezing. Insulation of moving elements is carried out by sealing the cracks with cotton wool and subsequent gluing with paper tape.
Insulation of plastic windows with film
The better way to insulate the basement
Before thermal insulation of the underground and above-ground parts of the foundation is created, it is worth deciding how to insulate the base of the building. After all, a wide selection of thermal insulation materials allows you to carry out insulation in different ways.
There are several types of materials used to insulate the basement, basements and foundation:
- expanded clay - is cheap, but it is better to use it to insulate houses that are occupied during the warmer months; mineral wool - the cost is average, the protection is also average, but is unsafe for the health of people doing the insulation; polystyrene foam - prices are low, the thickness of the layers varies, but it is bad can be cut and is very fragile; expanded polystyrene - average cost, no toxicity, easy to cut into the required parts, great durability; polyurethane foam - high price, excellent quality, but spraying must be done with special equipment, observing safety precautions.
Professional developers recommend choosing modern materials that are easy to use, have sufficient durability and are not susceptible to chemical influences. Therefore, the best option would be to insulate the basement floor with extruded polystyrene foam. True, compliance with the technology of polystyrene foam insulation and further operations, such as finishing or cladding, is mandatory.
How to insulate a base with polystyrene
In order for the insulation of the base to give maximum effect, it is worth knowing the order of priority of the actions performed. To work with extruded polystyrene foam it will look like this:
- Digging a trench along the foundation along the entire perimeter. Cleaning the basement floor of debris and old cladding layer. Priming the cleaned surface with waterproofing mastics. Insulating the basement, starting from the corners of the building. Completely covering the basement floor with polystyrene slabs. Additional strengthening of the slabs on the base. Further finishing with cladding materials.
The first step is to remove the soil from the very foundation of the building. To do this, a trench is dug if the foundation of the house is of a strip or monolithic type.
The depth of the trench should be the same as the foundation of the building itself. But the width can be adjusted, but make it so that it is convenient to work with insulation boards.
It is worth remembering that for columnar or pile foundations of houses, insulation can only be done externally.
It is imperative to clean the entire surface of the foundation before further work. This will not only remove the old worn-out layer, but will also help the insulation lie flat without large seams.
Before insulating the base of any building, it is worth thoroughly priming it. To do this, you can use liquid mastics, which are evenly applied to the surface and dry quickly, creating an excellent protective film.
After this, you can begin to insulate the base from the outside. You need to start such actions from the corners of the building, since they take the most load from the external influences of the atmosphere.
Possible mistakes
Despite the fact that information about the choice of insulation and the technology for its installation on basement surfaces is publicly available in sufficient quantities on the Internet, in practice, contractors make a large number of mistakes that lead to deformation of not only the heat-protective layer, but also the structural elements of the building.
The biggest mistake that home craftsmen make is saving when choosing the thickness and density of Penoplex. The optimal thickness of base heat insulation sheets for the central regions of Russia is from 80 to 100 mm.
How to eliminate them?
Most errors made during the installation of thermal insulation cannot be corrected ; a complete rework of the base thermal protection system will be required. For example, if solutions not intended for this purpose were used as an adhesive or reinforcing mixture, for example, tile adhesive.
You also can’t save money by mixing glue with sand or adding cement to it for “strength.” It is no less dangerous to use cheap reinforced mesh or violate the technology of its installation. It is better if it is alkali-resistant, with a density of at least 140 g/m2.
A common cause of cracks in the thermal insulation of the base is when the reinforcing mesh is mounted directly on a layer of thermal insulation sheets. It needs to be deepened into the reinforcing layer so that it is 1/3 in the center of the layer. Another common mistake when reinforcing is connecting reinforced mesh sheets without an overlap of 10 cm .
Thermal insulation of the basement floor with polystyrene foam
To properly insulate the base from the corners, you should simply cover the corner part with polystyrene foam of greater thickness than the rest of the surface of the base.
For regions with a temperate climate, where winters are not very long and precipitation is average, polystyrene 5-6 mm thick can be used to insulate the surface. And for corners, 10 mm material is optimal.
Thermal insulation of the basement part of the foundation is carried out according to the following scheme:
- dilute the adhesive mass in the proportions indicated on the container; let the mass sit for a certain time; prepare slabs of material by cutting them into parts convenient for work; apply the adhesive composition to the slab and let it spread a little over the surface; attach the slab to the surface of the foundation and press tightly; strengthen the rest slabs on the foundation wall, joining them using grooves; treat the resulting seams with mounting foams; apply a protective fiberglass mesh to the finished insulation; cover the mesh with an adhesive solution.
After the insulated foundation has dried, the underground part of the foundation is backfilled with soil. And on the above-ground part of the foundation, finishing is done with plaster or facing with brick, stone or ventilation material.
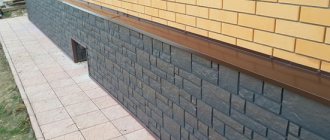
Cladding work after insulating the basement
After the insulation of the base from the outside is finished, it is worth covering it. This will not only give the above-ground part of the foundation additional beauty and well-groomed appearance, but will also protect the insulation from external influences of the sun and precipitation. And it will maintain a stable temperature in the basement and eliminate dampness.
Before you start covering the basement floor, it is worth protecting the polystyrene slabs from physical influences. And at the same time, further strengthen them on the surface.
Special plastic dowels with wide heads must be driven into the joints between polystyrene foam.
To do this, use a drill to drill holes 1-1.5 cm longer than the dowel itself. After this, a dowel is inserted into the holes, and a nail is driven into it. This structure is carefully driven into the wall with insulation.
It is important to remember that fastenings with dowels should be made 4 pieces for each sheet of insulation. This will protect the material from premature deterioration.
Now you can begin leveling the surface of the basement. To do this, you can plaster with mortar or putty the base wall with plaster.
Upon completion of the work, any finishing will be placed on such a surface without any problems. This can be laying with facing bricks or decorative stone, painting, spraying with finishing materials.
Recommendations for insulating the basement yourself
In order for the work on thermal insulation of the foundation to bring the desired result, it is worth listening to the advice of professional builders. And they recommend adhering to the following rules:
- Insulation should be carried out only in dry weather - the material will lose many of its qualities when damp. You need to choose the thickness of the slabs taking into account the materials from which the building is built - the colder the base, the thicker the insulation should be. It is worth storing polystyrene in a place where it is not exposed to will be exposed to direct rays of the sun - it is destroyed by ultraviolet radiation. The adhesive compositions that will be applied to the slabs must be water-based - the solvent will destroy the structure of polystyrene.
By following these recommendations, you can make high-quality insulation yourself, no worse than specialists.
Sources:
- utepleniedoma.com
- udobnovdome.ru
- opalubok.ru
- rufundament.ru
There are no similar posts, but there are more interesting ones.
Features of slab installation and subsequent finishing
If, after purchasing polystyrene foam boards, you find that their thickness is not enough to provide normal thermal insulation, then the insulation can be fixed in two layers so that the required thickness is achieved. Many experts say that with good adhesion, the double layer of polystyrene foam boards will actually be one whole. To prevent the formation of cold bridges, it is necessary to ensure that the installation of two layers of slabs overlaps at the seams. However, with vertical displacements of the soil, the insulation layers delaminate, causing serious heat loss.
Options for fastening dowels.
The question of whether to install insulation in two layers is very controversial, therefore, if there is such an opportunity, it is worth returning the unused material back to the store, and purchasing slabs of the required thickness to replace it. As a rule, stores now accept goods back without problems for some time.
The insulation of the basement is carried out on the outside of the house. Expanded polystyrene boards are glued to the surface of the base using any suitable adhesive composition that does not contain solvents that can potentially destroy the material.
The bottom row of polystyrene foam boards must be laid with emphasis on the base. It's great if you have a small foundation overhang that was made during construction. Despite this, very often polystyrene is laid on a gravel backfill where the foundation was built. Polystyrene foam can also be installed over gravel backfill, although many experts caution against such steps. If there is no protrusion, it is convenient to insulate with penoplex.
As a decorative finish, tiles, bricks, natural stone, facade paint, and plaster are laid on top of the insulation. It is recommended not to use decorative tiles or sand-lime bricks, which at sub-zero temperatures lose many of their characteristics and chips begin to form at the edges of the material.