Features of the garage arrangement
A garage space is usually not very large, but it does have some features that need to be taken into account. Initially, it is advisable to create a project or at least a detailed plan, and then make “land markings” - mark on the floor, walls, where and what will be located. When designing, the height, length, width of the room, and a list of items that should fit here are indicated. You should “push off” from the place where it is most convenient to park the car - nothing should interfere with its entry or exit.
Gates are also an important element; they are installed as hermetically as possible; additional space will have to be allocated to open some types of structures. The width of the passages between all items in the garage is made sufficient for convenient movement.
What other elements can be placed in the garage space:
- basement, inspection hole;
- mobile overpass;
- cabinets, racks, shelves for storing various things, tools, materials;
- tables, workbenches;
- crane-lift with winch;
- lathe, drilling machine;
- miniature sawmill;
- stands for wheels, tires;
- lighting fixtures, heaters;
- water pipes;
- compressor;
- welding machine.
In recent years, garages have become very popular, with a full-fledged heated living room equipped on the roof or inside. To climb into it you will need to make a ladder.
Garage storage
A garage is not only and not so much a home for a car (our users often put their car in the garage only when going on vacation), but a workshop and a place to store necessary items. Organizing everything so that not a single centimeter of space is wasted, but so that there is no feeling of crampedness and clutter is a real art.
All storage devices in the garage should be compact, and everything stored in them should be easily accessible. On the top shelves of racks and hanging shelves above the car you should store things that are rarely needed: exotic garden tools, some materials that will not be needed soon, etc. For hanging on the walls, they install rails, perforated panels or galvanized mesh, make hooks or pull the cords tightly.
Almost all of these techniques were used by our participant with the nickname Vasara to arrange his garage.
Shelves, cabinets, racks for storing tools
Cabinets, shelves, and racks can be purchased ready-made, specifically designed for the garage, or made independently. The manufacturing materials are:
- natural wood;
- chipboard;
- MDF;
- plywood;
- metal;
- plastic;
- combinations of several materials.
These items are intended for:
- maximum space saving;
- lack of clutter;
- convenient placement of things and tools;
- giving the room a lived-in appearance.
It is highly undesirable to purchase ready-made racks made of plastic - they are short-lived, not suitable for storing heavy objects and tools, and quickly lose their appearance.
Homemade rack
The most practical structures are made of metal and wood. According to the method of assembly, the racks are:
- stationary - usually built-in, designed for a specific area of the room, attached to the ceiling, floor, wall, sometimes made in corners, U-shaped;
- mobile – equipped with wheels, if necessary they can be easily moved to the right place;
- suspended – mounted on the wall, ceiling;
- disassembling - design racks, the shelves in which can be rearranged and swapped;
- rotating - suitable for many constantly used small items.
To make a good rack, you need to draw it on paper, indicating the planned dimensions, distances between shelves, and methods of fastening. The metal structure is usually made by welding, from metal pipes, sheets, and corner elements. Wooden - assembled from timber (10 by 10 cm or 5 by 10 cm) and boards, using self-tapping screws, perforated corners, etc. Most often, wooden shelves or objects made of chipboard are mounted on a metal frame, their approximate dimensions are 50 by 100 cm, thickness – 20-25 mm, distance between individual shelves – about 40 cm. The finished structure, depending on the material of manufacture, is varnished, stained, and painted in any color.
Making hanging shelves
Shelves are hung on the walls, less often on the ceiling, and are often multi-tiered. Wall-mounted options are made closed, open, stationary or dismantled, with or without a back wall. Wooden shelves are mounted on a perforated steel frame and secured to the wall with dowels and anchors. Ceiling ones are hung from hooks built into the ceiling, special “pins”; the structure is shaky and unsuitable for storing heavy objects.
Shelf made of perforated fabric
Products made from perforated parts are usually made dismountable - the profiles are mounted on the wall, screwed to it, then shelves are fixed there. To make such a thing yourself, you purchase a metal perforated corner, the cutting of which is usually ordered at the place of purchase. Horizontal and vertical planks are connected to each other with bolts, while the horizontal ones form a kind of frame into which boards, iron sheets, and plastic containers are inserted.
Hanging shelves: fast and practical
Not in all cases there is a need to create a rack, since it will take up a lot of space. On the other hand, in a garage of any size there is always unused upper space, which can easily be used for hanging shelves.
Structurally, it is quite possible to make any version of such a device for the garage with your own hands:
- Wall shelves can be equipped in both open and closed versions. They are convenient due to their spaciousness, as well as ease of construction. They can be hung on a loop or using an anchor. In the first case, a collapsible structure is obtained, the location of which can be conveniently changed at any time. In the second, the shelf gains additional strength due to the reliability of its installation with the wall.
- Hanging shelves are attached to the ceiling. Due to the peculiarities of their location, they occupy exactly that part of the space that is not used and do not interfere with the car at all. The disadvantages of the design include its lack of reliability - it can sway a little upon contact. However, for small items (hammer, pliers, screwdriver, paint, etc.) it will do just fine.
- An interesting option for storing tools is to make one wall or a fragment of it in the form of a shield. The shield is attached using anchors, and then small shelves are selected and mounted on it.
- To store large items of small weight, you can design hanging shelves that are attached to the ceiling using studs.
- studs and shelf base - most often plywood or chipboard is used, the thickness of which depends on the expected loads;
- large anchors (at the rate of 4 units per 1 shelf);
- hexagonal and regular nuts;
- flat washers and special Grover washers (at the rate of 4 units per 1 shelf.
You can also build a shield yourself from wooden beams, as shown in the photo.
ADVICE. It is better to place such a shield on the same side on which the workbench will be located, so that all the tools are literally at hand.
To make these devices for placing useful items in the garage with your own hands, you will need the following materials and tools:
The tools you will need are the standard set described above. The sequence of actions is as follows:
- Shelves of appropriate sizes are calculated and cut out. It is better to immediately treat them with primer and varnishes and let them dry completely.
- Markings are made on them for fastening. If the shelf is long, the supporting supports should be placed at a distance of no more than 60 cm.
- It is better to reinforce the ends of the plywood with a metal profile to ensure maximum reliability of the structure.
- The edges are marked with grooves into which the studs will be mounted. They should be placed at least 5-7 cm with a margin from the edge so that the wood does not crumble during prolonged loads.
- All grooves and holes are drilled, then future fastening locations are marked along the wall and/or ceiling.
- The holes on the wall are also drilled, after which the anchors are inserted into them all the way.
- The studs are connected to the anchors, as shown in the photo.
- Finally, the shelf itself is put on and secured using regular washers and Grover washers.
- The level checks the correct location and makes adjustments if necessary.
If the shelf is mounted to the ceiling, you can strengthen its connection to the wall using metal corners - then the product will not swing and will last much longer.
The entire technology is shown schematically in the figure.
Making a shield shelf
The DIY technology for making such a device for a garage has its own differences compared to installing conventional shelves:
- The shield itself is made of durable plywood, the parameters of which are selected according to the situation. Visually, the shield should completely cover the surface of the desktop.
- Space is allocated on the board for all shelves and appropriate notes are made.
- Next, all the holes into which the dowels fit are made in the surface of the structure. It is on them that the hooks will be attached, on which all the tools will be placed.
- The shield is secured to the wall using brackets. The corresponding holes are made using a hammer drill.
All steps are shown schematically in the figure.
DIY tool panel above workbench in garage
Folding compact table
A small table, like some other pieces of furniture, can be easily made from scrap materials.
Required:
- the side of a wooden cabinet or a piece of chipboard;
- self-tapping screws;
- some timber;
- two “used” loops;
- perforated corners and mortise nuts from the cabinet;
- anchor bolts.
One piece of timber is screwed to the wall, two legs are marked, attached to the tabletop, which is connected to the timber on the wall using hinges. When folding, the legs are removed, the tabletop is fixed to the wall with a hook or latch.
Power calculation and cable selection for a garage workshop
I began the implementation of my ideas by working out the general diagram of the electrical network of the garage-workshop (Fig. 7) and assessing the main current loads. When working alternately, machine tools and power tools consume a maximum of 2 kW, a welding machine (3 phases) - 5 kW.
I decided to use cables with only copper wires. Aluminum ones break after several kinks and, with the same cross-section, withstand 25-40% less current than copper ones.
If there is no marking on the wire, its cross-section can be calculated using the formula S = ND2/A, where S is the wire cross-section in mm2;
N—number equal to 3.1 A;
D is the measured diameter of the wire in mm.
The diameter of the conductor (without insulation) is measured with a micrometer or caliper. The cross-section of a flexible stranded wire is determined by the sum of the cross-sections of all wires included in the core. The conductors of the wires have standard cross-sections: 0.75; 1.0; 1.5; 2.5; 3.0; BP 6.0; 10.0 mm2.
If there are several simultaneously loaded conductors in one cable, then reduction factors are used. When calculating, the maximum permissible current passing through such a conductor must be reduced by approximately UP to %.
After calculating the current load, I entered the garage with a cable with four copper conductors with a cross-section of 4 mm2, protected by a 25 A automatic circuit breaker. The three-phase sockets were connected to a cable with four conductors with a cross-section of U mm2 (3 mm2 could have been taken), and the automatic circuit breaker was used at 16 A. Blocks sockets on the walls (maximum current - 10 or 1 bA) were powered by a cable in two 2.5 mm2 cores. I connected the socket blocks on opposite walls of the garage to different phases. The lighting was carried out with a cable in two conductors with a cross-section of 2.5 mm2 and protected by a 10 A automatic circuit breaker. The three-phase meter on the panel is rated at 20 A.
How to make a drill stand
The drill stand consists of the following parts:
- supporting frame - all other parts are fixed to it;
- stand - the guide part on which the drill is attached and moves up and down;
- handles – control the movement of the drill;
- additional components that expand the functionality of the product.
Usually the product is assembled according to drawings from metal parts. A support is attached to a horizontal stand, which is connected to a stand secured with screws. Guides are mounted to the rack - they can be made from telescopic furniture elements. A carriage is attached to the moving part of the guides, and there is a mount on it, where the drill is later fixed.
The stand for the drill is sometimes made of wood - from timber and boards.
The most popular materials for wall decoration
Armed with the criteria listed above, you have probably narrowed down a considerable number of options for yourself, but there is no need to worry that the choice will be narrow. In fact, there are enough materials suitable in all respects for the interior decoration of a garage. And now make sure of this.
Ceramic tiles (porcelain tiles)/Clinker
It is no coincidence that we started with it - in all respects it is the optimal material that can be used equally well for cladding both floor and wall surfaces. With one caveat - it is best to use porcelain stoneware. This is a special type of tile, which is also made from ceramic, but is hardened at a higher temperature.
As a result, gres (as porcelain stoneware is also often called) acquires all the necessary physical properties and becomes indispensable in places where resistance to chemical agents, high and low temperatures, as well as mechanical loads is required.
There is another type of tile - clinker, made from high-quality raw materials using extrusion technology. Hardening occurs at a very high temperature, which allows the clinker to become even more durable than porcelain stoneware. And, alas, more expensive. Most often it is used for finishing facades, but there are often cases when clinker can be seen in the interior decoration designs of garages and other technical premises.
PVC panels
We recommend using only those panels that have the best mechanical strength class, as well as moisture-resistant and fire-resistant. As a rule, they are more expensive, but they will last you much longer in operation than standard options.
Of course, finishing with PVC panels is possible only in cases where you are not turning your garage into some kind of service station - simple repair work will not harm the material at all, and the light weight of the polyvinyl chloride structure and simple installation allow even those who are not considers his arms to be quite “straight”.
Plaster
Another way to “ennoble” your garage, spending a minimum of money, time and, accordingly, effort. It is best to use cement-sand plaster - it ideally covers structures made of aerated concrete or brick and safely stays there for the maximum amount of time.
One of the main advantages of choosing this particular material is the possibility of coloring. Yes, after applying the plaster to the surface, you can paint it in any color you need. Or even several - it all depends on your taste preferences.
Lining
Years go by, but lining is still in trend. In garages it is always appropriate from a visual point of view, but its high hygroscopicity and flammability cast doubt on the advisability of use in this technical room.
However, some expensive types of lining with a good margin of strength and fire resistance are quite justified for interior decoration.
Drywall
It is not used as often as the other materials listed above due to the fact that it is easily deformed and does not tolerate chemically active compounds well. However, there are options on sale with improved characteristics. They cost much more, but if you like this particular material, then why not?
Painting
The old trick to tidy up even the most neglected room still works.
Making a flyover with your own hands
The overpass for a personal car is made from:
- bricks;
- wooden sleepers;
- metal
The latter option is optimal for indoor spaces. To make the simplest overpass you need:
- welding machine;
- set of electrodes;
- rolled metal;
- fittings;
- Bulgarian;
- cutting wheels for grinders;
- nuts, bolts;
- paints for metal.
The structure is made stationary or collapsible. To begin with, a sketch with dimensions is drawn, the bases of the pedestals are assembled - the dimensions depend on the dimensions of the car. The parts are welded together at right angles. Next, the racks are made: their approximate height is 50-60 cm, angle is 120 degrees. The upper supports of the pedestals are welded to the racks, the base is attached, and a “dead end” is made from the corner. Then the crossbars from the reinforcement are welded, and the gangway bridges are made. The latter, before being fixed to the base, must be “adjusted” to the dimensions of the machine.
Primary requirements
How to arrange tools in the garage
Arranging a space for a garage means that it will be warm and dry enough.
Your car should not freeze even in very severe frosts. If possible, you can provide a system for quickly warming up the garage.
It is very important to reliably protect the premises from unauthorized entry. When setting up your garage, remember that access to tools or equipment that will be located in the garage should be as convenient and simple as possible. Therefore, it is better to think in advance about the location of storage areas.
In general, these are only the very minimum requirements that it is advisable to take into account for your own comfort. You can also, if you wish, supplement and equip your garage with additional means for repairing and servicing your car. A workbench with tools and an inspection pit can be an excellent addition to the equipment of the room.
Making your own compressor
An air compressor is a useful craft that can spray paint. To make it yourself, you will need a car accessory used to inflate wheels. The compressor must be powerful - quickly create pressure up to six atmospheres, without loading the engine, and also productive - release compressed air quickly, giving a strong flow. To combine both performance and power, you need a high-speed engine equipped with a positive displacement piston system. The device can overheat, which will inevitably lead to stops during operation, so you will have to organize sufficient cooling for the cylinders. To reduce the cost of the design, a receiver is used - a storage tank, which is a steel cylinder. To make a small compressor, take an electric motor from a toy or a device that supplies water to an aquarium with fish.
Do-it-yourself garage tipper: step-by-step video instructions
Along with creating the considered devices for the garage, you can also take care of making your own working tools that will be needed directly for car maintenance.
One of the most useful installations is a tipper for inspecting the bottom of the car. The need for such a product is most relevant for Russian realities, since not in every case there is a real possibility of constructing an inspection hole.
Detailed video instructions with step-by-step manufacturing diagram
Before making such an installation, it is extremely important to consider the issue of safety. Even a light car can cause an accident if it falls and, at a minimum, will receive serious damage. Therefore, you can only undertake the creation of such a design if you have sufficient skill.
Self-manufacturing of garage accessories allows you to rationally organize the internal space and essentially get your own workshop in which you can carry out any ongoing repair work.
Manufacturing of a crane with a winch
The lift is used for machine maintenance if a sudden breakdown occurs. A purchased one will be expensive, but a homemade one can be done with minimal labor costs.
Types of lifts:
- screw;
- chain;
- hydraulic.
The method of lifting the car is scissor, fork, platform. The last option is the easiest to create. To work you will need:
- steel plate from unnecessary equipment, one or two cm thick;
- corners made of steel - to make the structure as stable as possible;
- worm-type gearbox - it is usually removed from a non-working structure, since a new one is expensive;
- set of bolts;
- star-shaped keys;
- fastening hook;
- metal chain with links with a diameter of two to three cm;
- steel cable having a thickness of five mm.
The assembly sequence is as follows: first, the corners are attached to the wall, an iron plate is mounted on them, and the connection is made with bolts. Afterwards the worm gear is mounted by fixing it on the drive shaft. Holes are made in the plate for the chain, and the chain mechanism is installed. For safe use, holes are made in the frame and locking parts are inserted.
Knife sharpening device
Thus, the useful device receives a hole for the rod in the bolt. The rod is made by hand from thin wire. The carving is made taking into account the length of the sharpening bars.
The bar clamp can be created from:
- organic glass;
- ebonite;
- saw clamp.
The upper part of the plate acts as a clamp. The surface with two drilled holes is applied to the frame. Then a common through hole is made closer to the knife. The thread is cut in the frame.
So, the homemade do-it-yourself device is almost ready. The second hole is made only on the plate away from the knife. Then cut a thread for the bolt (needed for tightening). A simple homemade mechanism for the garage allows you to sharpen knives on the go.
The artificial diamond stone is affordable and very wear-resistant.
Assembling a workbench with your own hands
A workbench is a work table on which manual processing of objects, parts made of metals, wood, and other materials is carried out. The structure is equipped with a vice, stops, and several tool boxes. Purchased workbenches have the following dimensions:
- height - 80-90 cm (sometimes adjustable);
- length – 130-150 cm (for one workplace);
- width – 75-85 cm.
If desired, a convenient workbench designed for certain work can be made with your own hands. To do this you will need:
- Bulgarian;
- metal circle;
- grinding disc;
- screwdriver;
- welding apparatus and electrodes;
- protective clothing, devices;
- tape measure, square, level;
- electric jigsaw;
- perforator;
- corners of different sizes;
- square pipes;
- steel strips and sheets;
- boards and plywood;
- guides;
- screws, self-tapping screws, anchor bolts;
- paints for metal, wood.
The approximate dimensions of such a workbench table are 220 by 75 cm, height – 90 cm. The material is cut out in accordance with the drawings. The frame is welded from profile metal pipes and has four legs on which two cabinets will be placed, connected by a tabletop and a footbar. On top of the frame there are jumpers to support the tabletop, on the sides of the cabinets there are for drawers. The structure is strengthened by diagonal jumpers in the corners.
Next, drawers are constructed from plywood and screws, and guides and handles are mounted to them. Boards pre-impregnated with an antiseptic are placed on the tabletop. The structure is sanded, painted, and a steel sheet coated with an anti-corrosion compound is attached to the tabletop.
Garage rack: step-by-step manufacturing instructions
Since the garage always contains quite a lot of items, organizing their arrangement is a fundamental requirement for proper storage. The simplest and at the same time convenient option is to create a rack with shelves.
Preparatory stage
Before you begin installing the structure, you should consider several important requirements:
- The total weight of the rack should not be more than 4-5 centners - otherwise the structure will be very difficult to move if necessary. It will also put significant pressure on the floor, which can deteriorate the quality of the coating.
- When choosing materials, it is important to proceed from considerations of strength and durability of the structure. Metal, as well as wooden products made of beech or oak, are ideal. Plastic shelves are not suitable - they are not durable and, moreover, may not withstand temperature changes.
- When choosing between a metal and wooden structure, you should proceed from your specific needs. Metal is more durable and stronger, but wood is more affordable. If you need to place a few tools, it is enough to make a small wooden rack.
- Since all the tools are very heavy, you should immediately calculate the strength of the structure so that it can withstand at least 100-150 kg on one shelf.
Installation of a wooden structure
To make such a device for a garage with your own hands, you will need ordinary working tools:
- hacksaw for wood and metal;
- hammer, nails;
- screwdriver, self-tapping screws;
- construction tape;
- construction level;
- electric drill.
The sequence of actions is as follows:
- All necessary calculations of the parameters of each shelf, as well as the entire structure as a whole, are carefully made. You need to proceed from the real needs and the area that can be allocated for the structure. Several drawing options are presented below.
- Next, the appropriate material is purchased - the actual shelves and supports. To strengthen the structure and increase its service life, you can use metal racks, and it is quite enough to make shelves from wood. This combination option combines durability and affordability.
- The shelves are made from chipboard sheets. They are cut in accordance with the planned project. The racks are made of wooden beams, the preferred sizes are 100*100 mm or 100*50 mm.
- On the surface of the prepared parts, appropriate markings are made of the places where the fastening will be made. If necessary, a mark is made for the excavation for communications (pipe).
- Installation of the structure using self-tapping screws. screwdriver, nails and hammer. You can also use tenons or wood glue.
- The rack can be attached to the garage wall to provide additional stability to the structure. The work is carried out using metal brackets.
Before assembly, it is important to prime and varnish all wooden parts. The garage may experience high humidity or temperature changes - so without treatment the wood will not last long.
Video - Do-it-yourself wooden shelving technology
Installation of a metal structure
Metal structures are exceptionally durable and strong. In addition, they do not need to be treated with special materials to prevent rotting.
You can make both a rack and separate structures, for example, for storing rubber, from metal.
In this case, you should take into account the rules for storing tires, which are shown schematically in the figure.
At the design stage of a metal rack, you should take into account that all the necessary items can be freely placed in it. You can take this drawing as a basis.
Or this option.
The easiest option is to purchase a modular design and assemble it yourself. But you can make this device for the garage with your own hands. The sequence of actions is as follows:
- Most often, a profile pipe or a large corner is used as vertical support posts. In this case, it is better to take the largest sizes, since the strength of the entire structure will depend on the dimensions. And for the same reasons, you should choose solid objects, without welded seams.
- On the selected racks, using a marker, mark all the joints between each other, as well as the fastenings to the wall. The interval between the posts should be no more than 80-90 cm so that the structure is sufficiently reliable.
- Installation of racks and shelves is best done by welding. During work, you need to constantly check the evenness of the surface using a building level.
- A metal corner of 5*5 cm (or 7*7 cm) is optimal for transverse bases.
- It is better to strengthen the shelves on which the most massive equipment is supposed to be placed, by welding additional metal supports underneath them.
It is better to place the heaviest equipment on the lower shelves for optimal load distribution throughout the rack. In this case, the best option is when the lower ceilings are made of corrugated metal, and for the upper ones it is quite acceptable to use durable chipboard.
Arrangement of a cellar, pit
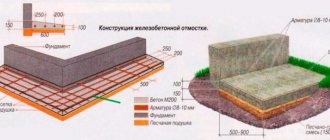
To equip a viewing hole or a full-fledged cellar in the garage, they begin with excavation work, usually done by hand. The bottom is carefully compacted, a sand cushion and waterproofing are placed, and the floor is made of clay or concrete. The walls are made of brick, aerated concrete, and reinforced concrete.
The ceiling of a spacious cellar must be made as strong as possible, especially if the machine is large and heavy. The best option is a reinforced concrete slab. When the cellar is slightly larger than the inspection hole, it is covered with thick boards, and the hatch is made from the same boards. The staircase down is made monolithic or welded. The cellar must be provided with ventilation and waterproofing.
Inspection pit and cellar
A necessary accessory for a DIY garage is an inspection hole. Moreover, the owner does not have to carry out all the repairs himself. Underground communications can be used in the following cases:
- inspection of the chassis, steering, and brake systems before a long trip;
- oil change, which allows you to save money and does not take much time;
- minor repairs that can be carried out by the owner's qualifications.
Inspection hole in the garage
It is more convenient to make the entrance to the cellar from a hole, as this will allow you to concrete several steps instead of using an extension ladder.
Cellar under the garage
The main nuances of these designs are:
- swelling of clay soils is harmful to underground structures;
- therefore, all elements of the pit and cellar are insulated from the outside with expanded polystyrene;
- sand or crushed stone is used in the underlying layer before concreting and backfilling of the pit sinuses;
- Drains are laid along the perimeter of underground structures at the base level to collect and drain water.
The width of the pit should allow the driver to enter it without lighting.
Devices for storing tires and wheels
Tires and wheels are very bulky items that need to be stored as compactly as possible. For this purpose, shelves or brackets are used, consisting of two metal triangle frames with jumpers. These triangular parts need to be fixed to the wall. The wheels are laid perpendicular to the bottom of the shelf. Slightly falling between the jumpers, without falling out, due to the heavy weight.
Homemade extension cord with two sockets
The “branded” extension cord reel is made from two plywood disks that are bolted together. The fragments are separated by a duralumin tube and washers.
On one side of the reel, the bolts are recessed to ensure contact with the handle without injury. On the other side, two holes for sockets are drilled at a certain distance. Socket boxes are attached with screws.
Proper storage and use of the tool
Each pipe is attached to a plywood plate with self-tapping screws through a slot. To prevent the pipe fragment from becoming loose during operation, pieces of glazing beads are glued under the sides of the holder with PVA glue.
When it is necessary to hang the holder on the garage wall, the handle is inserted into the holder tube. The handle post fits tightly into the slot and is fixed. With this additional equipment, the reel is mounted on the ceiling or on the bottom of the shelves.
In order for the extension ram to rotate easily, a small handle is mounted on the edge of the device disk, which consists of tubular sections of various diameters. A larger diameter pipe is placed on a smaller hose and firmly fixed with a flat screw.
We recommend watching:
- How to install sandpaper in the garage
- DIY mechanical devices
- DIY garage device
DIY garage tool photo- Interesting gadgets for the home workshop
Homemade devices and devices
Garage heating device
Stationary heating is carried out in various ways:
- gas;
- by air;
- electricity;
- stove;
- water;
- solid fuel;
- with used oil.
A homemade heater is made using:
- heater assembly kit;
- wires with plug;
- graphite powder;
- laminated plastic;
- epoxy glue.
A mixture of powder and glue is made, the rough side of the sheets is covered with this mixture, after which the parts are fastened and fixed on a wooden frame. Terminals are mounted to the graphite conductors, after which the structure is thoroughly dried. Next, you need to check the resistance; use a multimeter to check the functionality of the device.
To prevent heat from leaving the building too quickly, garage doors, walls, and the basement are also insulated.
How to assemble a compressor for a garage
Garage DIYs are capable of assembling more complex equipment, such as a compressor for monitoring tire pressure, painting a car, or blowing something out. If you have the necessary parts in the garage, you won’t need to spend a lot of money to assemble such a necessary device.
Homemade compressor
To make a compressor you will need:
- Old refrigeration unit.
- Air receiver, approximately 10 liters.
Tip: To improve the appearance of the unit, you should remove all rust and paint, and paint the compressor with an aerosol can in the desired color.
- For the receiver there is an oxygen pressure gauge.
- Pressure regulator.
- Two meters of high pressure hose for 20 bar.
- Filter regulator, the cheapest.
- Clamps.
- Adapters.
If there is limited space in the garage, the compressor can be placed on a makeshift shelf in the desired location on the wall. Then all the parts are assembled according to the previously drawn up sketch.
The receiver of such a compressor has three outputs:
- Above . To supply compressed air to the consumer.
- In the middle . For pressure gauge in receiver
- At the bottom . For draining condensate and oil.
Air is supplied to the panel in the lower part, where the filter regulator and the power button are located. The minimum pressure of the regulator is two atmospheres, the maximum is 8 atmospheres. For safe operation of the unit, an emergency valve can be installed.
Lighting
Sufficient lighting is required for any work carried out in the garage. It is produced using halogen, LED, and fluorescent lamps, which are necessarily decorated with shades. It is necessary to install a stabilizer in the garage in case of sudden power surges. In addition to ceiling structures, lamps are mounted above the workplace on a rail, allowing them to be moved to the desired location; rotating structures are also convenient. The brightness of the light flux is selected depending on the activity being carried out. Lighting is also necessary in the basement.
Lighting and ventilation
In garages, parallel circuits of lighting fixtures are more often used. One lamp allows you to use a specific area, several devices are turned on during a major renovation or a visit to the cellar. Minimum energy consumption is ensured by LED lamps. Daylighting devices have a great resource.
Cars use toxic, harmful fuels and lubricants, so do-it-yourself garage ventilation devices that allow you to create air exchange are becoming relevant. The influx is organized from below:
- garage - vents in the masonry, protected by bars;
- cellar - pipe from the garage or from the street.
Ventilation of the garage and cellar underneath
The hood is mounted under the ceiling of the cellar, the roof of the garage, or has the form of vents in the main walls at the highest points.
Related article:
Ventilation in the garage with your own hands. From this publication you will learn why garage ventilation is so important, what air exchange schemes exist, and installation nuances.
Recommendations and tips for zoning space in the garage
When planning and decorating a garage space, it should be taken into account that the access part of the garage space is made with an outward slope so that water does not accumulate near the gate. If any work is planned inside with pesticides, a welding machine, or a woodworking machine, the garage will be equipped with hoods, since simple vents are not enough. The distribution panel from which the wires go into the room is located inside or outside, it must be protected from moisture.
The division of the garage space looks something like this:
- passage places are the part that should always be free, as it is intended for movement within the room. The maximum that can be placed here is a hanger with everyday items (shoes, work clothes, keys, etc.);
- quick access space – storage areas for small items that require access quite often. Sealings, canned food, animal feed, a small supply of cereals, etc. are stored here;
- essential items are used constantly, which is why they are placed near the entrance. Such things include a broom with a dustpan, a shovel for removing snow, etc.;
- area for large and rarely used items. The easiest way is to arrange it under the ceiling, on the mezzanine. An artificial Christmas tree, decorations for it, skis, a tent, a folding barbecue, a set of fishing rods and much more are stored here. The more often an item is used, the more accessible it should be;
- place for tall, narrow objects - these are mainly garden tools, cleaning items: brooms, hoes, pitchforks, rakes, hoes with long handles, mops, etc. All this can be easily placed on a narrow corner rack near the entrance, from where they can be easily taken out and placed in place;
- work area - tools and equipment for hobbies and creativity are placed in it: auto repair, assembly and disassembly of electrical appliances, wood carving, gardening, etc.;
- resting place - it will be equipped if there is free space left. There is a comfortable sofa, a table with chairs or folding stools, and, if necessary, a minibar, microwave, and small refrigerator.
Homemade carriers for the garage
Even a well-lit motorhome has one drawback: under the bottom of the car it is dark, almost like night. To create illumination for this area, it is worth using portable carriers for the garage. These are the simplest, but very useful devices for the garage, which are easy to make with your own hands.
It is also important to choose the location of the light bulb so that the light it emits is directed in the right direction. In other words, the system can be improved, and we will explain how later.
Unbreakable lamp socket
It is important to provide for every little detail in the garage: everything needed to repair a car must be safe. Therefore, it is worth modifying a regular cartridge, giving it unbreakable qualities. Make a kind of lampshade from a plastic bottle that will reliably protect the fragile bulb of an energy-saving light bulb.
You can also apply an LED lamp to such a lampshade, and the incandescent lamp will heat up and melt the plastic.
To create a plastic lampshade, you will need to do the following:
- find a translucent bottle with medium-thick walls;
- arrange a window in it 1/4 of the diameter of the bottle itself;
- cut the neck so that a lamp can be mounted inside the product, but in such a way that the screwed-in bulb presses it against the socket;
- assemble the design, try it.
Carrying LED Recessed Light
We continue the section “tips from a garage homemade product.” Another way to modify an ordinary carrier for working in a garage pit is to replace the incandescent lamp with a flat LED recessed lamp operating from a 220 V network. We’ll tell you how to do this from a regular product below.
You will also need a cord with a plug, a piece of plastic window sill, slightly larger in size than the lamp itself, for mounting the light device.
The car owner chooses the dimensions at his own discretion, and the sequence of work is as follows:
- on one side, cut a hole in the window sill, the diameter of which is smaller than the diameter of the lamp body;
- remove the standard mount of the device;
- pass the wiring through the cells of the window sill, bring it out into the organized hole;
- connect the lamp;
- glue it to the base;
- cut strips of plastic from the window sill and seal the sides with them;
- Bend a bracket from a piece of tin, screwing it to the lamp with self-tapping screws.
The main idea when arranging a building for a car or a country house, which should be adhered to in your work, is rational space planning. Place items so that they are all at hand and stored in order.
Interesting and useful homemade products for the garage will help you do this. Then the dacha or garage will always look neat, and it will be cozy to be inside the building.
Over time, a finished “motorhome” acquires a large number of tools. Conventional homemade products for the garage bring practical benefits without overpayments. Any machines made by yourself will not be inferior in quality to their factory counterparts. Let's look at some devices.