Which corrugated sheet to use for the fence
Before you make a fence from corrugated sheets with your own hands, you need to understand the labeling of this material.
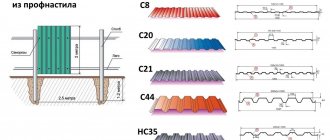
The correct selection of the grade of corrugated sheeting will make the structure reliable and durable. The profiled sheet is marked with an alphabetic and digital code. There are three letter designations for profiled sheets: S, N and NS. For fences, corrugated sheets with the designation C (wall) are used. Products with the designations H and NS are used for roofing work.
Table of profiled sheet brands.
The numerical designation shows the height of the stiffener in mm, and can vary from 8 to 35. A higher stiffener makes the sheet stronger. For fences, sheets with an edge height of 8 mm can be used, but for fences in places with high wind loads, it is better to take sheets with an edge of 10 to 20 mm.
The thickness of the metal varies from 0.4 mm to 0.8 mm. For a fence, it is enough to choose 0.45 - 0.5 mm.
It turns out that for fencing you should choose profiled sheets of grade C8, C10 or C20, 0.5 mm thick.
Manufacturers produce galvanized or painted corrugated sheets. The cost of painted sheets is 20% higher than galvanized sheets, but their service life is longer.
You can read more about choosing a profiled sheet for a fence here.
Fence installation process
Next, we suggest you read the step-by-step instructions that will help you understand the question of how to make a fence from corrugated board correctly and reliably. All work can be divided into several important stages.
Preparing the site for the installation of a fence
The entire surface of the soil must be thoroughly cleared of various elements that may interfere with the installation of posts and sheets: stones, tree roots, bushes, etc. Ideally, you should have a strip 2 m wide.
Installation of pillars - with compaction or concreting
We mark the territory - we determine where the gate and wicket posts, as well as the corner posts, will be located. It is recommended to take the support spacing no more than 2.5 meters. We drill holes to a depth of 0.8 meters and insert pillars. Next, you will need a stepladder and a glass, which we will place on top of the post so as not to damage the post when driving it in. We drive to a depth of 1.2 meters. Let's take into account that if we concrete, we will need a drill with a width of 150 mm. When the post is firmly standing, we begin to fill the hole with soil, crushed stone or concrete mortar.
Installation of cross beams
As we said earlier, the corrugated sheeting is attached specifically to the joists, which, in turn, are mounted on support pillars.
The joists can be welded or screwed to the vertical posts. Professionals advise using special plates – holders – for these purposes. These plates are screwed to the racks, and the logs are already attached to them. This solution makes the fence construction project more expensive and time-consuming, but such fasteners are considered the most reliable.
Methods of attaching transverse joists to racks
- end-to-end with a pole - an ideal option when arranging a solid fence;
- behind the pole (using a bracket-holder or by welding to the pole).
Installation of corrugated sheets
An important stage of work; mistakes here can lead to the rapid appearance of rust. To screw the corrugated sheeting to the joists, special screws or rivets are used. The correct start of installation depends on the configuration of the profiled sheet.
First you need to determine which outermost wave of the sheet is the covering wave. Different manufacturers do it differently, so the covering wave can be either on the left or on the right. The sheets must be mounted in such a way that each subsequent sheet covers the wave of the previous one. We also recommend starting installation from the gate, so as not to run into a situation where you have to install a small piece of corrugated sheet in the most visible place.
The corrugated sheet is attached at the edges to each of the transverse joists, as well as to the middle of the sheet (in each joist). If you know that the fence will be subject to strong wind loads, then it is better to attach the corrugated sheeting to the joists every two waves.
Construction of a fence made of corrugated sheets
A fence made of corrugated sheets with metal posts is a linear structure. Metal pillars reinforced in the ground in various ways are used as the base. To install gates, choose pillars with a thicker wall than for intermediate supports.
The pillars are connected to each other by horizontal metal logs or veins. For fences up to 1.5 meters high, it is permissible to install only two logs per span, at the top and bottom. If the fence is higher than 1.5 meters, add a third vein in the middle.
The corrugated sheet is attached to the logs with metal screws and rubber washers. The gate and wicket are hung on metal hinges, which are welded to the support post.
Stage 1. Development of a fence made from corrugated sheets: sketch and drawing
A corrugated fence is an extended structure that includes:
- Pillars (2) installed in a hole in the ground (1), which is concreted and filled with sand and gravel backfill (4).
- Joists (5) connecting the pillars. For a height of up to 1.5 m, 2 joists are sufficient, top and bottom. If the fence is higher than 1.5 m, an additional log in the center is required.
- Profiled sheets (6), which are attached to the transverse joists with self-tapping screws. To hang a gate or wicket, the support posts are equipped with hinges.
What elements does the fence consist of?
To calculate the required number of materials and install a durable fence made of corrugated sheets, you should first develop a sketch of it. This is a preliminary sketch depicting:
- Where will the fence be located, taking into account the entrances, the location of the gate, green spaces on the site, topography, etc.
- Changes in ground heights are noted to determine where shorter or longer sheets will be needed.
- Dimensions of individual straight sections, their height and length.
- Pole installation points: basic and intermediate.
- The length of the sections is for a sectional fence. It is taken as a multiple of 1, 1.5 or 2 sheets of corrugated board.
When installing a fence made of corrugated sheets, it is necessary to take into account that the distance from the ground to the bottom edge of the sheet can be 0-150 mm. With a terrain slope of up to 3%, the difference between the sheets is 150 m. For steeper terrain changes, the height difference is taken individually.
An example of a drawing of a fence made of profiled sheets
Sketch of a fence made of corrugated board
Required materials and tools
To install a fence from corrugated sheets, you will need the following materials:
- metal pipes for poles with a cross-section of 50 mm and a wall thickness of 2.5 mm;
- metal profile for veins, section 40x20 mm and wall thickness 1.5–2 mm;
- profiled sheet;
- self-tapping screws for metal with a rubber washer, size 5.5x20 mm.
- cement;
- sand;
- fine crushed stone.
To carry out work on installing a fence, you will need the following tools:
- bayonet shovel;
- electric or manual drill;
- a cord no less long than the total length of the fence;
- yardstick;
- construction level;
- plumb line;
- container for preparing the solution;
- screwdriver;
- electric drill with a set of metal drills;
- welding machine.
Calculation of the required amount of materials
Before you build a fence from corrugated sheets with your own hands, you will need to calculate the required amount of material.
When determining the number of corrugated sheets, the total length of the fence is divided by the width of one sheet. Please note that the useful width of the sheet is 1100 mm, while the standard sheet is 1155 mm wide. It takes 55 mm to overlap one sheet with another during installation - the width of one rib.
The length of the sheets depends on the height of the fence. Manufacturers produce sheets of standard sizes (2000 mm, 2500 mm, 3000 mm), but when ordering the material directly from the factory or from an official representative, you can order sheets cut to any size.
This is especially convenient when there are significant differences in height along the fence line and there is a desire to level the top line of the fence to one level, rather than installing sheets with ledges.
When calculating the number of screws, you need to proceed from the need for one sheet. The screws are tightened through one wave on each joist; accordingly, you need to count the number of installation locations for the screws along the width of the sheet, and multiply this number by the number of veins.
The number of pillars is determined based on the length of the fence line and the width of the spans. The recommended column spacing is 2000-2500 mm. If the length of the fence is 25 meters, then with a support installation step of 2.5 meters, 11 posts will be needed.
To determine the required number of lags, you should take into account the length of the metal profile and the method of fastening. If the profile is welded to the pillars, the optimal length of the lag is selected according to the multiplicity of spans.
For example, with a span width of 2.5 meters and a profile length of 5 m, one profile will be needed to cover two spans in a row. When cutting a profile to fit the span, you need to select the length of the material so that there are fewer scraps left.
Material calculation
We build a fence from corrugated sheets with our own hands and calculate the amount of materials needed. For example, let's take a plot of 6 acres. Of course, the configuration of the site may be different, but often 6 acres is 20 meters by 30 meters. The perimeter of such a land plot will be approximately 100 linear meters. meters. We will assume that we are installing a fence 2 meters high with a hole foundation.
Corrugated sheet
If you decide to install a solid fence in which the posts will be covered with corrugated sheets, then to calculate the required number of sheets you need to simply divide the length of the future fence (100 linear meters, which corresponds to a plot of 6 acres) by the width of the selected sheet, more precisely, by its useful length ( 1 m 15 cm). The result should be rounded up. In our case, you will need 100/1.15 = 87 sheets of C8 corrugated board.
Calculate the required number of corrugated sheets simply using the formula: fence length / 1.15 = number of corrugated sheets.
Required number of fence posts
The number of supports depends on the calculated distance between the pillars.
If you are building a solid fence, then the total length must be divided by the estimated distance between the posts. Considering the increased windage of a fence made of corrugated sheets, we recommend taking the distance between posts within 2-3 meters. It is not recommended to increase the distance between the posts, as this will worsen the stability of the entire fence and you may have to increase the number of longitudinal joists. For a fence 100 linear meters long. meters you should purchase 40 pillars: 100 linear. m/ 2.5 m (post height) = 40 pcs. When arranging a sectional fence, the number of posts is determined by the number of sections. We advise you to calculate the distance between sections in advance so that it is equal to a whole number or half the size of the corrugated sheet. This way, you can use up the sheets with virtually no residue.
It is worth noting that when making calculations, it is necessary to take into account the mandatory installation of posts at the corners of the future fence, as well as in the places where the gates will be located. The required height of the post is determined by the planned height of the fence and the depth of their immersion in the ground (more than 30% of the length of the entire post must be underground). In other words, if your fence is 1.8 meters high, then you need to take a post 2.8 meters high.
Cross joists
The number of transverse metal joists depends on the height of your future fence. If the fence is up to 2,000 mm, then two horizontal logs should be installed per section. But if the fence has a height of more than 2 m, or there will be a strong wind load on it, and also if the profiled sheet is thin, then it makes sense to install three logs. Thus, a fence with a linear length of 100 m will require at least 200 m of logs, each of which is 3 m in length. As a result, 67 logs are required, excluding gates and wickets.
Holder plates
Everything is simple here - the number of plates is equal to the product of the number of support posts and rows of horizontal joists. Such plates are not always used; most often, the logs are simply welded to the racks.
Plugs for poles
Their number is calculated by the number of support pillars. We advise you to additionally take a couple more plugs, which will certainly come in handy during the operation of the future fence.
Hardware
The corrugated sheet is fastened with self-tapping screws into the two outer waves and then every two waves into each of the transverse logs. In some cases, you can attach the sheet only along the edges and in the middle wave. Considering that, on average, at least 8 screws are required for one profiled sheet, it is not difficult to calculate their number - at least 536 pieces. But we advise you to take self-tapping screws with a reserve, since during the tightening process sometimes defects in fasteners are revealed.
If you plan to work with rivets, then you need a little more of them, since they fasten the sheet through the wave and along the edges.
Gate with wicket
Of course, no fence would be complete without a gate and entry gate. As a rule, one entrance is made; accordingly, one gate and one gate need to be installed.
Marking and excavation work
Do-it-yourself installation of a fence from corrugated sheets begins with markings:
- Initially, you need to determine the extreme points of the site boundary. Already installed poles in neighboring areas can serve as a guide. If necessary, representatives of the cadastral chamber are called.
- At the extreme points, pegs are driven in and a cord is pulled between them, which will show the line of the future fence.
- The distance between the supports is determined taking into account the convenience of cutting the material for the frame, but the distance between adjacent pillars should not exceed 3000 mm. Focusing on the line of the cord, pegs are driven in to indicate the installation location of each support. For ease of marking, the installation points of the pillars are marked on a stretched cord. Then a thread with a weight is tied to these points, which will indicate the exact location for the hole for the support.
For ease of work, the marking plan is transferred to paper. The drawing will help you accurately calculate the amount of material and avoid confusion when installing the frame.
The cost of installing a corrugated fence
Just like the cost of building materials, the prices for the construction of fences also differ. The builder’s experience and the availability of the necessary tools make a big difference in this. Average price for work:
- Installation of a support column - from 280 rubles.
- Installation of one profiled sheet – from 800 rubles.
- Installation of one section 150x250cm - from 410 rubles.
- Installation of crossbars on level ground – from 250 RUB/section
- Installation of crossbars taking into account unevenness and slopes - from 300 rubles.
You can compare prices for installation yourself and from companies here
What material to choose for pillars
To support a corrugated fence, metal pipes with a round, square or rectangular cross-section are used. The minimum diameter of the pipe for the post is 50 mm, the wall thickness is at least 2.5 mm. When choosing material for posts, you should also take into account the wind load in the area where the fence is installed.
The length of the post is calculated taking into account the height of the fence and the part that will be in the ground. For heaving soils, it is recommended to go through the freezing depth. In other soils, the ratio of the height of the ground part and the part fixed in the ground is calculated as 2 to 1. For example, the height of the fence is 2000 mm, which means that immersion in the ground will be required by 1000 mm, and the total length of the post will be 3000 mm.
To install supports under the gate, it is recommended to use more powerful pillars, with a section of 60x60 and a wall thickness of 3 mm.
In areas with weak soils, it is recommended to install fences made of corrugated sheets on piles.
Sheet profile marking and configuration
When starting to build a fence from corrugated sheets with metal posts, you need to decide on the material for the fencing. In order not to make a mistake when choosing a material for fencing, you should understand its markings. It encrypts all the main standard characteristics and indicators of rolled metal. So, for example, from the designation C18-1180-0.5 you can find out the following information:
- C - wall profiled sheet
- 18 — profile height (stiffening ribs), 18 mm. This value ranges from 8 to 35 mm Once again, we note that the higher the profile height, the stronger the structure. For fences, you can use corrugated sheets with a profile height of 8 mm. In case of increased wind load, it is advisable to choose sheet material with a higher profile height (10-20 mm)
- 1180 - the width of the profile sheet, in millimeters, depends on the number and height of the ribs
- 0.5 is the thickness of the metal from which the corrugated sheet is made. This value ranges from 0.4 to 0.8 mm. For fences, the material thickness (0.45-0.5) mm is sufficient
Installation of base for pillars
To prepare the base for the pillars, use the following step-by-step instructions:
- dig holes for supports. You can dig with a regular bayonet shovel or a drill (manual or electric). The depth of the hole for the support must be at least 1000 mm (taking into account adding a layer of sand or gravel to the bottom in a layer of 100-200 mm). The width of the yaki should exceed the diameter of the post by a third;
- sand or fine gravel is poured into the bottom of the hole. The pillow is carefully compacted.
The base for installing the support is ready.
Stability of supports – durability of the fence
Options for deepening posts for corrugated fencing
On the site proposed for the construction of a corrugated fence, it is necessary to remove all vegetation and clear the ground of excess debris. By the way, a marking drawing won’t hurt either; it’s easy to determine the number of spans and supports.
If it is not planned to build a foundation for a fence made of corrugated sheets, then it is advisable to still remove the top layer of soil and fill it with gravel or crushed stone. The backfill should be compacted thoroughly. This will protect the corrugated fence from moisture and vegetation.
In the corners of the future fence you need to install pegs and tighten the construction thread. This will help align the pillars at the same level. The pillars are installed at a distance of 2–3 m from each other, but you need to start installing them from the corners. To eliminate unnecessary costs, it is better to immediately determine the location of the gate and the gate, then measure the distance from the corner to the gate mark, and divide the result by the working width of the profiled sheet. It will be easier to calculate everything if the gate and gate are included in the drawing.
Supporting elements for fences made of corrugated sheets are installed using several methods, the most optimal for non-problematic soil is driven, and on heaving soil it is better to build a strip-and-pillar foundation with reinforcement.
We will assume that you are lucky with the soil of the area around the house, so in this article we will describe the process of driving in the pillars. To do this, prepare the holes. They are dug or drilled to half the depth. Next, the post is installed in the hole, some material is placed on top of it to protect it from damage, for example, a block, after which the support is driven in with a sledgehammer. The depth must be at least 80 cm.
It is inconvenient to install posts for fences made of corrugated sheets yourself, however, for any fences, since you need to control strict verticality. Therefore, you cannot do without an assistant. After driving, you need to fill the resulting voids with earth or crushed stone and compact them thoroughly.
After installing two corner fence posts, a construction thread is pulled from the corrugated sheet on top so that the remaining posts can be easily aligned at the same level. The remaining supports are installed in the same way. When all the supporting elements are installed, you can proceed to the next stage of construction - attaching the joists.
Installation of pillars
After preparing the hole for the support, the installation of the pillars begins:
- the part of the post intended for immersion in the ground is cleaned of rust, degreased, treated with a metal primer and painted over with bitumen mastic. Installation begins after the protective layer has dried;
- the post falls into the hole;
- check the height of the ground part of the pole. If necessary, adjust the height by removing excess sand or adding sand to the hole;
- With the help of supports, the post is installed strictly vertically. For this work, two people will be required: one adjusts the position of the pillar, and the second corrects the actions of the first, determining the position of the pillar by a plumb line;
- to securely fix the support in the foundation, several pieces of angle can be welded onto the surface of the underground part of the pillar;
- A cement-sand mortar is prepared for pouring the foundation in a ratio of 1 to 3 (one part cement to three parts sand). The volume of concreting is small, so the solution is stirred next to the hole in a small container; you can also use a sheet of iron or plywood;
- the solution is poured into the space between the post and the edges of the hole. To obtain more durable concrete, crushed stone or brick fragments are added to the solution. Each layer is carefully compacted and punched with an iron rod to prevent the formation of air voids;
- After pouring the solution, the position of the column is checked again and, if necessary, adjusted.
This completes the process of installing the pole. To carry out further work, you will have to wait 5-7 days for the solution to gain sufficient strength. It will take 28 days to fully gain strength.
Joists and sheathing also require attention
Methods of attaching logs for a fence made of corrugated sheets
Crossbars on fence posts for a house or a summer cottage can be attached in two ways: by welding or using bolts. If horizontal jumpers were previously provided in the pillars, then it is easy to attach the logs to them with bolts. But with the ability to use a welding machine, it’s not difficult to weld them.
The number of crossbars depends on the height of the fence made from corrugated sheets. If it does not exceed two meters, then two logs are enough. Well, for fences made from corrugated sheets exceeding this height, it is better to provide three crossbars.
After all welding work, it is advisable to clean the seams and check them for quality. It is better to eliminate all defects at the initial stage of construction of fences with corrugated sheets. After cleaning, the resulting frame of a fence made from corrugated sheets for a dacha or home should be treated with a primer and then painted.
Now you can put all the drawings aside and move on to attaching the corrugated sheeting to the fence for your house or summer cottage. The fastening process can be done using rivets or special screws with spacers. Practice shows that the use of self-tapping screws is more profitable. This is explained by the fact that if one sheet is accidentally damaged, the screws are easily unscrewed, and the sheet can be replaced without much effort. Rivets are more difficult to remove.
Attaching the joists
After installing the pillars, they begin to form a frame for attaching the corrugated sheet. To do this, install horizontal connections - logs or veins. There are two ways to attach the veins to the supports:
- The veins are welded.
- The veins are secured with bolts to brackets pre-installed on the posts.
Options for attaching joists.
The veins are pre-cut to size, taking into account the distance between the corrugated fence posts. When joining individual joists on a pole, a gap of 5 mm should be provided.
Before fixing the veins on the pole by welding, the fastening points are cleaned of paint, and the rust is removed with sandpaper or a grinding machine.
To weld the logs at the same level, maintaining a horizontal position, you will need the help of a second person who will hold the metal profile in the desired position and check its level. Boil the connection along the entire length of the contact between the log and the pillar.
After the welding work is completed, you need to clean the attachment points. Remove scale and excess deposits. At this point, poorly executed seams are often discovered, they are welded and cleaned again.
After cleaning, the junction of the vein and the post is treated with a primer and painted.
When fixing the logs on the brackets, work begins with installing the holders themselves. The brackets are screwed to the posts using bolts or powerful metal screws, having previously drilled the mounting holes.
Holes for bolts are drilled in the brackets and on the joists. Place the logs in the holders, insert the bolts and tighten the nuts. The connection is ready. All that remains is to treat the bracket and the mounting location with a metal primer and paint it.
Stages of fence construction
Marking the site, choosing the height and level of the fence.
When starting to install a corrugated fence, you first need to mark the boundaries of your site and find out how level it is and whether there is a significant slope. If the site is uneven, then you need to decide which top edge of the fence you want to see: flat or with steps. Also at this stage it is necessary to understand how high the fence will be. The length of the support pillars depends on all this.
If the area is flat or you decide to make a stepped fence, then for a standard two-meter fence, posts 3 meters long will suit you. If you need to install a fence on a slope, but you want to make the upper edge at the same height, you will have to take longer posts or build them up.
Installation of support pillars
As a rule, pillars with a cross section of 60 x 60 mm or 60 x 40 mm are used as support pillars. They are installed at a distance of 2.5-3 meters from each other. You can read in detail about what to look for when choosing pillars and what they should be like here.
Let's look at three main ways to install corrugated fence pipes.
Driving into the ground
Hammering load-bearing supports into the ground is the simplest and most economical method. However, this is the least reliable method and can be used for lightweight, decorative or temporary structures. Drilling can also be used for certain types of soil. This applies to sandstones, clayey or peat soils. In denser soil, the supporting elements of the frame are concreted.
Butting
This is a dry concreting technology using sand and gravel mixture. It is also a fairly simple and affordable procedure to install corrugated fence posts. The essence of the method is as follows: a drill is used to make a hole in the ground with a diameter of 20-25 cm and a depth below the freezing level of the soil. This depth is different for different regions; in central Russia it is enough to deepen the pillars by 1.2 meters. A pillar is placed in the well and covered with crushed stone, gravel, expanded clay, brick fragments and similar materials. All this is filled with water and carefully compacted so that the mixture lies as densely as possible. The advantages of this design are that it simultaneously serves as drainage, allowing groundwater to escape and minimizing swelling of the soil when freezing. On the other hand, it is better not to use butting in particularly windy regions or seismic zones. Due to constant wind loads, the crushed stone base becomes loose and loses strength over time.
Concreting
The most traditional and reliable method of strengthening supporting elements when installing a fence made of corrugated sheets. The preparation is the same as for the previous option. We drill a hole in the ground to the freezing depth, level the post and fill it with concrete. For the solution to fully set, we recommend giving it about two days. This method is suitable for almost any type of soil and is durable and has a long service life.
IMPORTANT!
With any method of strengthening support pillars, it is important to correctly calculate the depth of their installation. It should be greater than the freezing depth of the soil in your region. For central Russia this is 1.2-1.5 meters. If the depth of the pillars is not sufficient, swelling of the soil will lead to the supports being squeezed out of the ground. Also, a fence made of corrugated sheets has a high windage capacity, so a strong gust of wind can overturn a poorly reinforced fence.
Also note that when installing poles, you must retreat at least half a meter from ditches and storm drains.
Other methods of installing a support structure for a fence are strip foundations or screw piles. These are the most expensive and labor-intensive methods that are not often used in self-construction.
At the end of the installation, plastic plugs are installed on the poles. Also, do not forget to determine the location for the gate and entrance gate. We tell you more about their installation here.
Installation of cross beams
To make a frame for a fence from corrugated sheets, the next step is to attach horizontal guides. It occurs at a distance of 20-30 cm from the upper and lower edges of the fence. Also, do not forget that for natural ventilation of the area you need to leave a gap between the ground and the fence sheathing.
The logs are connected to the pillars by welding or using X-brackets. The first option is only suitable if you have ungalvanized and unpainted poles. After welding, the entire structure must be primed in two layers. This will protect the steel from corrosion to a certain extent. However, even a ferrous metal frame treated in this way will last several times less than a galvanized one. The only caveat of galvanized poles is that welding is not suitable for them. If you choose poles with zinc or polymer coating, use special X-brackets to attach the logs. When installing the corners, one of the “legs” of such a bracket is cut off with a grinder.
The number of crossbars depends on the height of the fence. For a standard 1.8 meter fence, two joists are enough.
Covering the frame with corrugated sheets
The optimal profile for the fence is S-8 or MP-10. In this case, it is enough to take material with a thickness of 0.4-0.45 mm. If you need a more rigid fence, the MP-20 or S-21 is suitable.
Roofing screws with a rubber gasket and a painted head, 5.5x19 mm in size, are used as fasteners for installing corrugated sheets on a fence with your own hands. Self-tapping screws with a press washer can also be used, but they are less convenient and reliable. You can read more about what to look for when choosing hardware for corrugated sheets here. Typically, 10 self-tapping screws are required per sheet of corrugated sheeting; they are drilled through one wave into the deflection. Additionally, rivets can be installed, but only as an anti-vandal measure. The fact is that theft of corrugated sheets is common, and self-tapping screws are very easy to unscrew. Not every thief wants to tinker with rivets. They are not suitable as independent fasteners, as they will not withstand the weight of the corrugated sheet.
A profiled sheet is mounted with an overlap equal to one wave. The corners for the corrugated board fence are made end-to-end. If you use x-shaped brackets, one of the legs is cut off. But if it doesn’t work out beautifully, you can install a corner strip on the outside. Also interestingly changing the appearance of the fence is a parapet or U-shaped bar, which is installed on top along the entire length of the fence. In addition, it gives additional rigidity to the fence.
If the area is often exposed to stormy winds, it makes sense to install so-called vents in the fence. For example, install two sheets of corrugated board, then three pickets, and so on. This will reduce the windage of a solid fence; it will have holes for air to pass through. At the same time, you can order a picket fence of the same thickness and in the same coating as the corrugated sheet.
Fastening corrugated sheets
To install the corrugated sheet on a metal frame, use the following step-by-step instructions:
- Preparation of material. If sheets of the same size are used, no preliminary preparation is required. If you need to adjust each sheet to size, mark and trim with an angle grinder. The protective film is removed before fastening, since after screwing in the screws, fragments of the film will be visible from under the rubber seal.
- Displaying the first sheet. To immediately set the correct order for installing the corrugated sheet on the frame, you need to correctly install the first sheet. The permissible height of the extension along the upper edge above the vein is determined. The sheet is secured with one self-tapping screw at the highest point. Then the second edge is leveled and also secured with a self-tapping screw at the opposite extreme upper point. Next, the sheet is screwed completely in increments through the wave.
- Installation of profiled sheets. After installing the first sheet, the others are fastened sequentially, with the obligatory check of the position of each sheet according to the level. If the position of even one sheet is disturbed, a failure will occur along the entire length of the fence. To install the profiled sheet, use metal screws with a rubber washer. It is important to maintain the optimal level of tightening: the rubber washer must fit snugly to the base. If the washer is pressed in, the self-tapping screw is tightened; if the washer does not fit tightly to the base and rotates, the self-tapping screw is not tightened.
- Installation of the plank. When building a fence from corrugated sheets with your own hands, you must not forget about protecting the top part of the material. To make the fence last longer, the upper ends of the sheets are covered with a special fence strip, 30 mm wide. To fix the strip, rivets with a head matching the color of the sheets are used.
Secrets (video) of technology for reliable installation of fence posts
Time-tested, when installing a fence made of corrugated sheets with metal posts, you can save on anything (on corrugated sheets, horizontal guides, on cement, etc.), but not on support posts. Reliable posts are the key to an even, stable and durable fence for many years.
Well, as they say: “It’s better to see once than to read a hundred times!” Therefore, if you want to learn the secrets of making a durable fence that will last forever, watch the video below:
Men's ideas and secrets of technology for installing fence posts for centuries
Construction of gates and wickets
The installation of a corrugated fence is completed with the installation of gates and wickets. Metal posts with a wall thickness of 3.5 mm or more are used as gate supports. Reinforced garage awnings are welded to the posts.
The frame for gates and wickets is made from a profiled pipe with a cross-section of 20x40 mm and a wall thickness of 2 mm. After hanging the frame of the gate and wicket, they begin to install the corrugated sheet.
The corrugated sheet is fastened in the same way as when installing the main row of the fence. Locking devices are installed before installing the profiled sheet.
We have already written about the installation of swing gates in a fence made of corrugated board in this article.
Installing a corrugated fence with your own hands
In the market for the sale of building materials, for all sellers, prices may vary significantly. To get specific answers to the question of the cost of materials, it is better to contact specialized stores. We can provide you with information on the average cost on the market:
- Racks made of profile pipe 5x5 centimeters will cost from 470 rubles/meter.
- A profile pipe 5x2.5mm will cost from 400 rubles/meter.
- Profiled sheet with a wave of 2cm - from 380r/meter.
- Profiled sheet with a wave of 1.8 cm - from 280 rubles/meter.
- Finished section made of profiled sheets on piles - from 740 RUB/meter
- Finished section with a metal frame 115-110cm - from 690 RUR/piece.
Corrugated sheeting for fencing
The profiled sheet used in the construction of fences differs from the roofing material. The main difference is the characteristics. They must be taken into account when calculating the structures of supports and crossbars.
A metal fence using this material differs little in its design from other types of fencing. And the construction technology itself may have some deviations. For example, in the form of replacing some parts with others or using different methods of connecting frame parts when installing a fence.
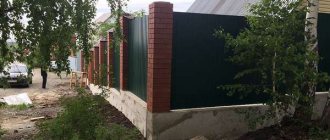
Fence frame from the yard side
The design of a corrugated board fence may include:
- continuous type of fencing;
- sectional type of fence;
- combined design option.
Installing a fence from corrugated sheets using a continuous method involves the formation of a continuous sheet on a metal frame without gaps between the sheets. The exception here is the entrance gate and wicket.
Location on
A sectional fence design involves the manufacture of a separate frame for each section. This is a more labor-intensive type of barriers that requires great care at all stages of work: from developing a drawing and ending with attaching sections to supports.
The combined view involves the use of the frame structure of the main element and corrugated sheets as background filling.
Multi-colored sheet options
Typically, gates, wickets or sectional spans are mounted in this way. Forging, metal picket fence, and decorative elements are used as a frame structure.
To install the fence, profiled sheets of several categories and various quality parameters are used. Most often, canvases with a wave height of 8 to 20 mm are used to fill sections. Fastening such material is much easier and simpler than using roofing metal with a wave height of up to 40 or even 80 mm.
Standard sheet sizes are:
- metal thickness - 0.4-0.7 mm;
- wavelength of the blade - 1150 mm;
- width - 1100 mm.
Types and options
Depending on the purpose, the fencing uses:
- PVC coated material;
- painted with alkyd enamels;
- unpainted galvanized sheet;
- unpainted metal sheet.
The choice of one or another type of material and construction method depends primarily on the purpose of the fence and the construction budget. The ability to make a beautiful fence from corrugated sheets depends on the ability to handle metalwork tools and on how much time is allocated for the construction of the fence.
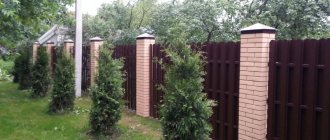
The photo shows a fence for a summer house.
Fencing for a summer residence
Additional protection of fencing elements
Plugs for metal supports of fencing structures made of corrugated sheets
No one is immune from mistakes and accidents when building fences from corrugated sheets. So it’s better to foresee at least some of them in advance. For example, a self-tapping screw can come off and damage the top protective layer of a profiled sheet, which will affect its durability. To eliminate this problem, it is advisable to purchase a can of suitable paint when purchasing material.
A fence made of corrugated sheets will last much longer if all its elements are reliably protected from moisture. For example, it is advisable to cover metal supports that are hollow inside with lids, which you can purchase or make yourself from a steel sheet and weld.
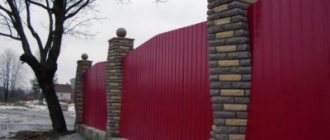
If a fence made of corrugated sheets was installed on brick pillars, then cylindrical metal caps and ebb moldings for the base are also sold for them. Water and snow do not linger on such protective caps, so the brick of the pillar will be reliably protected from dampness.
To prevent efflorescence from appearing on the brick, it should be treated with a water-repellent agent, which forms a film on the surface of the brick and does not allow moisture to penetrate into the material.
In addition, it is advisable to protect a fence made of corrugated sheets not only from above, but also from below. To do this, a small blind area with a slope is built so that rainwater drains and does not form puddles under the fence.
Thorough preparation and a serious attitude to the construction of fences make it possible to create structures that can last longer than the service life promised by the manufacturer.