Pros and cons of concrete paths
The advantages of concrete paths include:
- availability and speed of production;
- efficiency;
- the ability to create various forms;
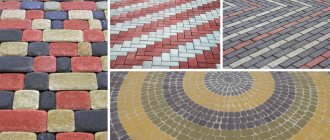
- variety for decoration;
- durability.
When building concrete paths with your own hands, you can come up with an original design for landscape design.
Along with the advantages, there are also disadvantages:
- labor intensity of preparatory work;
- occurrence of cracks;
- impossibility of redevelopment;
- mandatory installation of formwork structure;
- the need for a concrete mixer (if a large amount of work is planned);
- the paths shrink over time.
Of all the above disadvantages, the last one is significant: due to subsidence of the soil and washing out of the base, the paths can creep away. Therefore, in areas where there is a high depth of groundwater, it is recommended to lay such paths on a high cushion or fill them with a continuous tape.
In addition, it is recommended to fill paths only in dry weather, otherwise the prepared trenches will creep away from the rain.
Examples of work with recommendations
You can build many options for garden paths at your summer cottage. When choosing a suitable variety, it is worth considering the recommendations for arrangement.
Simple
The classic option involves paving with paving slabs. The material is easily laid on the base and does not require the use of additional devices.
Textured
You can create a textured path using tree cuts. They are distinguished by their original textured appearance and good compatibility with other materials.
Before laying, the saw cuts must be treated with antifungal impregnation to protect them from exposure to high humidity.
Using the form
Using a plastic mold allows you to create a textured surface. The mold is placed on the base and concrete is poured inside. To give an original appearance, the top layer can be painted.
With chain link
The chain-link is used as a reinforcing base. It is recommended to lay the chain-link mesh so that it is in the middle of the concrete slab.
Made from concrete blocks
An original solution is the use of lattice blocks. The structures are laid directly on the ground, having first removed the layer of turf, after which the voids are filled with earth and planted with lawn grass.
In the form of paving slabs
When paving paving slabs, a layer of sand is placed on the concrete base. After placing each tile, tap it with a rubber mallet to compact it. The cracks between the tiles are filled with sand.
Mosaic
Creating a mosaic with bright patterns decorates the area and makes the path original. The process of laying mosaics is labor-intensive, so it is recommended to lay only small sections of the path.
With stencil
Using a stencil you can create any texture on the surface of the track. The stencil is applied to the base and filled with concrete.
From lace slabs
You can transform classic concrete slabs with a lace doily and paint. A napkin is placed on the surface of the slabs and covered with paint to leave a pattern on the material.
From concrete "Leaves"
Paths in the form of leaves are very popular. There are several ways to make such a path. The first option involves casting a concrete block on a large burdock sheet so that the texture is imprinted with small details. It is important to place the burdock leaf with the convex veins facing up. The second method involves pouring concrete at the location of the path, then imprinting the sheet and drawing the veins.
In the form of steps
If there are lowlands and hills on the site, it is necessary to build steps on the garden path. The best way is to arrange wooden frames at different heights with a concrete central part. Metal brackets are used to connect wooden blocks, which provides a strong fastening and increases the strength of the track.
With shells
By sprinkling shells on a concrete base, you can transform the standard appearance of the path. The shells are placed on drying concrete and lightly compacted into the base.
From stones and concrete
The combination of a concrete base with various natural materials allows you to give the path an unusual appearance. You can separately prepare concrete slabs by mixing the mortar with stones, or lay cobblestones on the poured surface.
Imitation stones
The stone surface looks impressive, but natural stone is more expensive than alternative materials. The best option is to use a concrete solution that imitates natural stone. Concrete is poured without using forms, since the uneven surface in combination with paint will imitate the stone texture well.
Chess
A chess garden path involves alternating squares of concrete and grass. Having divided the allocated space for the path into squares, pour concrete and lay the lawn, observing a checkerboard pattern.
With glass pattern
You can lay out any patterns of glass parts on the concrete surface. For this purpose, standard blanks are made and filled with concrete mixture. After waiting for complete drying, the blocks are laid on the site in any way.
See also
How to decorate a classic bedroom design in a modern style
Required tools and materials
When installing concrete garden paths you will need:
- boards for creating formwork;
- fasteners;
- reinforcing bars to strengthen the structure;
- tape measure, building level, skein of rope (you can use twine), pegs for marking;
- wooden slats;
- concrete mixer (if you don’t have one, you will have to use a large container to mix the solution);
- crushed stone, sand, cement grade M500;
- waterproofing additives;
- hammer, wood saw, rake, rule.
Advantages and disadvantages
Creating concrete paths in a garden plot with your own hands step by step is not an easy task. But if you know some nuances, almost everyone can cope with it. The main advantages of such structures include:
- Simplicity in arrangement. With the right approach to the matter, you won’t need the help of specialists.
- The ability to give an object any size and shape if there is appropriate formwork.
- Affordable cost compared to stone and tile counterparts.
- Durability and strength.
- The ability to decorate the base at your discretion by diluting the pigment in a solution, using decorative ornaments, mosaics, etc.
- Resistant to precipitation.
However, there are some disadvantages to consider. This will help you avoid mistakes and make your garden or garden plot beautiful:
- The impossibility of redevelopment of a capital structure and changing its directions. Experts recommend first thinking through the layout and only then cementing the workpiece.
- Labor-intensive preparatory work.
- The formation of cracks due to incorrect proportions of the solution, seasonal soil movements or temperature changes.
Track project
At this stage, it is necessary to think over the design of the paths, so before starting work it is advisable to draw up a sketch, which will include:
- track layout plan;
- linking all sizes to turns;
- approximate indication of the width of the road tape;
- designations of places where it is necessary to add or cut soil.
At this stage, they are thinking about the design of future paths, so before starting work they draw up a sketch.
In addition, it is necessary to take into account such nuances as the possible installation of water supply and sewerage, telephone cable, and arrangement of the access area.
How to paint a concrete surface correctly
The process of painting a concrete base has a number of nuances. To avoid common mistakes, it is important to familiarize yourself with the dyeing technology in advance.
What can you paint with?
For painting concrete surfaces, special solutions are produced that are resistant to humidity and other atmospheric influences.
Stain
Painting a concrete surface with stain allows you to create a rich and beautiful shade. When stained, the result is an uneven color, as a result of which the coating becomes similar to natural marble. An additional benefit is increased wear resistance of the coating. There are 2 types of stain for concrete:
- A solid color stain, also called a pigmented sealer. This type of substance paints the concrete surface a uniform, monochromatic color and is available in a wide range of shades.
- Acid stain that creates a more transparent effect. Compared to the first option, acid stain has a smaller selection of colors.
Rubber paint
A distinctive feature of rubber paint is its increased plasticity, which is unlike any other type. Rubber paint contains polyacrylic resins, which provide elasticity and resistance to moisture. Rubber paint has a high degree of adhesion to the surface and does not freeze in the cold. Other positive characteristics include the following:
- when applying the material, no toxic fumes are released, and there is no sharp unpleasant odor;
- the material is resistant to temperature changes and does not lose its original performance properties;
- rubber paint creates a vapor-proof coating, which allows the surface to be treated not to be damaged by the destructive effects of moisture;
- the paint is resistant to constant exposure to ultraviolet radiation and does not fade due to sunlight;
- It only takes a couple of hours for the rubber paint applied to concrete to dry completely, after which you can move freely along the paved garden path.
Epoxy and acrylic paints
Epoxy paint for concrete is a two-component composition that forms a protective film. Drying time ranges from 12 hours to 24 hours. Acrylic paint is a water-based composition of acrylic resins and diluted polymers.
The glossiness or dullness of the coating depends on the concentration of the constituent components.
Polyurethane varnishes
The application of polyurethane varnish gives the concrete surface a decorative appearance. It is also beneficial to varnish the base due to increased protection against corrosion.
Procedure
When planning to paint the surface, you must first wait until the concrete has completely dried. Then the coating is cleaned of dust and paint is applied. To prevent the ingress of water and dirt, the painted surface is protected with polyethylene.
How to use the brush
If you need to paint a rough concrete surface, you will need a brush with 15-20 mm bristles. In case of strong roughness, it is better to take a tool with a pile of 25-30 mm. The brush is dipped into the paint and applied evenly to the coating.
The nuances of working with a paint sprayer
The easiest way to quickly paint a large concrete surface is to use a paint sprayer. There are two types of paint sprayers:
- operating using compressed air;
- spraying paint using an airless method.
The second option is used more often because it does not require special training. It is enough to connect and use the equipment according to the instructions from the manufacturer. It is recommended to work with the spray gun in calm weather.
Calculation of the weight of building materials
Before you start collecting materials, you need to make the correct calculations. Sand and crushed stone can last until the next repair, but cement is not suitable for long-term storage. Therefore, it is first recommended to calculate how much building materials will be needed for the work.
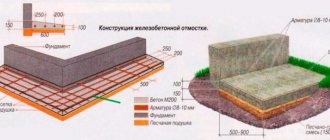
Depending on the type of soil, the thickness of the concrete layer is calculated:
| Swampy soil | Clay soil | Loam |
| Concrete - 7-8 cm Gravel - 5 cm | Concrete - 5-7 cm | Concrete - 10 cm |
In addition to concrete masonry, it is also necessary to take into account the sand base, the layer height of which is from 10 to 15 cm.
The weight of building materials is calculated using the formula LxWxH, where L is the length of the track, W and H are the width and height, respectively.
For example, you need a path with a width of 1 m, a length of 5 m and a height of 0.1 m. The height of the sand cushion will be 10 cm.
Then, according to the formula, you can get the following:
- with a volume of sand (building material is accepted according to GOST) 1x5x0.1 = 0.5 m³ - the weight of the sand from the reference book will be equal to 775 kg;
- with a concrete volume of 0.5 m³, the average weight ratio will be 1075 kg.
Based on the calculation of the proportions “cement-sand-crushed stone” in parts 1:3:1 and the total weight of a cubic meter of concrete, equal to 1075 kg according to the reference book (the total weight is divided into 5 equal parts), the following values can be obtained:
- cement - 215 kg;
- sand - 645 kg;
- crushed stone - 215 kg.
This means that to construct a simple concrete path 1 m wide, 5 m long and a layer height of 10 cm, you will need 215 kg of road cement and crushed stone and 645 kg of construction sand. All calculations are carried out without taking into account the addition of water and various pigment dyes.
No. 4. How to design a path?
The first thing you need to think about is where the paths will be located, who will move along them and when , what determines their width and shape. On paper, you can draw a site plan, indicate on it the location of all buildings and important areas, connect them with straight lines, which will be the axes for future paths. The paths can remain smooth and straight only between huge beds; in other cases, it is better to make them slightly curved to give the area an interesting look and make movement more comfortable and convenient.
The width of the path that leads from the gate to the central entrance of the house should be about 2 m, for auxiliary paths a width of 0.8-1 m is enough, between the beds you can arrange paths about 0.5 m wide. Those paths along which the car will move , should be no narrower in width than the car itself.
How to markup
Using a sketch, you should indicate the location of the paths. To do this, you need to use pegs with a rope stretched between them.
To mark the location of the paths, pegs with a rope stretched between them are used.
The pegs need to be driven into the ground at the same distance from each other. When the marking of the entire path is completely ready, you can begin excavation work, i.e. to excavation of soil for the construction of a trench for paths.
At this stage, it is necessary to remove the top layer of earth to prepare the base for a path with a total height of 20 cm (10 cm of sand cushion and 10 cm of concrete). If additional drainage from crushed stone is required, then add another 10 cm to this.
Upon completion of the excavation work and preparation of the trench for pouring concrete, the installation of the formwork structure begins.
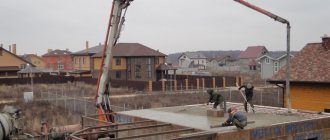
Pouring technology
Preparing the base for a garden path
After marking the area, the layer of unnecessary soil can be removed.
The next stage of work is the assembly of formwork to form the object.
First of all, a sketch is made on paper, and then the marking of the future path is carried out directly on the territory and fixed with a cord and pegs. After which the top layer of soil is removed. Next, formwork is constructed; for this purpose, self-tapping screws and a board as wide as the future height of the sidewalk are used. The outer edges are secured with pegs and additionally secured with transverse jumpers. For waterproofing, the bottom is covered with polyethylene film. It would be useful to create expansion joints; they are created by dividing the formwork space into sections with a lubricated steel sheet for the purpose of free removal from the hardening solution.
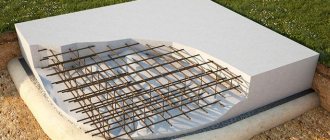
Reinforcement
This type of work can be performed by laying wire.
To increase the strength of the base, a metal structure is fixed to the middle of the formwork on supports. It can be wire, pipe, chain-link mesh or welded from thick rods. The optimal cell size is 10x10 cm. The reinforcement not only increases the rigidity of the base and prevents concrete cracking, while increasing its service life, but also reduces the thickness of the pouring layer, reducing the amount of work and materials.
Filling the track
To fill the base for a garden path, you need to additionally make a solution of 1 part cement, 3 parts sand, 5 parts crushed stone, and then add 0.5 parts water. To impart fluidity and viscosity, additives and plasticizers are used, which are added strictly according to the instructions. The main prepared solution is placed into the formwork using a trowel or spatula, achieving uniform compaction by tapping and piercing the mixture. The surface is leveled according to the rule; in addition, a slight slope is formed for water drainage. After pouring is completed, the entire structure is covered with polyethylene. Decorating with drawings can begin after a day, after another two - the path will dry, and after 5 days you can remove the formwork.
After laying the reinforcement, the area can be filled with mortar.
Processing and decoration
The daily solution can be decorated with a pattern, which is applied with a sharp object, or roughened using a stiff brush. Decorate with decorative embossing with a special stamp with various ornaments or images of animals, birds, plants and others, or create an imitation of brick, tile or stone. An already dry path can be polished, painted or lined with marble or mosaic. Impregnations not only add shine, but also, by filling all the voids of concrete, create additional protection from moisture and wind.
How to install formwork
Edged boards or thick plywood sheets with a smooth inner surface are used as formwork.
If the formwork structure is planned to be removable, then before installing it it is recommended to treat the inner surface of the boards with a special lubricant - thanks to it, the formwork can later be disassembled easily and quickly.
If there is no lubrication, you can use used machine oil.
Step-by-step instructions for installing formwork can be presented as follows:
- The boards are installed in trenches on a previously prepared base. The formwork can be installed all at once or gradually, as the boards are freed, the height should be equal to the height of the planned path. The horizontality of the structure must be checked using a building level.
- Layers of sand and crushed stone (if necessary) are poured onto the pre-compacted bottom.
- A mesh of reinforced rods is laid.
- Every 2-2.5 m across the trench, boards up to 20 mm thick are installed, which will take the main load when pouring the concrete mixture. They will also serve as expansion joints, thanks to which the concrete sheets will not crack due to temperature changes.
The formwork should protrude 5-10 cm above the ground.
If you need to arrange paths of a curved shape, then instead of boards, plywood or plastic panels are used, which are easy to bend in the desired direction.
In order to save effort and reduce material costs, the formwork can be installed in parts.
Edged boards are suitable for formwork.
Installation of formwork
When creating a homemade concrete path, you cannot do without formwork. For a standard and level structure, boards are usually used.
If there is a need to make curves and smooth lines, then any bendable material is used. The formwork should rise 7-10 cm above the soil level.
A reinforcing construction mesh is laid at the bottom, then transverse boards are installed at a distance of 5 m, which are a kind of expansion joints with a height equal to the level of the path itself.
These devices prevent concrete from cracking in the event of sudden temperature changes.
How to arrange a pillow
The pillow is arranged to distribute the load. In addition, acting as drainage, the sand layer allows moisture to pass through and prevents the paths from deforming.
On the compacted bottom before the sand backfill, you can lay a layer of waterproofing, which can be geotextiles, roofing felt or agrofibre.
It is recommended to compact the sand filling thoroughly, for which you can slightly moisten the layer and roll it with a rule or level it with a rake - there should be no voids left in the sand.
In regions with high humidity soil and low temperatures in winter, it is recommended to add crushed stone to the sand layer - this way the concrete structures will not corrode due to heaving of the freezing soil and will not form cracks. The height of the crushed stone layer should be within 10-12 cm.
Making a pillow
When figuring out how to fill the paths at your dacha with cement with your own hands according to the instructions and dilute it correctly, you should remember the need to arrange a cushion. Its main functions include ensuring drainage and uniform distribution of loads throughout the concrete. The sand base does not retain moisture, so the soil under the created path will always remain dry and free of freezing, which can damage the concrete surface. Experts also recommend lining a compacted crushed stone layer under the sand.
Sand is washed away by water over time, so it is appropriate to make waterproofing underneath it based on agrofibre, geotextiles and roofing felt . The sand cushion is carefully compacted and spilled with water to eliminate internal voids. A flat surface is created onto which the solution is evenly poured. Instead of sand, special flat stones are often used or a concrete screed is created.
Concrete preparation and mixing
Based on the calculations, a mixture of cement, sand and crushed stone is prepared, to which water and plasticizers are added. The composition is mixed and brought to a homogeneous creamy consistency of medium viscosity.
Crushed stone is used in medium fractions, 10-20 mm in size. When constructing paths with increased load, it is recommended to use crushed stone with a fraction of 40 mm.
It is advisable to mix the mixture using a concrete mixer, especially for large volumes of work. If you don’t have a concrete mixer, you will have to make the solution manually. To do this, all the components are poured into the container and thoroughly mixed with a shovel, after which water is poured into the mixture and mixed again until a homogeneous mass is obtained.
Mixing the solution.
It is advisable to use plasticizers in small quantities in order to make it more convenient to distribute the fill throughout the trench. Too much additives can reduce the strength of the concrete grade.
The simplest plasticizer additive can be prepared independently using the following starting materials:
- silicate glue;
- slaked lime;
- PVA;
- any detergent.
Instead of silicate glue, you can use liquid glass, and washing powder or laundry soap is suitable as a detergent.
If the paths are planned to be colored, then pigment dyes of the required color must be diluted with the concrete mixture.
Making a concrete path with your own hands. Step-by-step instruction
Let's take a step-by-step look at how to make a concrete path.
Step 1. Designing the tracks
Before you begin the process of making a track, you need to choose a location and make preliminary calculations in order to do everything correctly.
Think carefully about where the paths will lie, what shape and design they will have:
- Choose places for paths where traffic has already naturally formed.
- In a small area, concrete paths may be narrow, but if the area allows, it is advisable to design a width of at least 60–80 cm.
- Decide whether curbs will be used. If you decide to do without them, the path should be slightly raised above the soil level.
- You should not lay concrete paths under large trees; their roots can damage the coating over time, and water dripping from the crowns will create conditions favorable for concrete corrosion.
- Avoid installing paths above communications; this may make them difficult to repair.
Should I use curbs?
For paving stone paths, curbs are necessary. In the case of concrete pavement, there is no clear answer to this question.
Advantages of borders:
- beautiful smooth edge of the path;
- the edges of the path do not crumble or crumble;
- protection against subsidence;
- reduction in the volume of land work.
The disadvantages of curbs are that they increase the cost and complicate the work.
The next step is marking.
Step 2. Marking the tracks
Having decided on the location, width and configuration of future paths, proceed to marking.
Important!
In order to prevent the appearance of puddles on the path, a slope must be provided. It is enough to make a slope of 2 mm for each meter of the path. The slope across the path is especially important, but it is also advisable to provide it in the longitudinal direction. Direct the flow towards the natural decrease in the relief so that the water does not stagnate; do not divert water towards buildings, especially if the path is adjacent to the wall of the house.
To determine the level, use a level or a level with which marks are set.
Marking stages:
- Drive pegs along the perimeter of the path every 3–5 m and always in the corners.
- Make notes.
- Pull the twine or fishing line along the marks.
Step 3. Preparatory work
After the paths are marked, the preparatory work phase begins.
At this stage, curbs are installed, if they will be used, or formwork is constructed.
How curbs are installed:
- Grooves are dug along the edges of the path with a shovel.
- Concrete solution is poured into the bottom of the grooves.
- Curbs are installed on the concrete and compacted by tapping with rubber or wooden milk. The upper edge of the borders is oriented along the stretched fishing line.
Important!
Using the fishing line, we align the inner edge of the curb.
Installation of formwork and sand “cushion”
If curbs are not used, formwork is installed:
- Dig a trench along the width of the path, 15–20 cm deep if the path is pedestrian, or 20–40 cm for a path along which vehicles will travel, or for a path on soft ground.
- Compact the soil with a tamper or spill it with water several times and allow it to dry.
- For formwork, boards 20–30 cm thick are used (one edge of an unedged board needs to be trimmed) or thick plywood (10 mm), cut into strips 15–20 cm wide. The upper edge of the formwork is aligned with a stretched fishing line. To strengthen the formwork, you can fill it with earth from the outside.
Important!
The use of plywood has its advantages and disadvantages. Plywood bends easily, allowing you to give the path a smooth shape, but it is less stable than a board, so the pegs will have to be driven in more often.
- Every 1.5–2.5 m of the path it is necessary to install transverse partitions made of wood, metal or glass. Thus, concrete will be poured in sections, and temperature-expansion joints will remain between the slabs, compensating for seasonal loads. If you plan to reinforce the path, partitions can be made less frequently.
- The formwork is lubricated with detergent or waste so that it can be easily removed later.
- The base of the path is laid on top of the compacted soil - geogrid or geotextile is laid and sand or sand-gravel mixture is poured. Sand acts as a “cushion” that reduces concrete deformation and has drainage functions, and a textile layer is necessary to prevent sand from getting into the soil.
- Sand or ASG is poured a little more than half the depth of the trench. Another option is to pour a layer of crushed stone on top of the sand layer.
Important!
When choosing crushed stone for a path, do not forget that you need to get an even surface. Large crushed stone complicates this task, so choose material with a fraction of 5–20 mm.
Reinforcement
To strengthen paths, especially those that will be subject to heavy loads, and prevent cracks, it is necessary to reinforce them with a metal mesh 3–5 mm thick and a cell size of 50–100 mm. At expansion joints, the mesh is separated.
The mesh is laid so that the largest possible layer of concrete, at least 3 cm thick, covers it on top. This is necessary to protect it from corrosion.
Video: Path 2 years later
Important!
In private construction, reinforcement is not always used for small garden paths. It can be replaced by adding fiber fiber to the concrete solution. In the case where reinforcement is performed, the addition of fiber fiber provides the track with additional strength.
Step 4. Preparing the concrete mixture
How to pour a concrete path with your own hands?
To fill the paths, use cement-based mixtures of grade 32.5-42.5 (according to the old marking M400-M500).
The composition of the mixture can be different, but usually the recommended proportion is: for one part of cement, 2-3 parts of sand and 2-4 parts of crushed stone. Water is taken in such quantity as to obtain a thick mixture (about 1 part).
How to prepare a concrete mixture
The concrete solution is mixed with a concrete mixer or construction mixer in a suitable container. Usually, large aggregates are poured into a concrete mixer, then cement, and only after that water is poured, but some home craftsmen prefer to pour water first, then pour in aggregates and only finally cement, since in small concrete mixers this method produces a more homogeneous solution.
Important!
When pouring paths, a very thick solution is prepared, while in home concreting, due to the lack of professional tools, vibration treatment of concrete is usually not available. Concrete of the required consistency may lie loosely, with voids, which will contribute to the low operational strength of the coating. Therefore, in conditions of self-concreting without the use of special equipment, a critical step is adding a plasticizer to the concrete mixture. It reduces the amount of water in the mixture while increasing the workability and workability of the mortar and the strength of the finished concrete. Some plasticizers have a complex effect, providing water-repellent, water-reducing and other properties of concrete. Liquid plasticizer can be added to the mixing water or directly to the concrete during mixing.
Cemmix concrete admixtures are compatible with each other.
Video: DIY garden path
Step 5. Laying concrete
The concrete mixture must be laid in the formwork in a layer of 4–6 cm for pedestrian paths and 6–10 cm for paths that will be used for access and parking of vehicles.
A polyethylene film, foamed polyethylene or geotextile is laid on the leveled ASG, and concrete is poured on top.
Important!
If it is impossible to fill the solution in one day, interrupt work on the expansion joint.
The concrete is leveled with a board or trowel. The top layer is well leveled by imitation vibration, performed using a bar.
At the same time, cement laitance is released on the surface.
Step 6. Concrete care
The concrete solution poured into the mold does not just dry out: it hardens. In order for a mixture of cement, ASG and water to become a durable artificial stone, it is necessary that it undergo hydration reactions, during which new chemical compounds are formed. For these reactions to occur successfully, certain conditions are required: air temperature 18–20 ° C and high humidity.
When concrete dries, hydration reactions stop, which negatively affects the strength of the finished product.
Therefore, after 3–4 hours, when all the beacons have been removed, the concrete is covered with film. In hot, dry weather, it is advisable to water the concrete several times during the first day.
After 5–7 days, you can remove the formwork and apply a small load, but the concrete will reach its final strength no earlier than after 4 weeks.
Important!
The optimal time for pouring a concrete path is late spring or early autumn, when the air temperature is above zero, but not too hot. If it is necessary to make a path in conditions of low temperatures (5° C and below), use anti-frost additives for concrete.
Reinforcement and filling
A layer of homemade reinforcing mesh is laid on the sandy bottom, on top of which the concrete mixture is poured. Filling should be done in parts - first half of the solution, then another half.
You can also use small fragments of broken brick, Chainlink mesh, pieces of old wire, scraps of metal pipe and old hardware as reinforcing elements. If an all-welded mesh is used, then it is necessary to prepare supports from pieces of brick for it.
Before filling, it is recommended to spill the bottom of the trench with a small amount of water to avoid subsidence of the soil under the load of concrete. During pouring, the mixture must be pierced in several places over the entire area to release air.
After pouring, the entire solution is leveled with a rake until cement laitance appears. It is advisable to cover the poured structure with a film and leave it until it hardens completely, periodically moistening the surface to avoid the formation of cracks and voids.
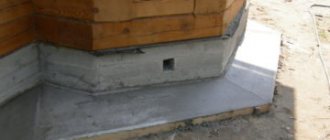
It is recommended to pour concrete so that the height of the path is 3-5 cm above the general ground level. In addition, it is advisable to make the paths slightly convex in the center. This will protect the path from damage, contamination from eroding soil and from the accumulation of puddles.
When paths cross water pipes, sewer lines or cable laying areas, it is necessary to use a cover to prevent damage to utilities.
No. 7. How to prepare the soil?
At this stage, they begin to select the top layer of soil at the trail locations. The soil is removed along with small roots, which can begin to rot and form voids in which water can accumulate, and when it freezes and increases in volume, additional pressure will be exerted on the path.
If the layer of “cushion” of sand is 10 cm, and concrete - 10 cm, then taking into account that it is better for the path to rise 3-5 cm above the ground level , you will need to choose 10 cm + 10 cm - 3 cm = 17 cm of soil. If a drainage layer of gravel is needed, then you need to add another 5-10 cm to the resulting value. Select the soil layer using a shovel.
Final works
After pouring the mixture into the trenches, at least 3 days must pass, after which you can remove the formwork structure and remove the pegs. It is advisable to treat the places of contact with the formwork and stakes with a waterproofing solution to prevent the structure from being destroyed by melt water.
Debris is removed from the edges, the formwork areas are covered with soil and compacted. After a week, the homemade path can be put into operation.
If a newly constructed concrete path joins the old one or comes end-to-end to a concrete blind area, then it is advisable to lay a thermal spacer between them to form an expansion joint. This will help create a movable connection so that concrete structures do not exert mutual pressure on each other.
Final events
The formwork with pegs is removed a few days after the work is completed.
The remaining small gaps and holes in the ground are masked using concrete and waterproofing additives. After this, the side parts of the path are carefully cleaned, covered with earth and compacted. After 5-10 days the path is suitable for use. Paths in gardens and courtyards are often decorative elements, so they can be given an unusual appearance. Often, to decorate them, they use imitation of natural stone, chaotic or ordered pressing of pebbles, painting, laying out patterns with pieces of tile, etc. If the path is planned to be used infrequently, then it can be made in the form of separately poured slabs of the desired shape. Affordable and practical to use, concrete has gained popularity in organizing garden areas and personal plots.
Decor of concrete paths
Concrete sheets in the country are decorated to give aesthetics to the garden area. Decorating the paths can be done either before pouring, or at the latest - a day later.
There are methods such as dyeing, stamping, using various shapes, etc.
You can decorate the paths before pouring or a day later.
Painting
Painting of paths can be done either at the stage of mixing the solution, or after the finished road surface has hardened.
In the first case, pigment dyes of the desired color are used, which must be thoroughly mixed. The advantages of this method: simplicity and convenience, color fastness.
In the second case, the paint is applied to an already hardened surface, but, unlike pigments, it is not resistant to abrasion, and therefore the color may fade over time. To avoid this and prolong color durability, it is recommended to use penetrating mixtures with pigment additives.
To restore color (when you need to refresh old paint), you can use the following instructions:
- Remove the mud layer from the path; for segment paths, remove weeds in the tile joints.
- Remove the old paint layer with a wire brush and remove dust.
- Seal chips and cracks on the surface using a concrete sealer (sealant, putty or grout mixture).
- Degrease the path with a stain remover.
- Coat the concrete surface with 2 layers of primer. The first layer must dry completely, and only then can the second be applied.
- Paint the dried surface with paint. You can tint in several layers for color saturation, but it is worth considering that the interval between applying layers should be at least 12 hours. This is the time required for the paint to fully set on the surface and dry.
To ensure color durability lasts as long as possible, it is recommended to paint the path with penetrating mixtures with pigment additives.
It is recommended to paint concrete with polyacrylic paints intended for exterior use: they are water-repellent and vapor permeable, concrete can “breathe” and will be protected from destruction by moisture. In addition, polyacrylic mixtures are UV resistant and scratch resistant.
You can also use polyvinyl chloride, polyurethane and latex mixtures to strengthen paths - they will protect against destruction. But it is undesirable to use oil-based paints: the enzymes included in the composition penetrate into the pores and destroy the structure from the inside, forming cracks.
When working with paint, you can use a brush, roller or sprayer, but keep in mind that the first two tools waste a lot of material, besides leaving air bubbles and streaks, and the sprayer can form streaks if overexposed.
Using forms and stencils
Stencils and forms can be used when pouring the mortar, and in this case a formwork structure is not required.
The template is installed in the trench, filled with concrete mixture and leveled. After 2-3 hours, the mold can be removed and wait for it to completely harden and gain brand strength without a limiter. Such tracks are segmental and consist of individual elements.
Despite the speed of installation, the elements also need to be periodically moistened with water until the concrete hardens completely.
Stamping
This method is a variation of using stencils with the difference that separate pouring into each limiter is not required. The concrete mixture is also poured into the prepared trench, and stamps are placed on the solution that has not yet completely hardened.
When choosing stamps in a store, you should be guided by the rigidity of the template - the denser the material, the easier and faster the stamping will be.
This method can simulate the laying of rubble stone, paving stones, boards and various building materials.
other methods
No less interesting and easy decoration options are the following:
- Imitation flagstone. For this purpose, slots are made on the surface of the concrete, which has not yet completely hardened. They can be filled with either grout or a concrete solution of a different color. The pattern on such a path will be similar to the laying of flagstone.
- Laying mosaics. Any broken material is suitable here: fragments of tiles of various colors, broken bricks, multi-colored pebbles and pebbles, and even old buttons. The main condition: do not press small parts too deeply, and embed the elements on a surface that is not completely frozen.
- Creating patterns. Relief designs can be created using various imprints when concreting paths. These can be leaves, small and large shells, traces of hands and feet.
Decorating paths
The smooth gray surface of concrete sometimes seems dull, but poured paths can be made more beautiful. To do this, we decorate them. Several methods can be used, both individually and in combination.
Painting concrete
Multi-colored paths can fit perfectly into the design of a personal plot
To do this, add pigment to the mixture. To ensure that the color is bright and correct, the solution is painted using special white cement (it is more expensive than usual).
To save money, only the top layer can be painted. By dividing the surface into sections (or using a form for paths), patterns and designs can be applied.
White cement
Inlaid the surface
Flooded path decorated with fragments of facing tiles
Immediately after pouring, various objects can be pressed into the surface of the concrete; most often, facing tiles are used, but multi-colored glass, pebbles, etc. can be used. As in the case of coloring, entire mosaics can be created.
Mosaic on a concrete path
What to consider when designing
Important! Such a surface at the dacha is a capital structure, so the choice of its location should be approached with all responsibility. If you design it incorrectly and do not take into account the main communication directions on the site, then it will be inconvenient to use. And it is almost impossible to change its location and configuration, due to its capital nature.
The covering must connect the house with other buildings on the site
It is important to choose the right width depending on the purpose. For main roads that carry the most important communication load - from the house to the main objects on the site, the width is at least two meters. This is done so that two people can easily separate on it.
Wide coverage
A path of secondary importance - walking or decorative, can be narrow and even have an interrupted canvas, which looks very decorative and does not visually burden the area.
Decorative version
Before making such a covering at the dacha, you need to make a sketch on paper. The sketch should indicate the location of the house and main objects.
The main ones are placed on communication routes that run along the route from the house to the main objects - to the gate, gazebo, pool and others.
Layout sketch
They can be straight - they provide the shortest path from one functional area on the site to another. The coverings around the house also have a straight configuration.
Surface around the building
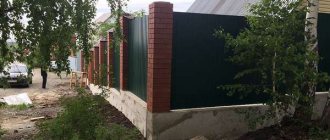
As you can see in the photo above, the path is made of a block with a rough surface. This was done for safety purposes during the winter. A drainage system has been installed for the drainage system.
Types of concrete paths
They are:
- Monolithic;
Monolithic view
Such paths are constructed using the formwork method.
Work progress
- From decorative tiles of different shapes and textures;
Tile option
Tiles can have different shapes and installation methods.
Tiles for products
Block tiles
- Molded.
Molded look
Such coatings are made using molds into which the solution is poured.
Device principle
What to consider when installing tracks
Regardless of which installation method is chosen, it is necessary to take into account several rules, the observance of which will allow you to create a high-quality coating.
The most important rules for installation:
- To install a rigid base of the structure, it is imperative to backfill it with crushed stone or sand;
Sand and gravel backfill
Important! The bedding will save the structure from damage during seasonal swelling of frozen soil saturated with moisture. The thickness of the drainage bedding depends on the intensity of use.
- For natural drainage, it must have a one-sided slope or a central convexity;
- If in the spring, when the snow mass melts, or in the summer after rain, there are places where puddles form on the site, this indicates that groundwater lies nearby. Installation in this place should take place above the ground surface, thanks to the high crushed stone backfill. Or, a drainage system should be installed along it, thanks to which the liquid will be removed into the rainwater collector.
Drainage system