Design
All supply valves have the same key design components:
- air duct A channel through which air passes from outside into a room. Usually made of plastic;
- external ventilation grille. Protects the air duct from atmospheric agents. Can be metal or plastic;
- inner part. It is presented with a plastic head and is usually sold disassembled. Includes a filter that purifies and directs air into the room.
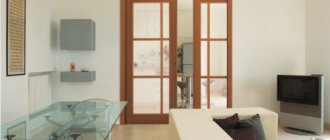
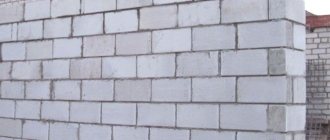
In the photo of the supply valve to the wall you can clearly see the design of this product, its appearance, the variety of models and installation method.
The design contains special material to increase thermal insulation characteristics and sound insulation. There are valves that allow you to regulate the air flow.
Their design includes a special regulator that goes into the room. There are also models with the ability to regulate indoor humidity.
In any stores where you can buy a fresh air ventilation valve, as a rule, there are also more complex models that can be equipped with additional devices:
- fan;
- recuperator (for heating air);
- temperature sensor;
- humidity sensor;
- remote control.
You can purchase a high-quality supply valve from Leroy Merlin. The hypermarket offers a huge selection of valve models, including those with additional functions.
If you don’t have this hypermarket in your city, you can find the valve in stores that sell equipment for ventilation systems.
Advantages and disadvantages
The supply valve has a number of positive qualities:
- there is no need to constantly open/close the window (the service life of the fittings is extended);
- low noise level;
- air flow can be adjusted;
- installation next to a heating radiator or at the top of the wall eliminates temperature fluctuations in winter;
- the device is almost invisible indoors;
- relatively affordable price.
But there are also some disadvantages:
- you need to make a hole in the wall;
- In regions with severe frosts in winter, a regular valve cannot be used; the room will be cold. The problem can be solved by installing a valve with a recuperator;
- errors in installation can result in freezing of the wall or freezing of a certain part of the air duct;
- Low performance of devices without a fan.
What does poor ventilation in an apartment lead to?
Decades have passed since the development of the SNiPs in force today. Most apartments and houses today have plastic windows and metal entrances, which are almost 100% airtight. This creates significant problems for natural air circulation inside the home.
We recommend that you read: Corrugation for ventilation: what it is and how it is used
Ineffective ventilation causes gas accumulation during an emergency leak, which, in turn, creates an explosive situation.
Moreover, the lack of normal air exchange leads to other negative consequences:
- The concentration of harmful substances increases, primarily carbon dioxide produced during breathing and carbon monoxide released during cooking in the kitchen.
- A high concentration of moisture vapor leads to the formation of condensation on the windows, walls and ceilings of the apartment, which causes the development of mold and mildew, and the appearance of an unpleasant smell of rot and dampness in the home.
- A damp, musty atmosphere is an ideal environment for the proliferation of many pathogens.
Note! Ineffective or absent ventilation inevitably affects the health and daily well-being of the residents of the house, especially children and the elderly.
This problem can be solved in the warm season by opening the vents and windows, but in winter this option disappears, especially if there are children at home. The only viable option for solving the problem is to organize a supply and exhaust system inside the apartment with your own hands.
Installation Features
Installation of the supply valve of almost all models can be carried out anywhere on the external wall. But, it is recommended to install it in the following places:
- under the windowsill, near the heating radiator;
- at a level of two-thirds of the height of the window opening.
The first option is more preferable, since in winter the air will be heated by a radiator. The second option is also successful, since cold air will enter from above. By the time it reaches the bottom, it will mix with the available air and heat up. In both options, the valve can always be hidden behind the curtains, so the interior will not be damaged.
Installation instructions
You can install the supply valve into the wall with your own hands. To do this you need to do the following:
- Select the optimal installation location, following the recommendations described above.
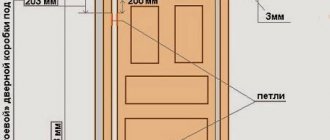
- Make a through hole in the wall with a slight slope (3-4°) to the outside. This will prevent the accumulation of moisture in the air duct.
- Drill holes for screws (to secure the inside).
- Try on the air duct and mark the pipe to the required length.
- Cut off the excess part of the pipe.
- Install the soundproofing element into the air duct. The part is usually supplied with the valve. If you don’t have it, it’s highly advisable to purchase it.
- Install the pipe into the hole.
- Secure the ventilation grille from the outside (with glue or screws). The grille blinds must be oriented downward and positioned horizontally.
- Secure the inside with screws.
- Assemble the inner part. The assembly process may vary slightly depending on the model and functionality, so you must follow the manufacturer's instructions.
Different types of check valves: operating principle, design
Both the design of the check valve and the principle of its operation are not complicated. Due to its simplicity, the system works quite reliably.
A shutter channel is built into the air duct, capable of functioning only in one direction. When the air flow is normal, the shutter remains open. As soon as the flow direction changes, the channel immediately closes. Automatic operating mode is supported.
While maintaining the principle of operation, the designs of the valves themselves differ.
Single leaf check valve
Single leaf check valve
A plate (shutter) is installed that completely covers the ventilation duct. It is mounted on an eccentrically located axis. In other words, one of the shutter halves is larger than the other (heavier). This helps it return to the closed position (to its original state) if there is no direct air flow through the channel. For this reason, these valves are called gravity-operated designs.
Plastic versions are made for home ventilation systems. At the same time, the weight of the sash should be insignificant so that it can open even from natural draft in the ventilation duct. Lack of draft or reverse air movement leads to the sash closing.
Single-leaf check valve for rectangular ventilation
Double-leaf check valve model
They are also called “butterflies”. They become moth-like when semicircular flaps open from the central axis, like the wings of an insect. Typically, valve system flaps are equipped with springs to return them to their original state.
Double check valve for ventilation
When a flow of a certain density is created in the air duct, the force of a weak spring is overcome by this flow. Then the sash opens, and this ensures normal passage. The pressure increases - the valve opens wider.
Multi-leaf check valve
This design is suitable for a system when there is a need to cover an vent with a large cross-section. This device differs from all others in that it is installed at the end of a horizontal exhaust duct. For example, at the point of exit to the street.