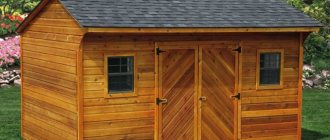
What are the benefits of wooden gates?
Despite the emergence of new building materials and technologies, wood still remains relevant. It has undeniable advantages:
- ease of processing - wood is easy to saw, drill, fasten with nails or self-tapping screws;
- natural beauty - it is enough to cover a good tree with transparent protective agents, and it will already be beautiful;
- economical - if you use available and widespread tree species, the gate will be quite cheap;
- light weight, which does not require powerful supports to support.
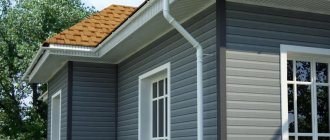
Wooden gates go well with fences made of corrugated board, forging, brick, and stone. But during operation, you need to take into account that wood is a living material that reacts poorly to high humidity, is susceptible to various types of rot and is not resistant to fire. To preserve the best qualities and neutralize the shortcomings of wood, it is impregnated with antiseptics and fire retardants. Effective protective compounds penetrate deep into the structure of the tree, prevent the development of pathogenic microflora and reduce the fire hazard.
The coating must be updated regularly. It's not too difficult or time consuming. In addition, there are impregnations that protect wood for a long time - up to 5-8 years. The most famous products are from manufacturers from Scandinavian countries, where wood is traditionally widely used in construction. Russian companies today can also offer high-quality paints and impregnations.
Advantages and disadvantages of a wooden gate
A wooden gate goes well with stone structures
The material is inexpensive and easy to purchase when it comes to common types of wood. Expensive species are rarely used; coniferous varieties are mainly used.
Advantages of a wooden fence gate:
- low weight of the structure, reliability and strength;
- fast production, ease of assembly and processing;
- environmental safety for human health;
- lack of complex equipment during production.
The disadvantages include the fragility of wood compared to other materials, since it intensively absorbs water. As a result, the structure rots and microorganisms multiply on the surface and inside. Bugs violate the integrity of the fibers and weaken the strength.
Without protective impregnation, the product will last 5 – 7 years. Wood ignites quickly and does not stop burning on its own, so it needs to be treated with preparations to increase fire resistance.
How to choose lumber
Gates, like street structures, are constantly exposed to harmful factors - precipitation, solar radiation, temperature fluctuations. There are tree species that can withstand unfavorable conditions quite steadfastly:
- Oak is hard, dense, not prone to warping and shrinkage. Its disadvantages are high price and processing complexity. Not every craftsman and not every tool can handle hard, durable wood.
- Larch is extremely resistant to moisture and decay, easy to process, and has a beautiful texture and color. But even such wood requires regular impregnation, which significantly extends the service life of structures.
- Pine is an inexpensive and worthy material that, with proper care, can last quite a long time.
- Spruce is soft; in atmospheric conditions and in contact with the ground, it is prone to rapid rotting. But given the strength of the wood and the economical price, it is quite suitable for the manufacture of fences and gates. It is easy to process, but requires mandatory conservation measures with chemical agents.
To choose a good tree, it is not enough to know only the species. The quality of lumber corresponds to the grade and is determined by the presence of defects, blue stains, cracks, resin pockets and other defects.
Characteristics of suitable wood for making gates
For gates and fencing, it is not necessary to use such expensive varieties as Prima or Extra, but you should still not use grades below 3. When purchasing, pay attention to the correct geometry of the material, the absence of stains, falling knots, and rot.
Example of a damaged board
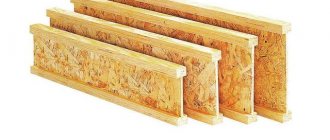
For the manufacture of gates, lumber that has undergone atmospheric drying is used - timber, timber, edged board, lining, lath. It is not recommended to use raw wood. During the drying process, it will begin to warp, which will irreversibly ruin the appearance of the product.
Selection of material for the gate
When we are faced with the problem of choosing a material for a gate, we are primarily guided by two criteria: price and durability. Of course, wood cannot be compared with metal in terms of strength, but in terms of cost it wins.
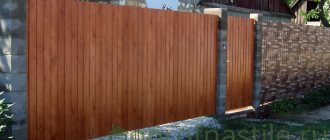
Finishing and painting a wooden gate to look like metal
And this material combines with the overall design of the site just wonderfully.
Return to contents
Softwood
If we talk about wood species, then everything depends on the capabilities and taste of the owner of the dacha. Of the coniferous species, pine is considered the most accessible and cheapest material. It is easy to process and withstands the vicissitudes of the weather well due to its high saturation with resin. In addition, the pine board has a beautiful golden color and if you open it with varnish, you will get a wonderful gate made by yourself.
Larch is much stronger than pine, it has an excellent structure and is remarkably easy to process. But its cost is also slightly higher. Therefore, the use of this type of wood is not very practical for the manufacture of wickets and gates. Cedar is much more expensive than pine, although in some respects it is even slightly inferior to it. This wood is famous for its high resistance to cracking and rotting.
Original decor of a wooden gate with forged elements and pillars made of natural stone
Cedar will make a wonderful carved gate, because it is the best species for this type of processing.
Return to contents
Hardwood
Oak will undoubtedly be the best option when making an inexpensive garden gate. This is a common type of wood, which is famous not only for the beauty of its structure and expressive color, but also for its strength and resistance to bad weather. This is hard wood, which is more difficult to process, but a wooden oak gate will last for many years without losing its beauty and strength.
Aspen is almost as good as oak, but is used extremely rarely for fencing. Easy to process, does not warp or crack.
Poplar can be used to make wooden gates. But if the board is damp, it is more susceptible to deformation than other types of wood. Therefore, you need to buy only well-dried material, or before use, lay it out on a flat surface and let it dry.
An example of a gate made of aspen and metal corners
Birch is a very affordable material, but its quality is significantly inferior to other types of wood. It is more susceptible to cracking. In the absence of another option, you can make a gate from birch, but its service life will not be too long.
Return to contents
Types of wooden gates
The most common design is a frame with sheathing attached to it. It is made of wood or metal in the form of a rigid frame of various configurations.
Simple wooden frame
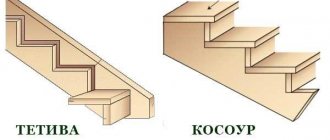
The basis for the gates is a frame made of horizontal bars or boards 40-50 mm thick and jibs, which give the entire structure stability. Sheathing is made of thin slats, boards or other materials.
Here are some simple frame assembly diagrams:
- with two parallel bars and one jib, forming a Z-shaped structure;
- in the shape of a “butterfly” with two intersecting braces;
- with reinforcement with side vertical overlays;
- with two jibs converging at one point.
Z-frame
The wicket frame has intersecting diagonals
Frame for gates with low height
You can make a simple wooden gate with your own hands very quickly:
- The filling is prepared from thin slats of the same width and length in such a way that if they are laid at equal intervals (2-6 cm), the canvas will correspond to the width of the opening.
- The bars are cut according to the size of the canvas. The planks are placed on the bars, screwed with self-tapping screws or nailed with small nails. At each attachment point you need to drive 2 nails or tighten 2 screws.
- The jib is cut so that it fits exactly between the support bars. Fasten to the frame with long screws or nails. The slats are fixed to the jib.
This type of gate is lightweight, but not very strong. It can be used in the country house, in the front garden or in an enclosure for small pets.
https://youtu.be/YxTDZLEET1U
Reinforced wooden frame
Wickets with a frame that includes vertical elements in addition to horizontal and diagonal ones are much more stable. The structure is rigid, deforms less and lasts longer.
Frame elements are cut from timber or boards 40-50 mm thick. They are connected with a tongue-and-groove lock with additional fastening with bolts or self-tapping screws. You can strengthen the corners with metal plates.
Slats, lining, and a thin board are attached to the finished frame-frame. Install the fittings. To hang the gate on the support posts, loops are fixed to the horizontal bars. They can be overhead or mortise. The mating part of the loops is screwed to the posts. The gate is installed in the opening and treated with decorative paints and varnishes.
Metal frame
The combination of a metal frame with various coverings is very common. This is a universal option, suitable also for wooden gates.
To make the frame, use a profile pipe or corner. The frame is assembled with bolts or welded, treated with anti-rust, and primed.
The slats or boards are screwed to the frame with wood-to-metal screws, the end of which is made in the form of a drill with wings. The screw fits easily and securely connects both materials without destroying the wood.
A metal frame is much more durable than a wooden one. If the filling needs to be changed after some time, its dismantling will not be difficult. You will only need to unscrew the screws and remove the worn wooden parts.
Types of gate structures
Before you start making a wooden fence gate with your own hands, you need to think about its design. There are three options.
Frame
A frame is assembled under the canvas, onto which the sheathing is fixed. The base can be made of metal or wood. The result is a rigid frame of different sizes and configurations. The frame is formed by bars and jibs. The latter are placed diagonally, they strengthen the base. The location of the jib can be different, it depends on the size of the canvas and its purpose. Most often, frames are found in the form of the letters Z, L or X, but other options are also possible.
Reinforced frames are considered the most durable. For their manufacture, not only diagonal and horizontal, but also vertical elements are used. This system turns out to be as rigid as possible. It deforms less, is resistant to mechanical stress and lasts much longer. To connect and simultaneously strengthen the frame elements, metal parts are chosen.
Instagram urbanartpdx
Framework
It differs from the frame one in the presence of a frame inside which the canvas is assembled. The base frame is made of metal, less often of wood. The result is a structure that is as rigid as possible and therefore durable. To assemble a metal frame, choose a corner or profile pipe. The parts are welded or bolted. Wooden planks are attached to the finished frame and secured with self-tapping screws.
Instagram courtlandlandscapearchitecture
With arch
A frame or frame gate with an unusual top part. An arch is installed on the pillars where it is fixed. It turns out to be a beautiful entrance group. If possible, the arch is additionally decorated with climbing flowering plants or just greenery. Sometimes, instead of or together with an arch, a small canopy is placed over the canvas. Its shape and design may vary.
Instagram stephan_baker_photography
Pixabay
The filling of the frame and frame can also be different. The planks are installed close to each other or at some distance. Sometimes lamellas of different lengths are chosen; after fastening, they form the upper or lower edge of a given shape. There are a lot of options, there is room for creativity and interesting ideas.
- Country cottage area
How to choose a place for a greenhouse: rules that every summer resident should know
Sheathing options
It is interesting to decorate the gate using simple but effective techniques. For example, using a combination of planks of different lengths. Short slats are attached alternately with longer ones, having previously cut them in accordance with any ornament. The lower part turns out to be almost dull, and the upper part is light and openwork.
The filling made from a straight or diagonal lattice looks original. It can be on top, bottom or side of the canvas, maintaining the degree of transparency you need.
Exclusive handmade models with a combination of solid filling from boards, openwork grilles, forged elements and carved decorative details look impressive. For such a gate you will need the skill of a carpenter and specialized tools.
A canopy or canopy will complement the look of a wooden gate. They not only add flair, but also protect the entrance area and the structure itself from precipitation.
How to make a wooden gate correctly?
The process of creating a gate itself is not difficult if you do everything step by step, following this algorithm:
- Correctly determine the location of the gate.
- Determine the convenient opening direction.
- Draw up a drawing, indicating all the necessary dimensions.
- Select materials for work and collect a complete set of necessary tools.
- Assemble the structure.
Accessories for wooden gates
Without accessories - locks, handles, latches, bolts - the gates will not be able to perform their protective functions. Most often, mortise or rim locks are used, although padlocks are also available. Handles - forged, metal or wooden, individual or combined with a lock. A bolt or bolt is placed on the inside to close the gate without a key while at home.
Accessories for street gates and gates are made of galvanized or stainless steel and aluminum. Depending on the design, installation is carried out by inserting into the frame or by overlaying and fixing with mechanical fasteners.
For a simple country gate, the design of the fittings can be without any special frills. For the entrance area to a personal plot, the models should have a more stylish look. Select them in accordance with the gate fittings and fencing finishes.
Set of necessary tools
Since the product is made of wood, you need to stock up on a set of carpentry tools:
- square, ruler, tape measure, pencil;
- a carpenter's saw, as well as a jigsaw, to cut out patterns if desired;
- a curved screwdriver, and, if possible, a screwdriver;
- rasp;
- plane;
- shovel, drill, crowbar, plumb line.
If you have all the materials, tools and installed supports, a wooden gate can be made in 3 - 4 hours. To do this, you do not need to be a great master, since any owner of a private house or summer cottage will be able to saw off a piece of board and tighten a screw. Using the technology described, you can make swing gates with your own hands.
Installing pillars
Gates can be attached to supports made of various materials - wood, metal, concrete or brick. The depth of the pillar depends on the loads, soil characteristics, and climatic conditions. Usually 0.7-1.2 m is enough, but with weak soils and large freezing depths it can be increased. A layer of crushed stone or sand at least 10 cm thick is poured onto the bottom of the well or pit to drain water and prevent the pillars from being squeezed out in winter.
Fixing metal poles in the ground
Wooden supports are made from debarked logs with a diameter of 10 cm or timber with a cross-section of 150x150 mm. It is recommended to coat the lower part with mastic or waste oil and wrap it with roofing felt. Another option is to burn it with a blowtorch or over a fire. Additionally, you need to dip the bottom of the stand in a clay mash and dry it. This waterproofing lasts for 5-10 years.
For metal racks, use a profile pipe 60x60-80x80 mm or a round one of the same area. The pillars are mounted by driving into the ground, backfilling, and concreting.
Supports made of brick or concrete blocks are laid out with mandatory vertical reinforcement. A pipe, channel or reinforcement cage is installed in the pit, which gives the pillar stability. Then concrete of a grade not lower than M300 is poured. During the masonry process, embedded parts are installed to weld the hinges. Over time, wooden and metal supports may become askew under the weight of a massive gate. To avoid unwanted deformations, the structure is further strengthened by fixing the racks in the lower chord. To do this, dig a shallow trench between them, add crushed stone or sand, lay reinforcement and concrete. Metal poles, if they are of sufficient height, can be connected from above with a piece of pipe or an angle, wooden ones - with a transverse beam.
Preparations before installation
First you need to install the supports on which the gate will be mounted. There are several ways to achieve this:
- sharpen the support and drive it into the ground;
- hammer in the support and partially concrete it;
- completely concreted;
- to burst.
The product will be securely mounted on poles using any installation method, but the question is for how long. If you simply drive the support into the ground, it will become loose after 2-3 years. If the structure is partially concreted, it will last for 5-7 years, but no more.
Unlike the previous options, when butting the support will not become loose, but still, due to the access of moisture, after a few years it will rot. The most reliable option is concreting. With it, the gate can last more than 10 years. Of course, if she is provided with appropriate care.
The depth to which the supports need to be buried ranges from half a meter to a meter, depending on the type of soil. If the soil is stable, for example, made of sand, then you can bury it half a meter deep, this is enough. The most convenient option for making a hole for installing a support is a drill. that it be at least 20 cm in diameter
Before installing the support in the hole, it is necessary to treat the column with an antiseptic. Additionally, it is necessary to treat the lower part with resin to avoid the ingress and absorption of moisture during concreting. If this is not possible, then you can wrap it with plastic film. When pouring concrete, you need to compact it with a shovel in order to avoid voids in it. When pouring concrete, the support must be kept at a level perpendicular to the ground at all times. To do this, use a building level. The distance between two columns should be between 1 m and 1.2 m.
Assembling the structure
At the first stage, the dimensions of the opening are measured. Most often, the width is 1 m, the height is approximately equal to the height of the fence or lower. If there is a porch in the gate, take into account its width.
Make a drawing of a wooden gate, which will help you correctly cut and assemble the parts. It is necessary to take into account the technological gaps on the sides of the canvas for attaching loops and on the bottom so as not to cling to the track. The gate should move freely.
Elements of a wooden gate
Prepare the frame elements - horizontal and vertical bars, jibs. If the width of the canvas is more than 1 m, it is recommended to strengthen the frame with additional jibs and/or jumpers.
Lumber is trimmed and sanded. To connect with each other, the following methods are used:
- tongue and groove;
- “half a tree”;
- butt with overlay;
- corner.
All connections are reinforced with galvanized fasteners - nails, bolts or wood screws. The frame should be as rigid as possible.
Slatted base
You can buy a picket fence, batten or cladding board already sanded and cut it to size with a small margin for trimming. Install materials according to the chosen pattern, placing them with or without gaps. Fasten to the frame with nails or self-tapping screws, 2 pieces per connection.
After all the slats are nailed, the protruding parts are cut off. You can make a decorative rounding along the top of the gate: tie a thread or thin rope to a nail, attach a pencil to the other end and, holding the nail in the center of the canvas, draw a rounded line. Carefully cutting the slats with a jigsaw along the contour of the arch will now not be difficult.
We fasten the canvas
To hang the gate, use garage or gate hinges with a diameter of 28-34 mm. They are made of high-quality metal and can withstand heavy loads. They are available right or left, some models are equipped with plates for welding to a metal frame. For installation on wooden structures, the planks may have ready-made holes for fasteners.
The loop is disassembled into 2 parts. First, the upper part is attached to the canvas, then a place for the lower part of the loop is marked on the support. The sash is lifted, if necessary, the position of the counterpart is adjusted, and then it is welded or screwed. For a canvas width of up to 0.9 m, 2 hinges are sufficient, above - 3. The hinges on the support must be attached strictly vertically, one below the other. When installing, you need to leave a small gap between the part and the post to prevent rubbing of the supports.
When choosing hinges for a gate, pay attention to whether their design includes a full bearing. It prevents the hinge from skewing and ensures uniform movement without squeaking or rattling.
Manufacturing procedure
The first step is to install the pillars (depending on the size of the sash, timber 60x60, 100x100 is taken), and the sash is made according to the size of the resulting gate opening. Standard sash dimensions are 1.1x2m.
Dig two holes 70 cm deep the width of a bayonet shovel. It is convenient to use a garden auger for these purposes. The screenings are poured into a 5 cm layer at the bottom of the hole. Then you need to prepare a wooden beam. Its lower buried part is burned with a blowtorch and treated with bitumen. Then it is placed in the hole on spacers and filled with concrete.
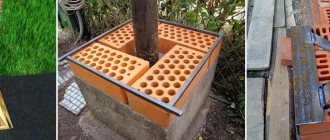
To limit the travel of the gate, slats are placed on the posts to imitate a quarter.
Scheme for installing columns in a bundle
Important! To achieve an ideal mutually parallel position of wooden poles, it is recommended to first knock them down crosswise with slats, thus assembling a rigid box. After this, they are installed in the pits in the form of such a structure and concreted. After the concrete has hardened, the slats are removed.
Assembling the gate on the frame
For assembly, prepare two identical horizontal beams along the width of the gate, onto which vertical slats will be placed. They are placed on a prepared table parallel to each other. It is advisable to make markings on the table and screw in the stubborn punks.
To maintain a constant gap between the vertical slats, prepare a thin rail, which is laid in front of each subsequent sheathing strip to be filled. The figured top edge of the picket fence is cut out with your own hands using a jigsaw after all the slats are nailed (or screwed). Therefore, it is not necessary to ensure that the top of the sheathing is level. The ends of the sheathing strips can be cut with a cone, and the edge of the slats can be processed with a figured cutter.
What does the assembled sash look like?
To attach the pickets, it is better to use stainless steel screw cutters. After the vertical strips are filled, the structure is turned over, the strut is measured and inserted.
Frame sash assembly
Making a wooden gate with your own hands is more difficult if you choose a frame structure. The complexity of the work depends on the design of the sash and whether it has curved lines. As a rule, the lower jumper of the frame and two side straight ones, and the upper jumper can be either straight or curved. The sash can be divided into 2 segments, with the lower part being solid and the upper part being transparent.
For the frame, a 30mm thick timber is taken, and the filler is made of 10mm thick lath and plywood. The essence of the design is that using a hand router, a groove is made with a 10 mm cutter on the inside of the jumpers. Slats or plywood will be inserted into it. If it is necessary to make a ledge less than 10 mm, then take a thicker lath (12 mm, 14 mm, etc.) and make the groove with a corresponding cutter.
Schematic diagram of the frame structure assembly
The vertical bars do not have to be cut to length; the excess ends can be trimmed off after assembly. And the transverse ones must be cut to length, since 3 cm spikes will be cut on them. If the width of the side post is 70 mm, then the length of the transverse will be 80 mm less than the width of the gate (140-60mm). The thorn is cut with a hacksaw, the cheeks are chopped off with a chisel. The eye in the rack is drilled out using a drill and finished with a chisel.
The infill lath (or plywood) is cut to exact size based on the depth of the groove.
Frame assembly process
The frame is assembled with glue, the tenons are reinforced with blind dowels. First, the lower jumper is connected to the stand, the filler is inserted, then the upper jumper is put on and the second stand is inserted. For tightening, use a hip or rope twists.
The simplest DIY design:
Features of the lock mortise
Installing a lock on a wooden gate is easy, much the same as installing a lock on a wooden door. But there are some nuances: when installing the mating part, you need to additionally enlarge the hole in the trim vertically. This is done to compensate for slight vibrations of the pillars as a result of seasonal freezing and thawing of the soil. The lock tongue will fit freely into the locking plate socket. Otherwise, the gate may be difficult to close.
Painting
For exterior work, varnishes, enamels and primers are used to form a protective film on the surface of the wood. They are made on the basis of acrylic, latex, alkyd resins or oils. A distinctive characteristic of materials for wood processing is their high resistance to moisture, frost and UV rays.
In order for the paint to lay evenly and penetrate the wood layer as deeply as possible, the surface must be dried and sanded. For water-based materials, brushes should be medium hard with artificial bristles. Oil-based or alkyd compounds are best applied with a natural bristle brush.
First, the wood is covered with primer, and after it dries - with 2-3 layers of paint. It is applied evenly along the fibers, each layer must be thoroughly dried.