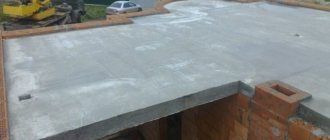
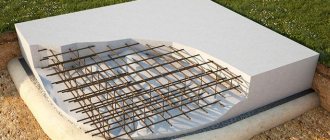
Some rules for calculating a monolithic slab
- To determine the span of a reinforced concrete slab, it is necessary to measure the width and length of the room (the distance between opposite walls). The dimensions of the slab itself will exceed the measured values by part of the thickness (at least 100 mm) of the load-bearing walls.
- When determining the geometric parameters of a slab, to simplify calculations, it is considered as a beam. All calculations are performed for one meter of beam, and then the obtained calculation results are applied to the entire floor.
- The calculations take into account static loads of the slab during operation (arranged furniture and other interior items) and dynamic ones. There are concentrated, uniform and uneven loads.
- Monolithic flooring in a cottage-type house is usually calculated to bear a load of q1 = 400 kg/1 m². If the thickness of the monolithic floor is 100 mm, 250 kg/m² should be added to the total weight of the structure plus another 100 kg/m² (the weight of the screed and finishing materials). A reliability factor of 1.2 is also used. Thus, the total load will be q = 900 kg/m².
- The thickness of the monolithic floor is proportional to the span, which is expressed as 1:30 (should not be less than 150 mm).
- The number of reinforcement bars used may vary. For example, to reinforce 1 linear meter of a slab with a pitch of 0.2 m, there are 5 rods with a diameter of 14 mm. The same cross-sectional area of the reinforcement can be obtained by using 7 rods with a diameter of 12 mm, laying them in increments of 0.14 m or 10 rods (10 mm) in increments of 0.1 m.
Removal of formwork and installation of interfloor ceilings
When installing the main floors, the formwork is removed. Removal of the side surfaces is permitted when the main floor has completely hardened and formed a solid structure. It is necessary to carefully check the entire surface from all sides.
The strength of a concrete structure is determined by the following indicators:
- Load-bearing elements whose span is less than 2 meters account for 50%.
- Slabs with a span of 6 meters or more – 70%.
- Reinforced types of structures no more than 25%.
How to determine the strength of hardened concrete of an installed interfloor slab?
The concrete surface increases the strength of the coating from the moment the last layer is poured over time:
- 3rd day strength is about 30%.
- Day 7 increases to 60%.
- Day 14 is 80% or more.
- Day 28 is around 100%.
- Day 90 increases by 30%.
The duration of hardening of the concrete floor depends on the air temperature and the level of ambient humidity. There are special additives that help speed up the hardening process of concrete on the surface of the floor.
Installation of interfloor ceilings can be labor-intensive; if difficulties arise, InnovaStroy specialists recommend contacting experienced craftsmen.
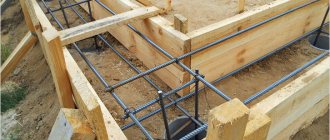
The main stages of installation of formwork for a monolithic floor
The monolithic floor slab is installed after the load-bearing walls have been erected to the design level. The formwork is a structure assembled from sheets of moisture-resistant plywood and vertical supports. The moisture content of plywood sheets should not exceed 25%. The supports can be telescopic racks made of metal pipes or wooden beams. In order for the formwork to have the necessary safety margin (for slabs with a thickness of no more than 300 mm), its installation is carried out in the following order.
- Stepping back 200-250 mm from the wall, install supports under the entire area of the future floor. The distance between supports is 1 m.
- A beam with a cross section of 50×150 mm is laid on top of the supports, orienting it along the long side of the formwork. The distance between the bars is 2 m. The edges of the bars must be attached to the wall.
- Another row of beams is laid across the beams in increments of 500 mm. At intersections, the elements are firmly connected with nails.
- The vertical position of the supports and the horizontality of the structure assembled from beams are checked. If a deviation is detected, pieces of plywood are placed under the supports for leveling.
- When using wooden supports (a beam with a cross-section of 150×150 mm is suitable for this), braces are installed from boards 30 mm thick to further strengthen the structure.
- Vertical side parts of the formwork frame are assembled on the surface of load-bearing walls and partitions, and sheets of plywood are laid on top of the horizontal sheathing of beams.
Note: instead of moisture-resistant plywood, special ribbed metal floors can be used to install the bottom of the formwork.
How to fill a slab: technology
The technology itself involves several stages of the process: calculations, preparation of equipment/materials/tools, assembly of sealed formwork, creation of a reinforcement cage and placing it inside the formwork structure, mixing of concrete mixture, pouring, proper maintenance.
Installation of formwork
Before pouring the floor slab with your own hands, you need to install the formwork. You can rent a ready-made structure or assemble it yourself from boards, plywood, or timber. Factory-made formworks are supplied with telescopic supports, saving time on installing supports. But the second option will be cheaper, although labor-intensive.
To make your own formwork, take an edged board with a thickness of at least 2.5-3.5 centimeters or moisture-resistant plywood sheets with a thickness of 2 centimeters or more. The boards are knocked down as tightly as possible and covered with waterproofing film.
To complete the work you will need: plywood, boards, timber, hacksaw, hammer, level, axe, nails.
The formwork installation process - step-by-step instructions:
- Installation of vertical support posts - it is best to make telescopic vertical ones from metal. If there are none, you can take wooden logs with a cross-section of 8 centimeters or more. Install the racks in meter increments, at a distance of at least 20 centimeters from the perimeter walls.
- Next comes the laying of crossbars on the surface of the racks - a longitudinal beam that will hold the formwork structure.
- Formwork is mounted on top of the crossbars - first, wooden transverse beams are installed on the longitudinal beams, and plywood or boards are mounted on top of them. The extreme edges of the formwork structure must rest exactly on the walls, without creating gaps.
- Adjusting the height of the support posts so that the upper edge of the formwork is strictly at the same level with the upper border of the laid wall.
- Installation of vertical structural elements - the edges of the floor slab extend onto the wall, so the vertical fence must be mounted at a certain distance from the inner edge of the wall.
- Checking the level of evenness of the formwork installation, correcting possible deviations.
The formwork elements are connected with nails or dowels, and the inside is covered with waterproofing material. Compared to their wooden counterpart, metal telescopic stands are considered more preferable due to their reliability and durability.
One such rack can support up to 2 tons without cracks or deformations, unlike wooden beams, which sometimes cannot withstand the thickness of concrete.
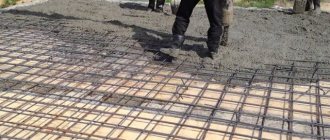
Reinforcement of the floor, reinforcement of reinforced concrete floors
Before making a concrete floor with your own hands, you need to lay a reinforcement cage into the formwork, which will give strength to the structure and make it resistant to bending loads.
To create a frame you will need: metal rods with a diameter of up to 16 millimeters, tying wire, a hook for tying, special clamps for the rods (ensure that the reinforcement is poured with concrete from all sides). It is also advisable to prepare a grinder with a metal disc and a device for bending rods in advance.
Rules for assembling the reinforcement frame:
- Cutting rods into pieces of the required size
- Knitting rods with wire to form a mesh with a cell size of 15 by 15 or 20 by 20 centimeters
- Layout of clamps, laying the bottom mesh on them
- Installation of vertical (transverse) rods in increments of at least 100 centimeters
- Assembly and installation to the vertical bars of the upper frame mesh
The overlap when assembling elements should exceed on average the diameter of the reinforcement by 35-40 times.
Important nuances of reinforcement:
- Typically, for the reinforcement frame, rods of class A400 C, periodic hot-rolled profile are chosen; the steel must correspond to grade 35GS or 25G2S
- Working diameter – from 8 to 16 millimeters
- The main reinforcement is considered to be the lower one, since it takes on bending loads. Here you need to make a particularly strong frame. The diameter of the upper reinforcement may be smaller (except for the floor areas in the support zones, where, according to calculations, it is necessary to strengthen the upper zone of the slab)
- If the spans are large or there is support on columns, install transverse reinforcement (frames or clamps), choosing class A240C
Concrete preparation
Before pouring a monolithic floor slab, it is necessary to determine the composition of the concrete. Usually, durable brands of solutions are chosen to ensure the required parameters and resistance to loads. Concrete in Moscow and the regions can be ordered ready-made from the factory, or you can mix it yourself.
Preparation of concrete for pouring a monolithic floor:
- Preparation of building materials - purified water, sand sifted and cleared of impurities, crushed stone of a fraction of 20-30 millimeters, M400 cement
- Mixing concrete mortar: mix 2 parts sand, part cement and crushed stone thoroughly, then add the optimal amount of water to achieve the desired consistency
- It is best to mix in a concrete mixer - first all the dry ingredients, then gradually adding water
Concreting a monolith
To make a strong, durable and homogeneous monolithic slab, it is recommended to pour concrete in one go. This is why many craftsmen prefer to order ready-made solution from the factory, since it is almost impossible to quickly prepare the required volume on your own.
Rules for pouring mortar onto slabs:
- Supplying the mixture to the formwork structure, uniformly distributing the mixture over the area
- Compaction of the layer with a surface or deep vibrator
- Checking the evenness and accuracy of the fill
Hardening of the slab, care of concrete
Poured concrete must be moistened periodically. After all, during the hardening process, water leaves and heat is released. If hydration occurs too quickly, the concrete monolith may become cracked and deformed.
To maintain optimal humidity of the monolith, it is covered with polyethylene and periodically (in the first 7-10 days) water is sprayed over the surface. Next, they wait until the concrete gains most of its brand strength without carrying out any work.
How long does concrete dry at +20C:
- 3 days – 30% strength according to brand
- 14 days – up to 80% strength
- 28 days – 100% brand strength
When humidity levels and air temperatures change, concrete can behave differently. So, at +5C the hydration process stops altogether. Therefore, it is best to carry out work in the warm season. You can see the features of drying and hardening of concrete mortar depending on conditions in the reference literature.
Checking the concrete for dryness: leave a piece of roofing felt on the surface in the evening, lift it up in the morning and look. If a dark spot appears under the roofing felt, the concrete has not yet dried.
Monolithic flooring is an excellent choice for a high-quality and durable building made of any material. If you perform all the calculations correctly and implement the project yourself, you will be able to save significantly without compromising the strength and ability of the structure to withstand mechanical loads.
Monolithic floor reinforcement
The reinforcement frame of a monolithic floor consists of two parts. The first, located in the lower tier, works in tension, and the second, mounted in the upper tier, works in compression. For reinforcement, rods with a diameter of 10 and 8 mm are most often used; the reinforcement is knitted at the intersection points with 1.2-1.5 mm wire.
Basic rules for assembling reinforcement cages
When reinforcing, the following rules must be observed:
- there must be a gap of at least 20 mm between the side parts of the formwork frame and the reinforcement;
- the monolithic floor structure should be such that the reinforcement is covered with concrete about 25 mm thick at the top and bottom;
- between the upper and lower tiers of reinforcement the distance should be within 90-100 mm;
- to create a gap between tiers of reinforcement, remote clamps with support legs are installed;
- in the case when the length of rods with a diameter of 10 mm is insufficient to reinforce the floor, extensions are made with a minimum overlap of 480 mm;
- The connections of the rods in the tiers of reinforcement are arranged in a checkerboard pattern.
Monolithic floors: reinforcement technology
Sequence of actions when assembling a metal frame (step-by-step instructions).
- In order for the reinforcement of the lower tier to be covered with a layer of concrete, plastic clamps are installed on plywood sheets in increments of 1.0-1.2 m.
- In increments of 200 mm, reinforcement bars are laid in the longitudinal direction. Between the supporting supports, in the middle of the structure, there must be additional rods.
- The second row is laid in a perpendicular direction relative to the first row of rods. The laying step is the same as for the first row.
- Using soft metal wire and a special hook, the reinforcement bars are tied at their intersections.
- Plastic clamps are installed in a checkerboard pattern on the rods of the lower tier at an angle of about 15°. The distance between them should be 1 m.
- The upper frame is mounted in the same order as the lower one.
- At both edges, with a pitch of 400 mm, U-shaped connectors are attached to the rods.
Wooden floors
Using wooden floor beams
Beams made from softwood are the main part of the wooden floor. It consists of the beams themselves, the floor, the run-up and insulation. If the thickness of the floor boards is no more than 30 mm, then the gap between the beams should not exceed 50 cm.
Note!
Before installation, wooden beams must be treated with an antiseptic, and the ends that will be laid on the wall must be wrapped in several layers of roofing felt. Leave the end of the beam open so that the wood can breathe.
Use anchor bolts to secure the wooden beams. Attach cranial bars to their side faces. Make rolls from boards or shields, which are fastened with self-tapping screws to the skull blocks. According to the established roll-up, you make the ceiling.
Then you lay insulation, most often mineral wool or polystyrene foam is used for this.
Pouring concrete
Monolithic reinforced concrete floors are created using concrete grade M200 and higher. The components of the solution are water, crushed stone of a fraction of 5-20 mm and clean, sifted sand. The filling rules are as follows.
- Do-it-yourself monolithic flooring is poured in one step: otherwise the strength of the structure will not be ensured.
- The solution is evenly applied to the bottom of the formwork. The thickness of the solution layer is limited using beacons.
- Air is removed from the concrete mass using a deep vibrator. If it is not available, a metal rod is used, which is often used to pierce the solution over the entire area of the pour.
- The laid concrete should be covered with plastic film for several days: this will ensure uniform hardening and prevent cracking.
- After 28 days, the formwork is dismantled and construction can continue. If it is necessary to erect the walls of the next tiers earlier, the work is carried out without dismantling the formwork.
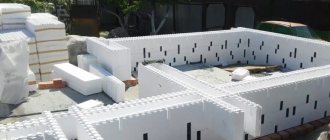
Construction of interfloor vaults in a house made of aerated concrete ↑
The main feature is that aerated concrete, despite all its positive properties, does not have sufficient strength. Because of this, it is not recommended to build buildings with more than two floors from ordinary aerated concrete.
Installation of wooden floors between floors
Step-by-step instructions for installing a vault in aerated concrete ↑
To install flooring between floors, especially when it is necessary to install the ceiling of the 2nd floor of a house made of aerated concrete, a reinforced support from a reinforced concrete belt located along the perimeter of the building or room is prepared in advance.
DIY work stages:
- The ends of the beams must be sawed at an angle of 60°-70°, creating an additional cavity for ventilation after installation.
- Next, the bars at the point of contact with the wall are wrapped with roofing material, which prevents abrasion of the structure stop. The end must be left open to remove moisture from the wood during ventilation.
- When creating niches for laying wood, it is necessary to calculate their size so that the gap between the wood and the wall above is at least 50 mm. After laying the beam, insulation, for example, mineral wool, is placed in this gap.
- Installation begins with the outer beams, mounting the ceiling along wooden beams. Then the intermediate slabs are installed, checking the correct installation according to the building level.
- The beam vault is fixed to the reinforced belt using metal corners, pins or special plates.
- The next step is the installation of boards and bars secured to the bottom of the beams.
- After fixing the bottom layer of the structure, the insulating layer is distributed, selecting its properties depending on the type of floor - providing thermal insulation, improving sound insulation or waterproofing.
Floor finishing on beams
Finishing work and recommendations ↑
Finally, logs are laid on top, on which the finished floor is mounted. The lower part of the vault is also refined, covered with clapboard, fiberboard, plywood or other finishing material.
Of all types of floors, those made of wood are more preferable when building a house on your own - wooden interfloor structures require less cost and are not very labor-intensive. Using timber, you can build any type of floor - interfloor, attic or basement (basement). You just need to correctly calculate the load and choose the right lumber for construction, which will ensure the strength and durability of the structure.
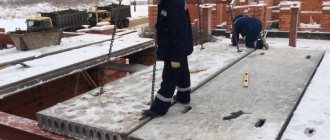
How prefabricated monolithic floors are created
In the event that the parameters of the structure allow the use of standard slabs for the installation of interfloor slabs, care should be taken to ensure the availability of lifting equipment. A standard slab does not exceed 9 m in length. For longer spans, additional supports or load-bearing walls are erected.
Features of installation of prefabricated monolithic interfloor structures.
- Before laying the slab, the levels of the load-bearing walls are checked: the difference should not exceed 10 mm.
- In the place where the slab is laid, a backing of cement-sand mortar is laid, which will ensure a tighter fit to the wall.
- The slabs are transported to the installation site using a sling system.
- If available, embedded reinforcement is welded.
- The gaps between adjacent slabs are filled with mortar.
- The holes of the hollow slabs on the side of the external walls are partially filled with mortar to prevent the formation of “cold bridges”.
- A leveling screed is placed on top of the prefabricated monolithic floor.
Floor options
Installation of wooden beams
Ceilings are divided according to design features and functional purposes. These include interfloor, basement, and attic floors. They are beam, prefabricated and solid. When choosing a floor design, take into account the differences in installation technologies for its different options.
- The construction of beam floors is carried out using metal, reinforced concrete or wooden beams. They must have a large margin of safety.
- The distance between the load-bearing beams should be 70-80 cm. The wooden load-bearing beam should not be more than 5 m in length for floors between floors and more than 6 m between the attic and the lower room.
- The span width for reinforced concrete or metal load-bearing beams can be any.
- Hollow and monolithic slabs are used to create continuous floors. To prevent the slabs from moving, they must be secured with cement mortar. When installing slabs, you will have to use special lifting equipment.
Aerated concrete: monolithic flooring using modern technologies
Aerated concrete is used not only to build walls, but also to create floors. These designs differ:
- high strength (can withstand loads of up to 600 kg/m²);
- low specific gravity;
- ease of installation;
- long service life;
- environmental safety.
The individual elements that make up a prefabricated monolithic structure are manufactured at specialized enterprises and given the following dimensions: length - up to 6 m, width - up to 1.8 m, thickness - 0.3 m.
Installation of floors made of aerated concrete blocks involves the installation of reinforced concrete beams. This reinforcing structure is called “Trigon”. Some features of installing a monolithic floor are as follows:
- Interior partitions are erected 10 mm below the ceiling. This will reduce the load on the floor slabs and prevent their destruction.
- Aerated concrete floor blocks are placed in place using lifting equipment using soft slings.
- The slabs must rest on the load-bearing parts of the floor to a depth of at least 1.25 mm.
- Before laying the slabs, a fastening solution is applied to the load-bearing walls.
- Two levels of reinforcement frame are laid along the perimeter of the load-bearing walls.
Compliance with the technology of laying slabs helps create a perfectly flat surface of the ceilings. At the end of the article about how monolithic floors are created - a video clearly demonstrating the process.
Construction of houses
-73 votes
+
Vote for!
—
Vote against!
Floors are special structures that separate floors. They can be made from various materials and come in a wide variety of types. Individual construction is becoming increasingly popular. A large number of city residents dream of getting out of their apartments and becoming the owner of a spacious home. In order for the construction to be of high quality and reliable, it is necessary to consider the types and features of the ceiling.
Table of contents:
- Installation of floors in a private house
- Do-it-yourself ceilings in a private house
- Installation of ceilings in a private house
- Flooring options in wooden houses
- Beam floors in a private house
- Interfloor ceilings in a private building with your own hands: monolithic, reinforced concrete and aerated concrete
- Metal ceiling in a private house
- What to make a ceiling from in a private house
Installation of floors in a private house
The ceiling structure has different variations, but there are rules that apply to each option: the ceiling must be rigid, reliable and adapted to the expected load.
A ceiling is a structure whose purpose is to separate adjacent zones by height. We can say that this is the ceiling space that separates the living area from the roof and basement areas. The main requirement for this structure is strength, due to the fact that bulky objects will be installed on it and the inhabitants of the house will move around. There are certain construction parameters for floors: for the upper, attic floor, the loaded weight should not exceed one hundred kilograms per square meter, as for the floor between floors, it must withstand a load of up to two hundred kilograms per square meter. The second, no less important condition for the overlap is rigidity. It should not “play” under loads or bend.
You should also think about sound insulation when constructing such a floor yourself. This can be achieved by sealing cracks and gaps at the joints. Those structures that will differentiate residential and non-residential areas require the use of an additional layer of thermal insulation materials.
Do-it-yourself ceilings in a private house
In a private home there can be a variety of floors, which can be grouped as follows:
- basement – separate non-residential unheated premises;
- basement - essentially the floor of the first floor;
- attic - serve to protect residential premises from high and low temperatures in the attic;
- attic - divide buildings by height.
The main requirements for floors were listed above: strength, rigidity and a high level of sound insulation. In addition, the following features can be noted:
- fire resistance - in the event of a fire, it is necessary to have a reserve of time for evacuation;
- heat-saving qualities - it is necessary to lay a vapor barrier as a barrier to the formation of condensation;
- waterproofing is a necessary condition provided that the ceiling borders a non-residential premises;
- resistance to fungus and mold.
The structures that are erected are of two types: prefabricated and monolithic. Or another name for structures - beam and beamless. The beam version consists of joists and filler, and the non-beam version consists of tile or panel components.
Installation of ceilings in a private house
Before erecting a ceiling in your own home with your own hands, you should treat the wood using a special solution that will prevent the development of microorganisms and mold. Provided that the beams will be inserted into concrete walls or stone, the edges of the wood should be carefully wrapped in roofing material. The so-called nest is prepared in advance, where the beam will be inserted. It should have a beveled edge. After installation, the socket with the beam is filled with polyurethane foam.
In a private house, the construction of a floor involves the manufacture of a reel. These are the bars that are necessary for the future ceiling covering.
The issue of sound and thermal insulation deserves special attention. Two goals can be achieved at once with the following materials: sand, slag, expanded clay, foam plastic, mineral wool, sawdust. Not all of the listed materials are an ideal option, since they do not “breathe”. Mineral wool is considered the best material, as an option that allows air to pass through it perfectly.
Waterproofing materials are first placed on the run-up, followed by a layer of thermal insulation.
Flooring options in wooden houses
There are such types of floors:
- wooden;
- reinforced concrete;
- metal.
But in modern designs there are the following flooring options:
- beamless;
- coffered;
- prefabricated monolithic;
- aerated concrete.
For some flooring options, it is necessary to use horizontal joists, others require factory floor slabs, which are laid using special lifting equipment. Monolithic floors are poured on site. Prefabricated monolithic structures - a combination of a concrete monolith with beam supports. Coffered ceilings are almost never used in private homes.
Beam floors in a private house
In beam structures, the basic foundation is beams that are installed at equidistant distances. Filling materials are placed on them. It can be wood, reinforced concrete or metal.
In your own private home, floors made of wooden material are most often used; it is used for:
- interfloor ceilings - when the span is five meters;
- attic floors - when the surface size is more than six meters, as for metal beams, they have no restrictions and can be used with arbitrary span widths.
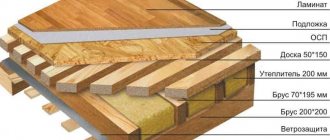
Light wood species are used as the basis for the wooden floor. The construction of a beam floor includes the following elements:
- beams;
- roll up;
- gender;
- insulation.
The main advantage of using a wooden floor is the fact that it is installed quickly and easily, without the use of special devices. No construction equipment is needed, and the coating itself is inexpensive and lightweight.
The disadvantages of wooden coverings are that wood is a fire hazard, is subject to attack by microorganisms and is prone to mold.
Interfloor ceilings in a private building with your own hands: monolithic, reinforced concrete and aerated concrete
Monolithic floors have a large number of advantages: a flat surface that has no joints or seams. To construct such floors, no special equipment is needed. The procedure for pouring floors is complex and requires skills. To carry out this procedure, you need to prepare the following tools and things:
- high quality cement;
- crushed stone or slag;
- sand;
- fittings made of high-quality metal;
- reinforcing mesh;
- wooden boards;
- supports for formwork.
First, the vertical supports are placed, and plywood or a similar material is laid on top for pouring the mortar. It is necessary to make formwork and pour concrete. Due to its complexity and labor intensity, this option is almost never used in multi-storey private buildings.
Reinforced concrete slabs are another option for flooring. These are nine-meter-long factory materials. They are supported by load-bearing walls. Proper installation is very important to avoid distortion. There are two types of plates:
- hollow;
- flat, voidless.
The slabs are laid using a liquid mortar that adheres well to the slab. The gaps must be carefully sealed, and then the entire surface must be sealed with a screed.
If the private property is low-rise and made of aerated concrete, a construction made of aerated concrete is considered a convenient and high-quality method of roofing. They can be ordered according to the required size directly from the enterprise. When mounted, the blocks are connected to each other using special connectors or clamps. To transport the material you need to hire a car. As a result, the idea will be expensive; in addition to paying for the material ordered according to size, it is necessary to pay for transportation, unloading, lifting and installation. It is cheaper to install the ceiling yourself during the construction of the building.
Metal ceiling in a private house
Undoubtedly, metal beams are a more durable material and can serve without the restrictions and problems that arise with wooden structures. Due to the strength of the material, you can save space by making the overlap to a minimum thickness. But despite all the attractiveness and advantages, metal floors are rarely used. The wooden version is most often used.
The gaps between the beams are filled with concrete mortar or wooden panels. The final weight of the structure will be as follows: a square meter of flooring will weigh about four hundred kilograms.
Metal beams can be used to cover spans of considerable size. The advantage of such structures is their fire resistance, immunity to microorganisms, mold, and termites.
The disadvantages of this type of structure are that areas in contact with moisture are subject to corrosion. To avoid this, problem areas are wrapped in felt.
Most often, rolled profiles are used for such structures. During the installation process, reinforced concrete slabs are laid between the beams and covered with a layer of slag or reinforced concrete material on top.
For this type of overlap use:
- metal corners;
- reinforced concrete slabs;
- plaster mesh;
- materials for waterproofing;
- plank flooring.
A noticeable disadvantage of this option is the need to use special equipment.
What to make a ceiling from in a private house
Having analyzed all possible options for making floors in a private home, it can be argued that a wooden floor is rightfully considered one of the most optimal for a private building. This design is based only on wood: load-bearing beams and floor boards. A solid beam or board goes into the load-bearing beams. The material is affordable and can be used on any wall: aerated concrete, brick or timber. Most home craftsmen use this material.
Speaking about wooden floors, we should highlight the main characteristics of this design:
- cost – the price of wood is affordable;
- durability - depends on the quality of maintenance and conditions of use, as a rule, it is from thirty to fifty years;
- manufacturing complexity - considered to be of medium complexity, but does not require special equipment;
- fire safety - one of the most fire hazardous materials, but the degree of risk can be reduced by treating the surface of the wood with fire retardants;
- weight – the design is considered light, the approximate weight of one square meter is forty kilograms;
- maintenance - it is necessary to use protective compounds: against microorganisms, mold, fungus.
Among the positive aspects of wooden flooring are:
- economical - the price is much lower than other flooring options;
- light weight – light weight compared to metal;
- no need for finishing;
- ease of installation - no equipment or special knowledge is needed for manual installation;
- versatility - the ability to use such a design for a building made of any material;
- the ability to hide the insulation - the thermal insulation is hidden behind the cladding boards.
But wooden floors also have disadvantages. Let's look at them:
- creaking – after some time of operation, the wooden structure will begin to creak;
- high fire hazard - wooden materials are susceptible to combustion, quickly ignite and support the process;
- the need for additional maintenance - in order for the structure to serve the maximum amount of time, it is necessary to treat it with protective agents and mixtures;
- low mechanical strength - the material is susceptible to impact and can be partially deformed;
- difficulty in constructing large spans - it is impossible to use this design on surfaces of more than five meters.
If you have questions about installing a ceiling in a private house with your own hands, you can watch the video at the end of the article. There you will find answers to all questions on the topic of flooring in a private house.
Floor calculation
Calculation of reinforced concrete structures in construction is carried out in accordance with the requirements of SNiP 2.03.01-84* Concrete and reinforced concrete structures . But in private construction, all the provisions of this document do not apply. Typically, the loads that the floors in an individual house must bear cannot be compared with those for which the structures of apartment buildings, industrial buildings and engineering structures are designed. Therefore, there is no point in “getting into the weeds”; you can make the calculation using the simplified method described in the video.
The author explained quite clearly how to do this. In any case, everything was clear to me. And most importantly, the method complies with the requirements of SNiP and is applicable to most floors manufactured for private houses.
Having determined the thickness of the ceiling and determined how much and what kind of reinforcement is needed for the device, you can begin formwork work.
How are floors classified?
Depending on the level at which the ceilings are located, the requirements for them differ.
Overlap happens:
- Basement. On this horizon the buildings are covered
The basement floors
bear the greatest loads and must ensure the rigidity of the entire building structure. They perceive the pressure of load-bearing walls, the mass of partitions, as well as equipment and decorative elements of the first floor. In this case, when designing, there are no strict restrictions on the weight and thickness of the structure. In this case, a sufficient level of heat, steam and waterproofing should be provided. - Tsokolny. For floors of this horizon, the requirements are similar to those for basement floors. Also, the weight and thickness of the element are not limited.
- Interfloor and attic. The choice of design is made taking into account the balance of weight and size indicators. To optimize them, it is possible to construct additional load-bearing walls, reduce the distance between spans or achieve load reduction. In an attic, its heating capacity should be taken into account in order to achieve the necessary thermal insulation. In ceilings located between floors, it is important to achieve sufficient sound insulation.
- Attic. The requirements for the strength characteristics of the structure are somewhat lower. In this case, it is important to ensure reliable thermal insulation.
Construction of floors is a serious matter
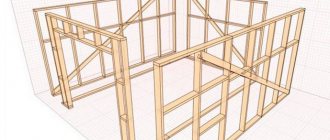
Do-it-yourself wooden interfloor ceiling
The wooden ceiling structure is responsible for the formation of a stable floor covering on the upper floor and a smooth, reliable ceiling on the lower floor. The main mass is taken up by the load-bearing walls of the building. The installation of wooden interfloor slabs is the most popular and in demand in the modern construction of country houses. Due to the ease of construction, the quality of the resulting flooring, environmentally friendly materials and economical costs. Wooden bars tightly connect the building elements, exerting a horizontal load on all the main supporting walls.
Advantages of installing wooden floors
- Increased level of thermal insulation;
- Preservation of the acoustic properties of the room (if necessary);
- Simplicity and ease of installation with your own hands;
- Carrying out work in any weather conditions;
- Use of any type of ceiling: basement, interfloor, attic, attic.
When using wooden floors in areas prone to moisture accumulation (bathroom, basement, pool area, baths, etc.), it is recommended to use an additional level of waterproofing material.