Fencing is a mandatory attribute of a personal garden and summer cottage. Some owners choose to build a permanent fence, while others, on the contrary, do not want to shade the plants on the territory, so they prefer to install lightweight structures - mesh ones. This solution has quite a few advantages over solid walls, not the least of which is the strength of a metal wire fence along with ease of installation. You don't need to be a jack of all trades: just have or find the right material, and then learn how to attach the chain-link mesh to ensure its ideal tension. There are even several methods; the owner will only have to choose the one that is more convenient in terms of work, the one that will be as reliable as possible.
Types of chain-link mesh, its characteristics
The very name “grid” does not allow much imagination to run wild. Chain-linking is made by screwing wire spirals into each other. Cells can be strictly rectangular or rhombic, in which the upper and lower angles are equal to 60°. Their size (the accepted value is the distance between the opposite corners of the cell) also varies: it can be 10-100 mm, but for fences the numbers are different - 40-50 mm. Smaller size is synonymous with greater reliability, which means its cost is also the highest.
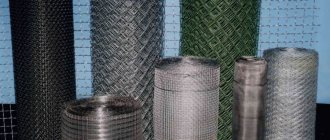
Such unpretentious material is convenient, even when it comes to transportation: it is transported in rolls that do not take up much space. The range of products is not too large, but everyone will find an option for themselves: both in price and in quality. The chain-link mesh is:
- Simple - non-galvanized, short-lived. After installation, such material needs a protective coating - paint (liquid rubber), otherwise soon - after the first rain or fog - the mesh will rust, and after a few years it will have to be thrown away.
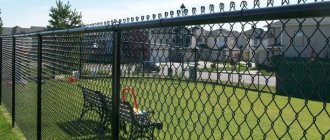
- Galvanized. This chain-link is not afraid of corrosion, so its service life is quite long. Fences with zinc coating look more attractive, but for this beauty, coupled with reliability, you will have to pay a little more.
- Plasticized, coated with an anti-corrosion polymer - polyvinyl chloride with additives. Plastic shells have different colors (green, red, gray, blue, black), which owners can choose at their discretion. This super-protected chain-link is the most reliable product, which is why it has the highest price. However, this drawback does not prevent its popularity from growing.
These differences do not affect the way it is attached. Installation of any type of mesh is done in the same way. There is another variety - plastic, but it is not suitable for serious fencing. The exception is the use of polymer material on the border with neighbors, but only with friendly ones.
How to fasten the chain link?
Humanity does not stop in its development, therefore, here we can point out that there can be endless ways to attach a chain-link mesh. You can fasten the chain-link mesh: - with nails; - screws; - clamps; - wire; — welding; - rope; — staples; And any other fasteners and hardware that are on sale. But in this article we will tell you just a few basic simple and not very, but most reliable ways of attaching a chain-link mesh. From the cheapest to the most labor-intensive. I would also like to note that all these methods of attaching a chain-link mesh will serve you for more than ten years or, as people say, “for centuries.” Whether you bought a chain-link mesh from us or elsewhere, this information is for all chain-link meshes!
The secret of her attractiveness
Chain-link mesh is in constant demand among buyers. The reason is the strength, reliability of the fence, availability of the material, and its low cost. For some, the following advantages of the material are also important:
- does not interfere with the penetration of air and sunlight necessary for plants;
- gives a feeling of spaciousness and overview to those who do not want to close themselves off from everyone and everything;
- promises relative ease of fence installation even for a non-professional;
- does not require special care, but only if a quality product is purchased;
- allows owners to decorate the fence with climbing plants.
Chain-link has some disadvantages. This:
- fragility if the most budget type of mesh is purchased;
- low degree of protection from “criminal talents”;
- not a very pretty look.
For some, these disadvantages will be significant. Other people's point of view will be exactly the opposite.
How to choose a quality mesh?
To buy a reliable product, you need to carefully examine each of the rolls. You can hope for a successful purchase if their edges are not curved, and the cells located above and below have curved tails that extend further than half the length of the side of the cell. This product will greatly facilitate installation work.
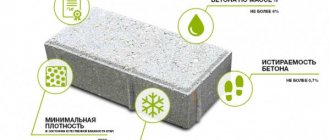
Same wire thickness, cell evenness are other important indicators. All deformations indicate one thing - the low quality of the product. When purchasing plasticized mesh, you need to inquire about its warranty period. Unscrupulous manufacturers offer chain-links covered with ordinary plastic. Such a product will begin to crumble after a few seasons. Buying a cheap product in any case becomes a “good” chance of running into a fake. A high-quality coating can stay on the mesh for 10 years or more.
Types of chain link
Depending on the purpose, the mesh is made of ordinary uncoated steel or galvanized wire. In more aggressive conditions, polymer-coated wire is used.
Non-galvanized
This mesh is made from black untreated metal. It is afraid of humidity, and after the first rain or fog it becomes covered with rust. Its scope of application is reinforcement of reinforced concrete structures and plaster, fastening of thermal insulation and other work where the metal does not come into contact with a humid environment or only contacts for a short time.
Non-galvanized mesh is inexpensive, which is what attracts summer residents to it. When installing a fence, it is recommended to cover it with waterproof metal paint or a water repellent. Protection needs to be updated at least once every 1-2 years, which, of course, increases the cost of operation.
Galvanized
A galvanized wire chain-link can last 20 years or more. The best way to protect steel is hot-dip galvanizing. An important characteristic is the thickness of the zinc layer, which is determined by the mass value per square meter and averages 70-90 g/m².
The second most reliable method is the galvanic method. The thickness of zinc during electrochemical processing is less than during hot-dip galvanizing, but it also ensures a fairly long service life of the material.
Corrosion of galvanized mesh in the first months of operation is the result of the fact that there is not enough zinc on the wire - 10 g or less. It can only be called galvanized formally. When purchasing, pay attention to this important factor.
Plasticized
The chain-link mesh with a protective polymer coating is decorative and at the same time very resistant to corrosion. This material is used in humid climates, including on the sea coast. Modified PVC is used for processing. It is evenly sprayed onto the metal surface, creating a sealed, resistant film.
High-quality polymer coatings do not crack from frost or heat, and do not fade. The mesh retains its appearance and technical characteristics for a long time.
Design options, installation methods
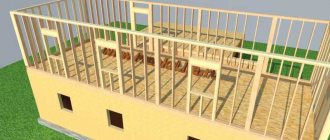
A chain-link fence is a lightweight structure in every sense. Due to its low weight and the fact that wind loads are not dangerous to it. The last fact is the basis that allows us not to put forward increased demands on the supporting elements, since the pressure on them even in a strong (hurricane) wind will be insignificant.
It’s not for nothing that the methods for installing a chain-link fence are called simple: a concrete foundation is not needed in this case. The pillars are installed in dug holes, then covered with sand or crushed stone. Such a fence can be installed without fear on any problematic soils: where the freezing depth is shallow, on clayey heaving soils, where the groundwater level is also high. Installation is done in several ways: without guides, with them, sectional.
Without guides
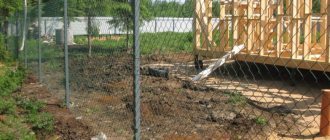
This design is the most elementary: the mesh is stretched between installed pillars. The depth of digging the supports into the ground is less than a meter.
On soils that are capable of draining water normally, the water that accumulates around the post easily goes to the bottom of the hole through sand or crushed stone, and then seeps into deeper layers. Frost is also not a problem for these supports, since frozen building material will not have a significant impact on it due to the small amount of moisture. Clays and loams differ in installation: here only gravel acts as backfill: first, 100-150 mm of material is poured onto the bottom of the hole, then a pillar is mounted.
With guides
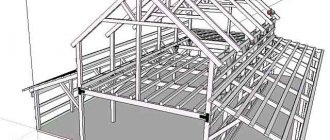
This method is chosen by those who want the fence to look better and be guaranteed to keep its shape. In this case, 2 longitudinal guides are usually attached to the supports. Potential materials are timber or pipes. The advantage of wood is its plasticity; it gives a chance to withstand ground movements without any problems. Welded metal can create some difficulties.
To avoid difficulties due to the higher degree of structural rigidity and to prevent the guide pipes from being torn off, the pillars are buried lower than the freezing depth in the region. There are no other differences: the hole is made 150-200 mm deeper than the underground part of the pillar, then a layer of crushed stone is poured into the hole, a support is inserted, covered with the same material, and compacted.
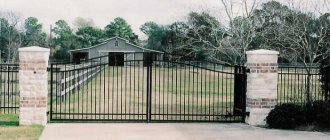
Sectional
This is an even more rigid structure, since in this case the frames are made from a profile (angle). A chain-link is pulled inside the welded sections, then the finished elements are mounted to the posts in the same way.
On clays and loams, supports are also buried deeper than the soil freezing level (200-300 mm). Concreting here is also not recommended, since the increased likelihood of the pillar being squeezed out will become not a theoretical, but a very real threat.
Decoration of a chain-link fence
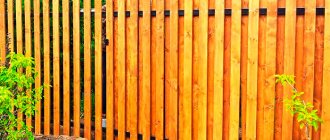
No matter how happy the fence may make you at first, after some time you will want to either decorate it or make it less transparent in order to hide from prying eyes.
The first way - the most obvious - is to plant plants. If the neighbors do not object, you can plant bindweed or any other annual or perennial plants.
The most natural way is to plant plants
If you just want to decorate your fence, you can do “embroidery”. The squares are the same size, so you can embroider as if on canvas. There are two materials for embroidery: wire and colored twine.
A decorated chain-link fence looks incredibly beautiful
The good thing about colored twine is that you can “embroider” colored pictures. Any that seem appropriate to you.
Embroidery on mesh with colored twine
Something like this
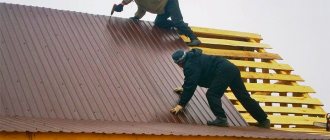
A not very aesthetic, but quite effective way is to stretch a camouflage or shading mesh. The good thing about these methods is that they require a minimum of effort: just pull it on and grab it in a couple of places.
Camouflage mesh on the fence significantly reduces visibility of the area
The shading mesh is almost opaque and the wind load will hardly change
The same effect is achieved if twigs or reeds are woven into the cells. The disadvantage of this option is its high labor intensity. It will take a lot of time.
Weave reeds or thin twigs into the mesh
Ready-made reed mats can reduce manufacturing costs. They are sold in rolls. All you need to do is roll it out and secure it. But the cost is much higher than the previous option.
Reed mat
Another way is to use artificial pine needles sold in rolls. It is used in the manufacture of baskets and wreaths, but it can also be used on a fence.
Green wall - chain-link mesh decorated with artificial pine needles
Not long ago, another way to decorate and, at the same time, reduce the visibility of a chain-link fence appeared - a photo grid.
This is a pattern printed on a polymer mesh. Sold in rolls (for tension fences) or fragments (for sectional fences). Attached using eyelets and wire or clamps built into the surface. You can see the approximate effect in the photo below. A photo grid for a chain-link fence will both decorate the fence and protect the area from prying eyes
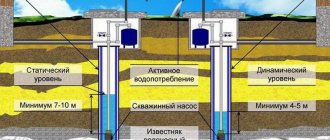
Potential pillars, their installation
The choice of material for fence supports is the first thing that site owners have to think about. There are several options.
- Wood - a log or beam. The materials are inexpensive and easy to process, but any structural elements (especially poles) made of wood have an Achilles heel - vulnerability. To ensure their long existence, the material is treated with protective impregnations: for example, waterproofing mastic. A budget alternative is painting the above-ground part, followed by long-term (several hours) impregnation and treatment of the underground part. For greater reliability, before installation, the “submersible” part of the supports is wrapped with roofing felt.
- Metal - square, round, rectangular pipes, corner. The recommended thickness of walls or shelves is 2-3 mm. The diameter of the round pipes is 50 mm, the profile cross-section is 40-50 mm, the length of the corner flanges is 50-60 mm. The best candidate is a rectangular profile pipe with a cross-section of 25x40 mm or less. There is no need for more value, since the fence will be quite light. The reason for the successful choice of metal is the ease of attaching wire, hooks, and mesh.
- Reinforced concrete pillars. The worst of the candidates, because installation will be difficult due to the heavy weight, and you will also have to tinker with attaching the chain-link to such a support. In this case, the owners will need to show miracles of resourcefulness, since it is only possible to use a long wire.
Metal supports promise the least fuss, but painting them and installing a plug to protect the inside of the pipe from moisture is mandatory. Metal or plastic caps are chosen for this role.
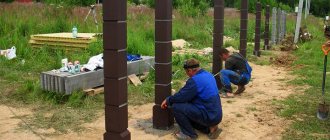
Procedure for installing supports
The first posts are installed in the corners of the site, or at the beginning and end if only one side needs fencing. Key elements are checked for verticality in each plane, and their height is simultaneously adjusted.
2 cords are pulled tightly between them: one, to adjust the height, at the very top of the supports, the second, to make it easier to find a place for the holes using a plumb line, at a distance of 100 mm from the ground. The installation step is 2-3 m. If you plan to install the mesh without guides, then 2-2.5 m will be ideal; this distance will avoid sagging. With any other method of installing a chain-link, 3 m is allowed.
A mesh stretched between corner posts without auxiliary elements can cause the supports to “lead.” To eliminate such a load, bevels are used, they are positioned correctly, and then welded between the installed racks.
Manufacturing a sectional fence
Chain-link fence
Marking and installation of support posts for a sectional fence is carried out using the technology described above. The only difference is that the posts should not have hooks, but rather welded metal plates. These plates have dimensions of 15x5 cm and a thickness of 5 mm; Weld them on top and bottom to the racks, departing 20 cm from the edges.
Installation of a chain-link fence
To assemble the sections you will need:
- Rabitz;
- steel corners 40x40 mm;
- Bulgarian;
- roulette;
- welding machine;
- reinforcement bars.
Step 1. Assembling the frame
Measure the distance between the supporting posts and subtract 15-20 cm from it - this will be the width of the frame from the corners. The height of the section is equal to the width of the mesh or the height of the post minus 20 cm. The steel corners are cut to the size of the section and welded into a rectangle. Then the scale is removed, the inner and outer surfaces of the frame are ground.
Chainlink fence
Step 2: Preparing the mesh
The roll of chain-link is laid on the ground, unrolled 2-2.5 m and carefully cut to width with a grinder. Now reinforcing bars are threaded into the outer rows of cells on each side. There is no need to connect the rods together.
Step 3. Section installation
The mesh is laid on the frame and the upper reinforcement is welded to the inside of the corner. Next, pull the mesh well down and weld the bottom rod, after which the sides are secured. The finished section is lifted vertically to the posts and welded to metal plates. You can also secure the section with bolts by drilling a hole of the required diameter in the protruding part of the plate.
When installing the next section, you must ensure that the edges of adjacent frames are on the same line. Even a difference of 1-2 cm will be noticeable and will give the fence a sloppy look. Finally, the sections are primed and painted. This way you can make a fence of any size without much hassle.
Chain-link fences are not inferior in functionality to wooden or metal ones
Fence made of welded sections
Sectional mesh fence
Methods for installing chain-link
Getting started does not foretell any difficulties. The mesh is first attached to one of the corner posts. Four places on each support is the required minimum. The most basic way is to attach it with wire passed through the cells. Such simplicity can cause a “tragedy”: one “fine” day the owners will come to the dacha, but will not find the nets.
More reliable options exist. Some owners act like this:
- Find a steel rod whose diameter is at least 4 mm. It is threaded through the meshes of the chain-link, and then welded to the support, the pitch is 400-500 mm.
- Take 3-4 rods at once, each up to 6 mm thick. They are welded to each support, then a mesh is strung on them, and the ends of the rods are bent.
- 2 through holes are drilled in the pillars, a piece of rod bent into a horseshoe is inserted there so that it grips the cells. The ends of the “hoof device” are flattened (riveted), twisted or welded.
How to prevent sagging of the canvas
Even if the mesh can be tensioned well, it may sag over time. Therefore, at the installation stage, it is necessary to take care of additional fixation of the chain-link between the supports. For this, 6 mm wire and a welding machine are used. If you are also one of those who are thinking about the question of how to tighten the chain-link mesh with your own hands, then you need to thread the wire into the second or third rows of cells horizontally. The element should be located along the entire fence.
In those places where the chain-link will be adjacent to the posts, the wire must be welded. The lower edge of the chain-link is strengthened in the same way. At the final stage, the hooks must be bent. The fence canvas should be tightly secured to the supports, while the mesh will not bend or sag.
Tension method
In this case, the chain-link mesh is stretched from pillar to post, without missing any of them. If you fasten it through one support and then work on the remaining ones, then problems (sagging or uneven tension) cannot be avoided.
Possible sagging is dealt with this way: a rod is inserted vertically into the mesh, one person pulls it strongly, and then holds it in the optimal position. Meanwhile, the assistant fastens the chain link. Without an assistant, such an ideal job is impossible.
Wire help
The tension option attracts the speed of work, but such a fence will always be threatened by sagging of the upper edge. The culprit of the fact could be a person or a large dog who decided to travel a little. To avoid such consequences, a wire is pulled through the top row of cells: steel or protected with plastic.
This operation is performed by wrapping the pillars with wire loops. They start with the outermost element, then move on to organizing the perimeter: on every 2-3 supports, wire loops are again made, trying to stretch the material as much as possible. Then the wire is twisted on the “loop” posts using a thick metal rod. The last stage is attaching the mesh, which is fixed to the wire.
A few more “wire” methods:
- Attaching to lug-bars welded to the top of the posts, however in this case the work runs the risk of going much slower.
- Using factory wire tensioners. After being secured to the first support, on the second the wire is passed through the device. It is secured in a clamp and screwed onto a drum.
- Installation using a cable and rigging - lanyards - hooks with clamps. In this case, the cable is passed through the cells, so the best type of chain-link is plasticized.
Welded rod
This method also involves fastening through mesh cells, and you can use both the top row and the following ones. A steel rod is threaded through them, its diameter is 6-8 mm. It is first cut into pieces, the length of which corresponds to the distance between the pillars. Sections with a strung mesh are welded to the supports.
Attaching chain-link mesh to metal posts
Before we figure out how to secure the chain-link mesh to the support posts, let’s consider what methods exist for installing this material.
Scheme of fastening to metal poles
Attaching the chain-link mesh to the corrugated pipe is carried out in 2 ways:
- Tension method.
- Fixation of sections.
Regardless of the chosen method, for installation work you will need:
- mesh material in rolls, in the volume necessary to cover the perimeter of the fence;
- steel strips and angles;
- welding machine;
- screwdriver;
- fasteners (bolts, screws, nuts, washers);
- perforator;
- wire cutters and pliers.
Option for fixing the chain-link to the corrugated pipe
Correct installation of the fencing mesh is carried out with extreme caution.
Therefore, protective gloves will also be needed. The main danger is the sharp ends of the horizontal parts of the wire. They must be bent immediately after the chain-link is fixed.
With guides
They are called slugs, which are welded/attached crosswise to the posts. Their role is played by pipes or wooden planks. The number of guides is different: it is possible to make one, but no one has the right to prohibit the owner from a stronger structure, consisting of even three slug elements.
Mounting methods also vary:
- The simplest is with the help of wire, which is used to fasten the chain-link not only vertically, but also in the horizontal plane.
- Absolutely all methods described in the previous method are used.
- They resort to fastening the chain-link with plates. This method is suitable for posts and guides. The ends of the bolts holding the plates are riveted for reliability.