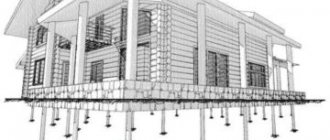
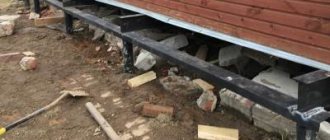
The reliability and durability of the entire building depends on the quality of the foundation. Construction of a house on screw piles can be carried out on unstable soils, in a flooded area, on a site with difficult terrain, in seismically active areas.
This technology is one of the most cost-effective. It is quite easy to install screw piles with your own hands. From this article you can glean information on how to properly install screw piles so that the building will serve for many years without repair.
What are screw piles
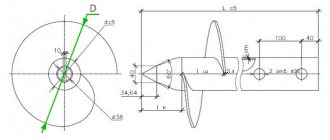
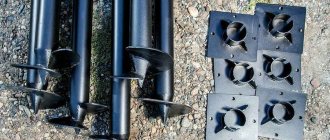
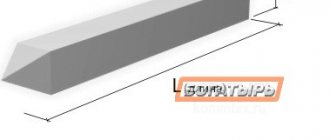
Screw piles are made in the form of a metal pipe with a tip and screw blades at the bottom. Can be used on difficult soils. They are not suitable for installation on stony and rocky soils, as they will not be able to penetrate a very hard layer when drilling.
The lifespan of a house depends on the correct installation of piles
The dimensions of the supports depend on the mass of the raw materials from which the house will be built and the load-bearing load of building materials, people and objects in the house.
In addition, the calculation takes into account the average mass of the snow layer that may be on the roof in winter.
The service life of the entire building will depend on the correct installation of the pile-screw foundation.
Screwing screw piles is beyond the power of one person; auxiliary workers will be needed to complete the work.
Installation steps
The reliability and durability of a pile-screw foundation is ensured not only by the quality of building materials, but also by compliance with the installation technology. Installation of screw piles is carried out in several step-by-step stages:
- Soil assessment, project development, calculation of the number and size of piles, as well as their type - with a cast or welded tip.
- Marking of the building site.
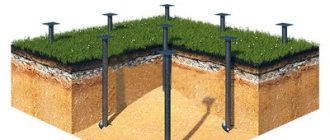
- Installation of piles in compliance with the depth and accuracy of vertical twisting.
- Concreting, adjusting the height of the supports, tying with a profile pipe or channel.
The process of manual installation of each pile involves 3 people. One monitors the correctness of the work being performed, while others screw in the support manually. Depending on the type of soil, installing one support can take from 5 to 60 minutes.
Where to begin
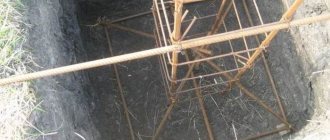
To determine the type of soil, it is necessary to remove the soil from deep layers.
Before deciding to build a house on stilts, you need to study the condition of the soil and determine the level of groundwater. Such information can be obtained from geodetic, construction organizations or from neighbors who are or have carried out construction.
To independently determine which soil layers lie beneath the construction site, test drilling is carried out. In several places on the site, wells are dug, 1.5 m deeper than the length of the pile. Particles of soil present inside the well remain on the drill blades.
If a flooded area is detected, you need to position the piles for the screw foundation so as to bypass it.
Obstacles to installation
Large stones in the soil mean that the place is not suitable for driving piles.
Installation of pile-screw foundations is carried out using a hydraulic apparatus or manually.
Do-it-yourself installation of screw piles is done by screwing in the support like a self-tapping screw.
Obstacles to installing a pile-screw foundation may include:
- the presence of large cobblestones (more than 5 cm in diameter) or debris in the soil;
- occurrence of concrete structures from old buildings in the ground;
- the root system of trees will significantly complicate the screwing of piles;
Manual installation technology involves using a long lever to screw in screw piles. If there is a building, fence, pole or tree close to the installation site of the foundation supports, the lever cannot be rotated 360 degrees. This will serve as an obstacle to constructing a foundation on screw piles.
The feasibility of manual installation of screw piles
The attractive side of this type of foundation is the absence of excavation work; it is not even necessary to carry out planning within the contour of the building. Pile foundations are well suited for weak and water-saturated soils, being practically the only reasonable solution in such circumstances.
The blades in the area of the lower cut of screw piles significantly increase the bearing area compared to submersible or bored analogues.
The wider the diameter and the denser the soil, the harder it is to screw in the piles
The pile shaft in the form of a steel pipe with a thickness of 3.5 mm can withstand significant loads with its own low weight. The piles arrive at the construction site in full factory readiness, without the need for additional manipulations. However, installing screw piles manually requires a correct assessment of your physical capabilities.
The effort required for installation depends on:
- pile diameter;
- diameter and number of blades;
- density and structure of the soil.
It is rational to use the manual method in cases where the base contains sandy, sandy loam or loamy soils consisting of dispersed particles with low cohesion. Manually screwing screw piles into rocky soils, especially those containing large inclusions or dense clay, may require too much effort and take extra time.
In this case, it is recommended to use specialized equipment or mobile equipment that develops sufficient torque and is capable of driving the pile into dense soil.
Determining the length of the pile
On stable soils, it is enough to screw in the piles to a length of 2.5 m.
The length of the supports used to construct a screw foundation will depend on the soil, the depth of its freezing and the level of the grillage.
If there is stable soil on the site, it will be enough to install supports 2.5 m long. On complex terrain with differences in height, structural elements of various lengths will be needed, depending on the height of the terrain.
On unstable soil, the support should be of such length that it reaches stable, compact soil. Its location is determined by test drilling.
You need to screw in the screw structure to the depth where sand and clay lie. Stable soil will ensure that the load-bearing element is firmly anchored in the soil. The presence of a dense fraction is determined by the particles remaining on the blades.
After this, the depth of the formation is measured. Lower a pebble into the well on a rope until it touches the bottom. Make a mark on the string, lift it and measure the length.
In seismically active areas, the length of the well must be at least 4 m. Supports are purchased half a meter longer than the design ones. It is better to cut off the excess later than during the drilling process it turns out that the length of the pile is not enough.
Choosing the right diameter
The diameters of piles produced in production and their purposes are indicated in the table:
| № | Diameter | Purpose |
| 1 | 5.7 cm | Suitable for installing chain-link fences. |
| 2 | 7.6 cm | They are used as supports for concrete fences, small utility buildings, and country houses. |
| 3 | 8.9 cm | Suitable for the construction of one-story houses. One such pile can withstand a load of 3 to 5 tons. |
| 4 | 10,8 | They are used in the construction of two-story houses made of light building materials. A support of this diameter can withstand a load of 5 to 7 tons. |
Calculation of the mass of the house
Calculate the total weight of all construction and finishing materials that will be used during construction. The estimated maximum weight of furniture, household items, and people who will be in the house are taken into account. Calculate the mass of the bathtub or pool, taking into account that the tank will be filled with water.
Take into account the load of the snow layer that may lie on the roof in winter. This indicator is calculated on the map depending on the region:
Calculation of the number of piles
The number of supports that will be needed for the foundation will depend on the project and the load-bearing load of the house.
Regulatory requirements:
| № | Material of construction and other factors | Distance between supports |
| 1 | Frame and wooden houses | No more than 3 m |
| 2 | House made of foam blocks, gas blocks and other lightweight materials | No more than 2 m |
When carrying out construction in a climate zone with strong winds, the distance between supports is reduced to 2.5 m.
The number of piles is calculated by the formula: add up all possible loads, and divide the resulting value by the load-bearing load of one pile.
How to install screw piles with your own hands?
To ensure successful construction, the following preparatory stages are carried out:
- calculation of the number of piles based on the perimeter of the building;
- using pegs, the location for installing the structure is marked;
- clearing the area of large debris, stones, uprooting trees, removing stumps and bushes;
- with the help of geological and topographic companies, the location of groundwater, the composition of the soil and the depth of its freezing are determined.
For soil that is richly saturated with moisture, elements with large blades are used. Screw pipes are installed to a depth of at least 2 meters from the line of freezing and groundwater flow.
Screw piles require the use of additional devices, for example, shovels and a welding machine.
To calculate the number of screw structural elements, you must adhere to a certain distance between the supports:
- for buildings made of wooden beams - no more than 3 m;
- no more than 2 m for houses made of light stone (foam block, cinder block);
- when forming a foundation for fences - up to 3.5 m.
After completing the preparatory work, the main installation stage begins.
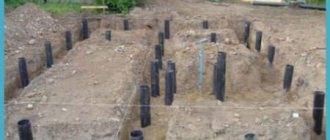
Rules for placing piles
Piles are placed in the corners of the future structure and in the center of the supporting structures
. Before installing the piles, you need to mark their location on the site. To do this, they initially draw on paper a plan for the placement of supports, guided by the design documentation.
The house plan is divided into rectangles, and the size of each plot is calculated. A pile is placed at each corner of the rectangle and in the center of all supporting structures.
After the location of the supports in areas with the maximum load-bearing load has been determined, the remaining distance between the elements is divided into equal segments. Depending on the estimated number of supports, they are evenly distributed around the perimeter. For more information about the layout, watch this video:
If the project provides for columns or a fireplace, there must be a support under them.
Installation of piles
To drive the piles, three people are required.
Having completed the layout and removal of the centers of the piles to the area, you can carry out “leader drilling” to facilitate the driving of the piles. A hole about half a meter deep and with a diameter close to the size of the pile shaft will save forces at the first stage and prevent the channel from moving away from the design one.
Since the main load is carried by the blades of the pile and part of the shaft, which is under soil pressure, a puncture below the relief level will not have a negative impact.
After passing through the preliminary channel, its positioning relative to the axes is checked. To do this, the tension of the thread is restored along the required axis, the plumb line is lowered and the amount of displacement of the well from the design position is specified. If necessary, it should be adjusted.
Without attaching a torque mechanism to the pile, it will be difficult to tighten the base
Screwing the piles begins with preparing the head for the installation of levers that ensure the transmission of torque. Usually a special nozzle is used, fixed with a bolt on the upper cut of the pile or hole for passing the lever. The second option can lead to deformation and weakening of the upper section of the product, so it is better to limit its use to buildings that do not carry a significant load, for example, fences or sheds.
Having inserted levers of sufficient length into the eyes, usually three to four meters, and having fixed the pile in its initial position, they begin to rotate it, while simultaneously controlling the verticality using a plumb line or a building level. Thus, a minimum of three people are required to complete the work. To learn how to turn screw piles with a drill, watch this video:
For better control, you can move the axis on the cast-off by a distance equal to half the diameter of the pile and tighten the thread. This allows you to accurately maintain the position on the axis, correcting it if necessary, since a hand-screwed screw pile, especially when the head is still at a high altitude, is subject to asynchronous forces that easily disrupt its centering relative to the design position.
After the blades are immersed, the possibilities for adjusting the position of the pile will be minimal; excessive forces will lead to deformation or bending of the shaft.
Do-it-yourself pile installation
To drive the piles, you will need several pairs of working hands.
In small areas, installing a pile foundation using special equipment is unprofitable; it is much more profitable to drive the piles with your own hands.
To do this, you will need a device consisting of a piece of pipe. It should be slightly larger in diameter than the cross-section of the screwed-in support. This pipe must have holes for connecting to the screw structure with bolts and two eyes for installing levers.
You can screw in one support yourself within an hour, depending on the type of soil in the area. You can twist load-bearing elements up to 400 cm in length using the strength of several assistants. Two people will screw in the screw structure, and one should ensure that the vertical plane is maintained using a magnetic level. For detailed instructions, watch this video:
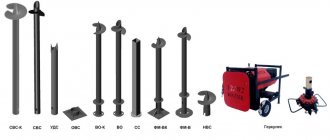
Tools
You will need devices for tightening screw piles:
- thick-walled pipes with a diameter of 5 cm and a length of 250 cm will be used as levers;
- tape measure, magnetic level;
- shovel, crowbar, sledgehammer, hammer;
- chalk or marker;
- wooden pegs or reinforcement rods;
- grinder for cutting piles to height after completion of foundation installation.
Installation technology
Monitor the vertical level of the pile after each turn.
To learn how to install screw piles, you need to study the installation technology. The work is carried out using a twisting device made by hand.
The question often arises of how to tighten screw piles with your own hands so that they do not deviate from the vertical level.
To do this, you yourself need to strictly control the actions of your assistants and the compliance of the screwed-in element with the vertical plane after each 360-degree turn.
After preparing and marking the area, the supports are treated with anti-corrosion compounds. According to the technology, screw piles are first installed in the corners.
Rules for installing piles:
- A drill is used to make a hole for mounting screw piles, smaller in width than the diameter of the support. The depth should be 30% of the pile size.
- A device is made for screwing screw piles. You need to place a metal element in the prepared hole. A crowbar is installed on the screw piles, inserting it into the technological hole from above. Pipes are placed on the edges of the crowbar, allowing the length of the lever to be extended to 2.5 m. The longer the lever, the easier it will be to screw the support into the soil.
- Two people take the levers and tighten the piles by hand. The third holds it in a vertical position and controls after each rotation that the support is immersed strictly at the vertical level.
- If the structure cannot be screwed in and loosens the soil, it is loaded. To do this, either two people hang on the levers, or one sits on top. When the screwed-in element rests against a solid object and it is impossible to move it further, leave it as is, and cut off the excess length.
- The upper parts are cut horizontally using a laser, bubble level or rangefinder. The technology for installing screw piles involves shortening the length by 100 mm. In some cases, the supports for a screw foundation are shortened by a greater distance.
- To impart strength and protect against destruction under the influence of moisture, hollow structures are filled with concrete.
- If necessary, a wooden or concrete grillage is built, which serves to uniformly transfer the load from the house to the piles.
When building a house on a pile-screw foundation, you must strictly adhere to the technology of installing screw piles.
Manually tightening screw piles
The most attractive aspect of this method is its low cost. However, this major advantage will have to be offset by significant labor costs, since the torque is generated by the combined muscular efforts of two or more people. The process of manually screwing screw piles looks like this:
- First, the pole marking the location of the pile is removed, after which pits are dug at this location to the depth of the blade of the screw pile.
- After preliminary preparation of the site for driving the piles, they begin to assemble the gate - the main driving force for screwing in the screw piles manually. A solid metal rod (for example, a regular crowbar) is inserted into the head eyes, and the pile itself is placed in a calibrating hole or installed in a calibrating hole. Then two pipes of suitable size are put on the rod (crowbar) (their internal diameter should be slightly larger than the diameter of the rod). The gate is assembled.
- The most crucial moment is screwing the screw piles into the ground. It occurs through the transmission of torque from the gate levers to the support. The rod rotates, screwing into the soil, pushing the ground apart with its blades. The entire process is generated by two (if necessary - 4) people moving in a circle with levers in their hands. In this case, it is necessary to have one more worker who must monitor the process of driving the pile using a geodetic instrument (theodolite, level). Control of depth to the design mark when tightening screw piles is carried out manually using a ring marker, which is applied to the surface of the pile in advance.
- Trimming the piles to a horizontal level in accordance with the design mark, cutting off the installation hole.
- Concreting the pile cavity (to displace oxygen and prevent corrosion of the pile from the inside).
- Creation of a supporting structure: welding of the heads followed by installation of a grillage.
- Achieving the required torque when using the manual pile driving method can be facilitated by increasing the length of the gate lever. The great advantage of this method is the possibility of ideal vertical immersion of screw piles. In addition, the range of installation possibilities is much wider (installation in cramped conditions, difficult access roads to the installation site, etc.).