A blind area is a path made of hard or soft materials, the main function of which is to drain water from the base of the building.
It protects the foundation of the building and guarantees a long service life. It can be built from various materials, but, most importantly, you must follow the manufacturing technology, otherwise it will not perform its functions efficiently.
This article provides step-by-step instructions for building a soft blind area around the house with your own hands.
What it is?
A soft, or flexible, blind area is a protective layer located along the perimeter of the structure. The main function of the structure is to drain melt and rainwater from the foundation. It does not have a continuous hard surface; instead, decorative stone, soil with lawn grass or paving slabs are used.
The soft blind area has a longer service life, it is more durable than the hard one.
The structure does not collapse due to soil heaving , since the concrete blind area is susceptible to the formation of cracks and splits.
In addition, this is the simplest and most economical finishing method that does not require concreting or asphalting.
Types of blind area
There are three main types of blind area:
- Tough.
- Semi-rigid.
- Soft.
Blind areas made of concrete are considered rigid. There is modern decorative concrete on the market that looks very aesthetically pleasing.
There is also an option to coat regular concrete with special rubber paint.
Blind areas made of paving slabs are classified as semi-rigid.
Soft blind areas are made from bulk crushed stone, but the top layer can be very different.
A blind area made of tiles is easy to repair and has an attractive appearance, and a soft blind area is the cheapest to make; you can do it yourself. The soft blind area has a number of features.
Feasibility of construction
A solid blind area is the most popular option used to remove moisture from the foundation, thereby extending its service life.
But it will not always function correctly, for example, in conditions of heaving soil, a solid structure is rarely used .
In this case, it is advisable to install a soft blind area, which is simpler, cheaper and more repairable. In addition, you can put insulation and waterproofing, as a result of which the structure will perform the same functions as a solid one.
How to properly make a blind area around the house?
If you compare the blind area with an object or element of clothing, then at first it may seem as if it is something like a white collar for your home. Indeed, the blind area gives the appearance of your home a certain completeness and solemnity.
But it’s not only beautiful, the blind area is necessary for the house, just like you need a scarf in winter. In addition to its aesthetic function, the blind area protects the foundation of your house from frost, and the soil under the house from erosion .
So, how to properly wrap your house with a “scarf”, that is, create a blind area that will protect your house?
When planning the installation of a blind area, you must understand that in this matter not everything will happen the way you like. At some points, for the blind area to work properly, you will need to rely on specific standards and criteria, for example, regarding the depth or width of the blind area.
Tune in to the fact that this work is most likely not a one-day task. It is quite possible that you will have to do this work together with someone, especially if you do not have much experience in the construction business.
Pie diagram
In a soft blind area, elements that perform the function of draining water are located in the lower layers. If the blind area will be installed on permeable soil, it is recommended to make a bedding layer of clay, 15-20 cm thick.
It is better to choose oily clay ; it allows moisture to pass through to a lesser extent. After laying, it is recommended to level it, ensuring a slope of 30-50 mm/m, and compact it thoroughly.
Thus, the first layer in the soft blind area will be clay. Further:
- Waterproofing - it is best to choose a PVC membrane, polyethylene or roofing felt. The width of the material should be 15-20 cm wider than the clay layer. It should be laid overlapping on the wall, attached using a strip or gluing. This is necessary so that when the soil freezes and thaws, the material does not move and empty areas do not form. The opposite layer of waterproofing rises along the ground to the sand level. Waterproofing sheets are laid overlapping each other to ensure sufficient tightness.
- This is followed by a 5-10 cm layer of sand, covered with geotextile on top . This is necessary to protect against chemicals as well as plant roots. Geotextiles are fixed to the wall along with waterproofing.
- 10-15 cm layer of crushed stone , on the outer layer of which a drainage pipe is laid. It is imperative to make drainage grooves along the perimeter of the blind area.
If other material (pebbles, cobblestones, paving slabs, etc.) will be laid on top of the crushed stone, then it should also be covered with a layer of geotextile and covered with sand. Otherwise, the crushed stone layer may be higher than the ground level. To prevent crushed stone from sinking into the ground, curb tiles should be installed.
Mistake #2. Stagnant water
Water that has fallen from the roof remains on the surface of the blind area and forms puddles next to it. This only means that the authors of the blind area did not take care of the slope of its surface. According to the above-mentioned standards MGSN 1.02-02 TSN 30-307-2002, the transverse slope of the blind area should be taken at least 10%. For example, if the width of the protective tape at your dacha is planned to be 1 m, then the height difference between the longitudinal sides of the formwork should be about 10 cm, and no less!
The importance of lateral slope
A failed height difference can be a consequence of unsuccessful concreting of a monolithic blind area if, at the stage of hardening of the concrete mixture, the builders did not ensure that it was given a transverse slope, and the concrete “stacked” into a horizontal position.
The blind area should drain water from the foundation
Drainage trays for drainage along the outer perimeter
The story with water does not end there: to drain it along the outer perimeter of the blind area, it is advisable to provide drainage trays. These can be modern plastic boxes, closed on top with metal bars, or simply sawn along the pipe, laid on a reliable base.
And we will take care of beauty
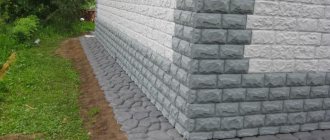
And it is reasonable to frame the structure of the blind area around the perimeter with curb paving stones. It will give the building architectural completeness.
Pros and cons of flexible design
The main advantages of the design are:
- Resistant to temperature changes.
- The material is not subject to shrinkage, which improves its quality characteristics and does not harm the base of the structure or building.
- The soft blind area does not require periodic repairs.
- If a special membrane is installed during the installation of the structure, its thermal and waterproofing qualities will improve, as well as frost resistance and immunity to seasonal soil heaving will increase.
- You can install the soft blind area yourself.
- The design can serve a decorative function. Depending on personal preferences, you can pour multi-colored stones onto the surface of the blind area, plant grass, or organize a flower bed.
Despite the predominant number of advantages, the design also has disadvantages. For example, the need for constant care, since grass can grow through the stones, plant roots can grow, etc. The surface of the pebbles requires constant cleaning of dirt.
Soft blind area: features, types
The soft blind area performs its functions thanks to deep layers that ensure structural integrity, which does not depend on damage to the top layer. To perform its functions, such a blind area only needs to have layers placed in strict sequence and according to strict placement rules.
The soft blind area includes seven layers:
- Waterproofing layer. Made from roofing felt and polyethylene. The best modern solution would be a polyvinyl chloride membrane for the foundation blind area, since it can best meet the requirement for this layer - to be durable and resistant to frost.
- Layer of clay. The layer is important on loose soils.
- Drainage. This layer is laid from crushed stone, pebbles or similar material. The layer is responsible for drainage flow.
- Geotextile layer. This layer allows you to distribute the load and prevent mixing of the layers of the blind area. This is a special fabric that allows air and moisture to pass through well. Geotextiles can protect the drainage system from flooding, so the design does not require pipes to drain water.
- Insulation layer. Most often, extruded polyurethane foam, expanded clay or polystyrene are used to organize this layer.
- Border and decor. The border fixes the structure and protects it from spreading, also performing an aesthetic function, and the decorative material gives a complete look. Can be made using any material - paving stones, colored crushed stone, lawn.
Advantages of a soft blind area:
- It is budget-friendly and does not require hiring specialists - you can do it yourself.
- It is flexible, which means it cannot break.
- Does not require special care.
- Not subject to freezing due to the use of special insulation.
- Resistant to temperature changes.
- Allows you to choose any covering – usually lawn grass or a flower bed. Organizing the top layer of the blind area in the form of a flower bed is becoming increasingly popular.
The soft blind area also has disadvantages:
- Not durable.
- May become covered with weeds and plants.
- It takes longer to build.
To organize a soft blind area you will need:
- Roofing felt and water-repellent membrane for foundation blind area.
- Geotextiles: needle-punched for clay surfaces, and thermally bonded for rocky surfaces.
- Shovel, gloves, stakes and string to stretch between stakes to ensure a level surface.
- Clay without impurities.
- Crushed stone.
- Sand.
Choose high-quality consumables to reliably protect the foundation.
The advantages of a blind area with a membrane and the order of its organization are in the video:
Tools and building materials for work
Materials for creating a soft blind area should not contain impurities. Consumables for the construction of a soft blind area must be of high quality, otherwise the quality characteristics of the entire structure will deteriorate.
It is recommended to use rolled materials as a waterproofing material; their installation is easier.
A wide range of waterproofing materials are available for sale:
- roofing felt,
- PVC films,
- polyethylene membrane.
For the top, drainage layer, sand or crushed stone is most often used, less often pebbles, gravel, and expanded clay. In the case of a soft blind area, it is necessary to lay geotextiles, which protect the structure and foundation from moisture and also help to evenly distribute the load.
The material is selected depending on the type of soil:
- thermally bonded – for rocky soil;
- needle-punched - for clay;
- woven - rarely used due to low quality characteristics.
It is also recommended to use thermal insulation material, which will help prevent the negative impact of low temperatures on the structure. As insulation, preference should be given to penoplex or expanded polystyrene.
If the soil is loose, it is recommended to lay a layer of rich clay at the bottom of the trench. Sand or crushed stone is placed on it as drainage.
Mistake #3. Violation of regulations for concrete work
The sad consequence of mistakes of this kind will be the appearance of cracks on the concrete surface of the blind area. How they threaten the foundation structure is not difficult to guess even for a summer resident who is far from construction.
Concrete production must be carried out strictly according to the rules.
The composition of the concrete mixture is probably known to every summer resident: cement, coarse aggregate (crushed stone fraction up to 20 mm), fine aggregate (sand), water. Then why are there so many mistakes on the dacha horizon? The answer is clear: firstly, the errors lie in the incorrect mixing algorithm. Secondly, in violation of the weight ratio of the components: this often happens if they are measured by eye. Experts strongly recommend abandoning such frivolity. Making concrete is not a case where you can count on chance. You can accurately dose the components even in country conditions. How ? In my opinion, nothing better than ordinary buckets has yet been invented, and if in addition you use a steelyard (even a very simple one), the weighing accuracy will be sufficient.
Cracks in the blind area are the result of improperly prepared concrete mixture
Concrete mix proportions
Sequence of mixing components
Mixing time
How long does it take to rotate the bulb of a household concrete mixer? To mix the dry ingredients, 2 minutes are enough, and after gradually adding water, another 2 minutes.
Not only the sequence of adding components is important, but also the mixing time
Eliminate the appearance of cracks
Compaction and tilt
The final stage of concreting is compacting the concrete mixture and imparting a slope in the transverse direction. You will have to rent a vibrating plate, the operation of which will ensure high quality finishing work.
Step-by-step instructions for the device
When arranging a soft blind area, the following must be taken into account:
- the structure should be 15-20 cm wider than the roof eaves;
- the width must be at least 60 cm, and in case of unstable soil - up to 1 m;
- the depth also depends on the type of soil (usually from 10 to 20 cm).
This type of blind area is usually soft and multi-layered. The first is cheaper and simpler, the second will require more time and money.
In addition, geotextiles are necessarily used in a multi-layer blind area, which protects structures from the negative effects of chemicals, plant roots, etc.
Multilayer blind area is of better quality ; it reduces soil mobility and prevents mixing of layers among themselves. Geotextiles do not allow moisture to pass through and are not clogged with small particles of dust and lime.
The material is laid after leveling and compacting the sand layer, thereby preventing the crushed stone from mixing with the sand.
To make the appearance of the structure attractive, it is recommended to lay a decorative layer . This can be tiles, crushed stone, etc. Before laying it, another layer of geotextile must be laid.
In places with cold climates, it is recommended to lay a layer of insulation. Sheet polystyrene foam is most suitable for this, as it is easy to lay and process. Applying insulation using the spraying method is significantly more expensive, but at the same time much more effective and durable.
Installation technology:
- The top fertile layer is removed to a depth of about 30 cm, width - up to 80 cm (sometimes up to 1 m).
- A 10 cm layer of clay is placed at the bottom of the trench, after which it is compacted. Be sure to make a slight slope from the walls to the site.
- A waterproofing film is covered, one edge is attached to the foundation, and the other to the ground.
- A layer of sand is poured to protect against mechanical damage.
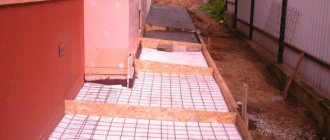
- Geotextiles are laid to prevent sand from mixing with crushed stone.
- A 12 cm layer of granite crushed stone is poured.
- After this, you need to lay another layer of geotextile, and pour a layer of sand on top.
- Next, you can decorate the blind area at your discretion.
If everything is done correctly, the result will be a high-quality blind area that will not be afraid of cold, moisture, etc.
Do-it-yourself insulated soft blind area with a stone border - in the video:
Step-by-step instructions for doing the work yourself
Creating a soft blind area involves performing several stages. A certain type of work requires attentiveness and competent execution of basic tips and recommendations.
It is better to start arranging the blind area at the stage of building the foundation, since excavation will be much easier.
Preparation
This stage consists of marking and ground work. The instructions are as follows:
- Mark the area according to the future parameters of the blind area. To do this, use pegs and twine. The result should be a rectangular shape in the form of a sidewalk along the entire perimeter of the building.
- Remove the fertile layer of soil. Level the bottom of the trench using a level. Then compact it by pouring small crushed stone.
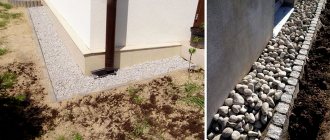
- Dig a small ditch along the edge of the trench to subsequently create a hidden stormwater system.
- Cover the bottom of the trench with moistened clay without sand and other foreign impurities, 20 cm thick. Level it so that the shape acquires a slope away from the building. Allow the clay to dry, systematically moistening it with water to prevent cracks from occurring.
If insulation is used, then increase the depth of the trench by 1 m.
Arrangement of the drainage system
The water drainage is laid in such a way that the runoff is directed into the drainage. You should not install the drain into the soil, since with heavy rainfall the soil will be heavily washed away under the water barrier and will eventually settle.
For drainage, install drainage pipes with a diameter of 10 cm . Pre-wrap them with geotextile for insulation.
Treat corners and intersections with tee manifolds. They will connect the channels to the upper outlet. Place the drain in a groove, which was previously filled with crushed stone and soil in a ratio of 70:30.
Layering
Occurs only after the clay layer dries. The stages are as follows:
- Fill in a layer of medium grade crushed stone 10-12 cm thick. Be sure to create a slope away from the building. It is 2-3 degrees or 2-3 cm per 1 m of structure.
- Level the slope with sand in 2-3 layers. Break them with geotextiles, compact them well and moisten with water. When laying the material, create an overlap of 15 cm on the wall.
- Place a geomembrane on top of the sand layer with a 15 cm overlap on the wall. It also needs to be laid at the bottom of the drain channel tray.
- Install collectors and pipes with geotextiles.
- Cover the geomembrane with a drainage layer. This way the water will not linger on the embankment.
- Pour a layer of sand and gravel up to 4 cm thick. Place geotextiles for leveling.
Insulation
Experts recommend insulating the soft blind area, especially if there is a basement in the building.
Insulation will reduce the impact of low temperatures on other materials and extend their service life.
Extruded polystyrene foam and polyurethane foam can be used as insulation. Each option has its own recommendations:
- Expanded polystyrene. Advantages: low moisture absorption coefficient, high mechanical strength, lightness, ease of processing, durability. Sheet sizes are 10 and 5 cm. Mount in one layer. Lay a waterproofing film on top.
- Polyurethane foam. The main advantage is low moisture absorption rates. Disadvantages: high cost, need to use special equipment. Install in two layers by spraying the material.
Waterproofing
This stage involves laying rolled material on top of the thermal insulation layer. It is better to use a profiled membrane. The manufacturer should be chosen based on personal preferences and financial capabilities. Lay the pieces of membrane overlapping: separate the geotextile from the tenons of the material, fix it with four tenons (minimum 10 cm), and insert it tightly into the grooves. Seal the joints with adhesive tape.
Important - make sure that there are no gaps, otherwise all the work will be pointless.
Return the geotextile to its place and seal the joints with tape . The minimum width of the tape is 5 cm. Fix the membrane to the wall using special fasteners - mastic. The height of the material entry should be 15 cm.
Finish: Protective coating options
Here the leveling of the soft blind area or finishing occurs. This is the main advantage of a soft blind area. A person can decorate a local area based on his own desires and financial capabilities.
Popular finishing methods:
- Granite crushed stone . Select material fraction 20-25 mm. Create a canvas over the base, then compact it well. Additionally, you can move the blind area lower by 10-15 cm. This will make it possible to pour a small layer of soil on top of it to create a neat line between the structure and the lawn.
- Combination of materials . This option involves the use of various decorative bulk materials, tiles. You can try combining clinker tiles with marble chips, colored crushed stone with pebbles, and so on.
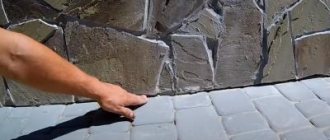
- Paving slabs . Before laying the tiles, pour a layer of sand onto the waterproofing material and compact it well. Then apply a small layer of primer and install it. Make sure there are no gaps. Fill the tile joints with cement mortar or primer.
The finishing coating can be made from any building materials. The final result depends on the imagination and desire of the home craftsman.
Possible installation errors
A soft blind area is a good alternative to a concrete path, the cost of which is several times higher. With proper installation and care, it will last for many years.
During the construction of the structure, possible mistakes should be avoided:
- The dimensions and location of the trench are incorrectly selected. The blind area should be located around the entire building, and be 20-30 cm wider than the roof canopy. If the building has a porch with a roof, then the blind area in this place should be wider to prevent moisture from entering the foundation area.
- Water stagnation. Failure to follow installation techniques can result in water pooling near the foundation, resulting in the formation of puddles. Therefore, do not forget about the construction of a transverse slope and drainage trays that will remove water from the structure area.
- Lack of insulation, especially on heaving soils. The fact is that prolonged frosts and thaws lead to oversaturation of the soil with water and its swelling. This leads to the fact that the load on the building elements becomes uneven, which is why cracks appear on the foundation and it collapses.
- Lack of waterproofing of the soft blind area. Gravel is usually poured onto the top layer of such a structure, tiles are laid, or a lawn is planted. They easily let water through, so they need high-quality waterproofing. It will create a sealed layer and prevent precipitation from destroying the foundation. Waterproofing must be laid with an overlap onto the foundation of the building.
What does the concept mean?
Based on the type of covering, blind areas are divided into hard and soft . The first option includes concrete, asphalt, and finished with paving slabs. The second one is sprinkled with crushed stone, crushed granite, gravel and covered with a lawn.
A rigid blind area cannot always be integrated into the landscape; it requires attention and repairing such a structure is more expensive. Therefore, in some cases, the best solution would be to choose a soft coating.
A hidden blind area is a moisture-proof and heat-insulated coating that protects the base of a building, which in appearance does not differ from the rest of the site.
It is created using a lawn that covers the traditional “pie” (layers of building materials located underground) of the blind area. At the same time, the main functionality of the design is completely preserved.
In what cases is it possible to create a structure, and in what cases is it not?
There are several reasons why owners choose a hidden blind area to decorate the area around the building:
There is no desire or time to pour concrete.
The process of creating a rigid blind area is labor-intensive, requires significant costs for materials and takes a lot of time to dry the material. When frost is approaching and the construction budget is tight, many choose the simplest and most economical option - a hidden soft blind area.- The site has heaving soil.
The hidden blind area is laid on the top soil layer, the depth does not exceed 40 cm, which is half the level of soil freezing in central Russia. With the onset of cold weather, the heaving soil begins to move: the moisture inside freezes and begins to expand, creating additional pressure on the foundation and the blind area itself. Insulating the structure allows you to minimize the effects of heaving on the base, and the soft blind area cannot be damaged; its “pie” does not contain materials that can crack. - An excellent option for any type of foundation: strip, monolithic, pile, columnar.
The grass surface requires care and has high humidity , dew accumulates on it, and microorganisms live on it. Experienced builders do not recommend creating such a structure near houses with a wooden base (this especially applies to old buildings).
The wood can become damp and moldy on the outside, with subsequent transfer to the interior structures. Or you will need to constantly maintain protection, a waterproofing layer on the basement walls around the entire perimeter.
There are no restrictions for buildings with a solid base lined with concrete, stone, brick and other materials protected from moisture.
The cheapest and easiest option
A soft blind area is considered the most inexpensive and simple way to protect the foundation from moisture. Crushed stone or sand are most often used for the top layer ; they are cheaper and easier to work with.
The most economical and simple option is to plant ornamental grass or form a flower bed on a blind area. This will not only reduce the financial costs of arrangement, but also improve the appearance of the site.
It is better not to skimp on waterproofing and geotextiles, as they play a primary role in structural reliability and durability.
It is worth noting that the soft blind area is highly susceptible to spreading, since bulk materials are most often used for the top layer. To prevent this, a concrete curb is laid around the perimeter of the structure .
To make it cheaper, it can be replaced with wooden formwork, which is mounted in poured clay. Such a barrier is capable of retaining bulk material and also maintaining the integrity of the structure.
Over time, the wooden formwork can be dismantled and a concrete curb installed in its place.
Slate for temporary blind area
Any type of slate that is available to you will do. It can be old-style asbestos-cement slate, corrugated bitumen slate, fiber-cement slate or plastic. In principle, all types of slate are intended for roofing, therefore they are resistant to water, high and low temperatures, and ultraviolet radiation.
But if you have the opportunity to create a blind area only using sheets of old asbestos-cement slate, keep in mind that lichens and mosses will settle on it. On the roof they are a rare occurrence due to the height of their location, but they can quickly master surfaces close to the ground. Therefore, such slate can and should be protected by painting it with acrylic paint for exterior use - it has both frost and moisture resistance.
Painting will protect the slate not only from parasitic plants, but also from destruction. In addition, such a blind area will look much more decorative.
Price for turnkey construction services
To calculate the exact cost of the necessary materials and work, you will need the help of a specialist. After all, this is the only way to assess the condition of the soil and select the type of blind area.
It is recommended to carry out work on the installation of a blind area simultaneously with the installation of drainage and storm sewerage.
The final cost of work is influenced by many factors , including:
- material used to construct the structure,
- building area,
- width and depth of the blind area,
- as well as some soil features (flatness, need for dismantling, etc.).
For example, in the Moscow region, the cost of installing a structure using sand, membrane, geotextile and crushed stone will vary from 1300 to 1600 rubles. depending on the width of the blind area. The more materials are used, the higher the final cost of the work will be. In Novosibirsk, the cost of similar work varies from 1000 to 1600 rubles, in St. Petersburg - from 1200 and above.
Possible mistakes
It is important to know in advance:
- In regions with heavy rainfall, it is recommended to install a high-quality drainage system and create a storm sewer system. Water from the roof should go into the collector and not accumulate at the foot of the blind area, forming swamps.
- Be sure to observe the slope when creating a protective coating. Without it, the blind area loses its functional purpose.
- Lawns and other green spaces require care and treatment against pests. Experts recommend periodically washing the plinth wall and treating it with antifungal agents.
The quality of the soil and seed material is of fundamental importance. The soil must be free of impurities, a lawn intended for private households.
Hidden insulated blind area with your own hands, video instructions:
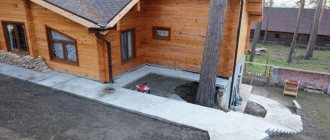
Photo
Photos of soft blind areas around houses: